Reviews
Aircraft
Lancaster Mk.1B – Part 1 of 3
by Eric Christianson
 Model: Lancaster Mk.1B
Reviewed by: Eric Christianson, IPMS # 42218
Scale: 1/32
Company: Hong Kong Models (HKM)
Price: $349.99
Product/Stock #: 01E010
Website: Hong Kong Models
Product Web Page: View
Product provided by: Hong Kong Model (HKM)
Part Two of this review can be found here:
[http://ipms-seattle.org/reviews/aircraft/2019-EC-HKM-01E010-Part2/]
Part Three of this review can be found here:
[http://ipms-seattle.org/reviews/aircraft/2019-EC-HKM-01E010-Part3/]
Since 2012, newcomer Hong Kong Models (HKM) has been rolling out some of the most exciting big-scale aircraft kits to hit the market. Ever since the prolific company first released the B-25J Mitchell, modelers have been anxiously waiting for the next big-kit announcement, perhaps none with more anticipation than the 1/32nd scale Lancaster Mk.IB.
As the RAF's premier heavy bomber, the Lancaster was to eventually form the backbone of Bomber Command in World War II. Loaded with an increasing variety of bombs and special ordinance, the ‘Lanc’ lorded over the night-time Allied bombing campaigns in Europe, disrupting or completely paralyzing German manufacturing and industrial infrastructure.
I have been a Lancaster fan since I built my first ‘Dambuster’ Revell kit in 1/72nd scale as a boy. The heavy, brutish look of the nose, combined with the sturdy layout of wings and box-tail, all bristling with guns and engines still fills my imagination. After watching a fellow modeler complete the similar-sized B-17G by HKM, I couldn’t wait to get my hands on this big boy.
This first installment (of three) will cover the assembly and painting of the interior, the gun positions and the interior of the fuselage body. Once the masks arrive (!), a second installment will cover the engines, wings, wheel wells and clear parts. The third installment will cover final assembly and finish.
Opening the box
Normally with a model of this size, the shipping container is separated into sections by cardboard dividers of some sort to protect the parts from damage during transit. In this case, however, all of the individually-packaged sprues, instructions, etc. were placed loose in the cavernous, yet sturdy box; small mixed in with the large. By the time it reached me in Seattle, everything had settled into a disorganized heap of bags, instructions and decals, all slammed into one end of the box. Examining the contents, however, produced two conclusions; 1) The somewhat brittle plastic HKM chose to bag everything in allowed them to easily slide around the inside of the box without snagging; and 2) the softness of the plastic used was key to saving the day. Even the largest sprues were able to bend and spring back against what must have been an enormous amount of jostling.
The clear parts come on two sprues, each packaged separately. HKM has gone the extra mile and inserted a clear sheet of protective film between the larger clear pieces and the plastic packaging, thereby providing the best chance possible for these important parts to ger to you in the best possible shape. The sprue attachment points and knock-out pins are thick, but HKM has tried their very best to place them all on the edge of the framing where possible. On the positive side, I was able to use one of the pins on each piece to hold the part while I dipped it in Future, making this task a simple affair. All in all, the clear plastic included in the kit was managed as well as possible for a big kit like this. Good Job HKM.
Looking over the sprues I noticed that many of the parts have circular ejection pin marks which are not always hidden or covered with other parts. Some modelers will want to fill these in before assembly. It is questionable however, even in this scale, whether the marks inside the cockpit will be visible through the canopy and other clear parts.
While most of the 800+ parts will need (some) form of minor cleanup with a sanding stick and such, the kit overall is flash-free and free of defects.
The largest of the 41 sprues is a little more than 20 inches across, the smallest one, perhaps 4. While there are some surface areas that show raised features, most of the panel lines and rivet detail is recessed, although a little light at this scale, in my opinion.
The fuselage comes together in four parts; left and right forward fuselage halves, and left and right main fuselage halves, with the vertical split along panel lines, just aft of the leading edge of the wings. Taping the four pieces together results in a main fuselage that, to be honest, is a little frightening. It’s HUGE. While the cavernous bomb bay along 3/5ths of the bottom of the fuselage decreases the amount of seam cleanup, the top of the fuselage shows a major 24-inch long seam that will have to be ‘disappeared’. Every ½ inch there is a row of rivets that go up and over the top, so cleaning that seam won’t be child’s play.
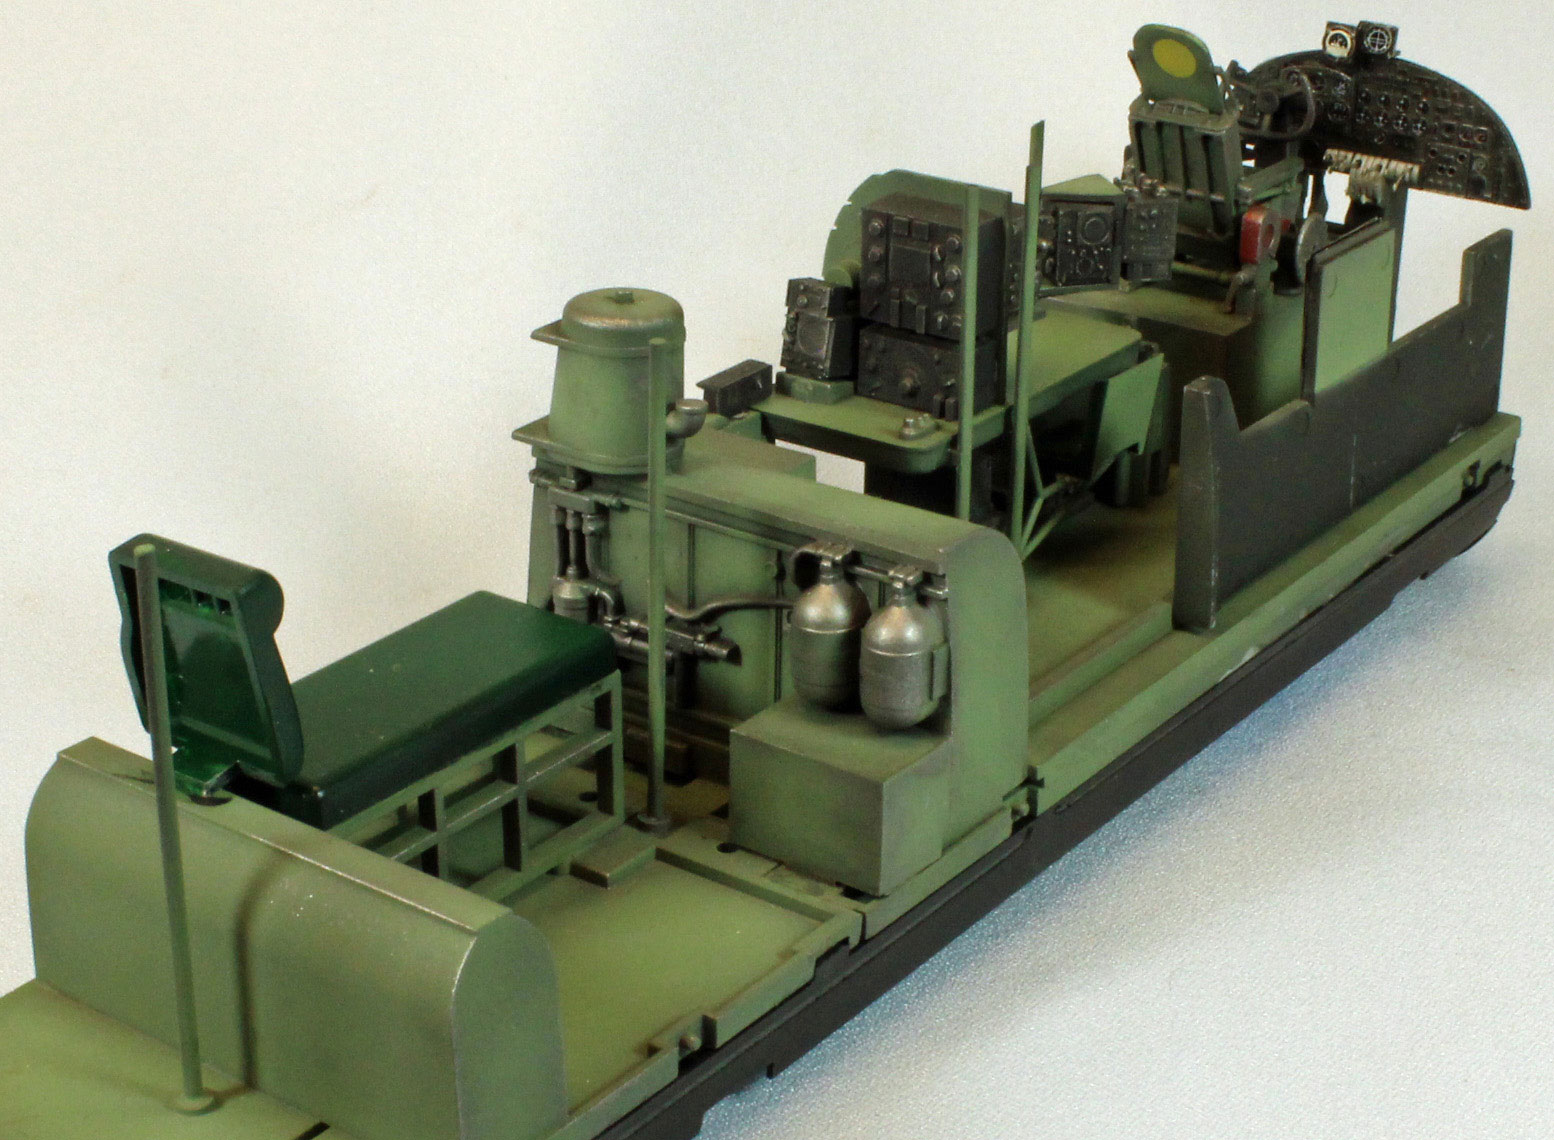
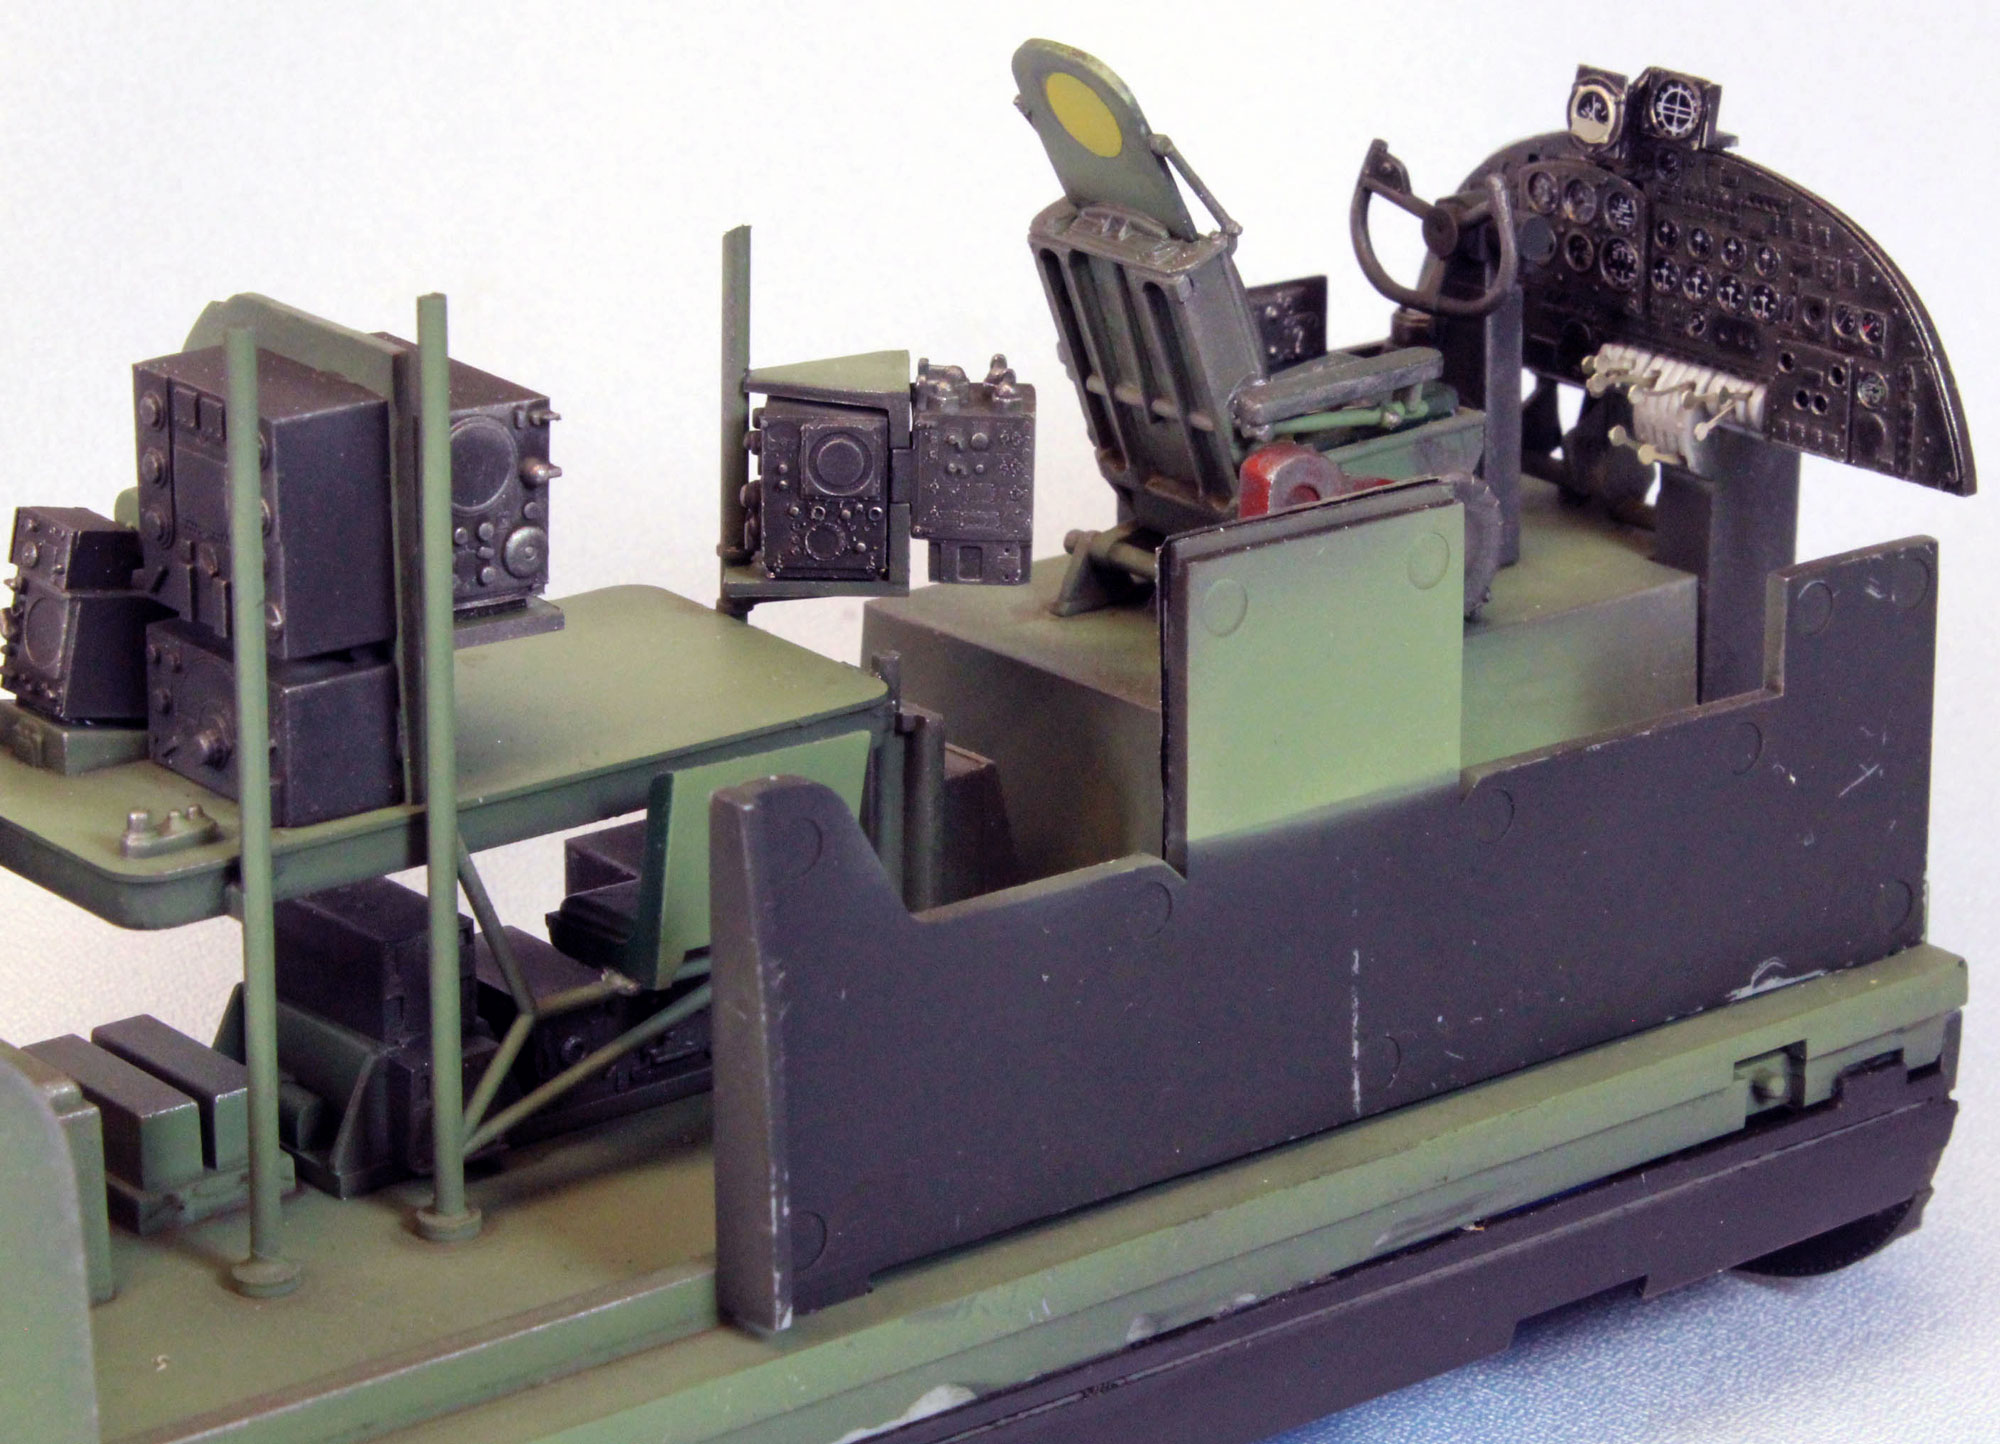
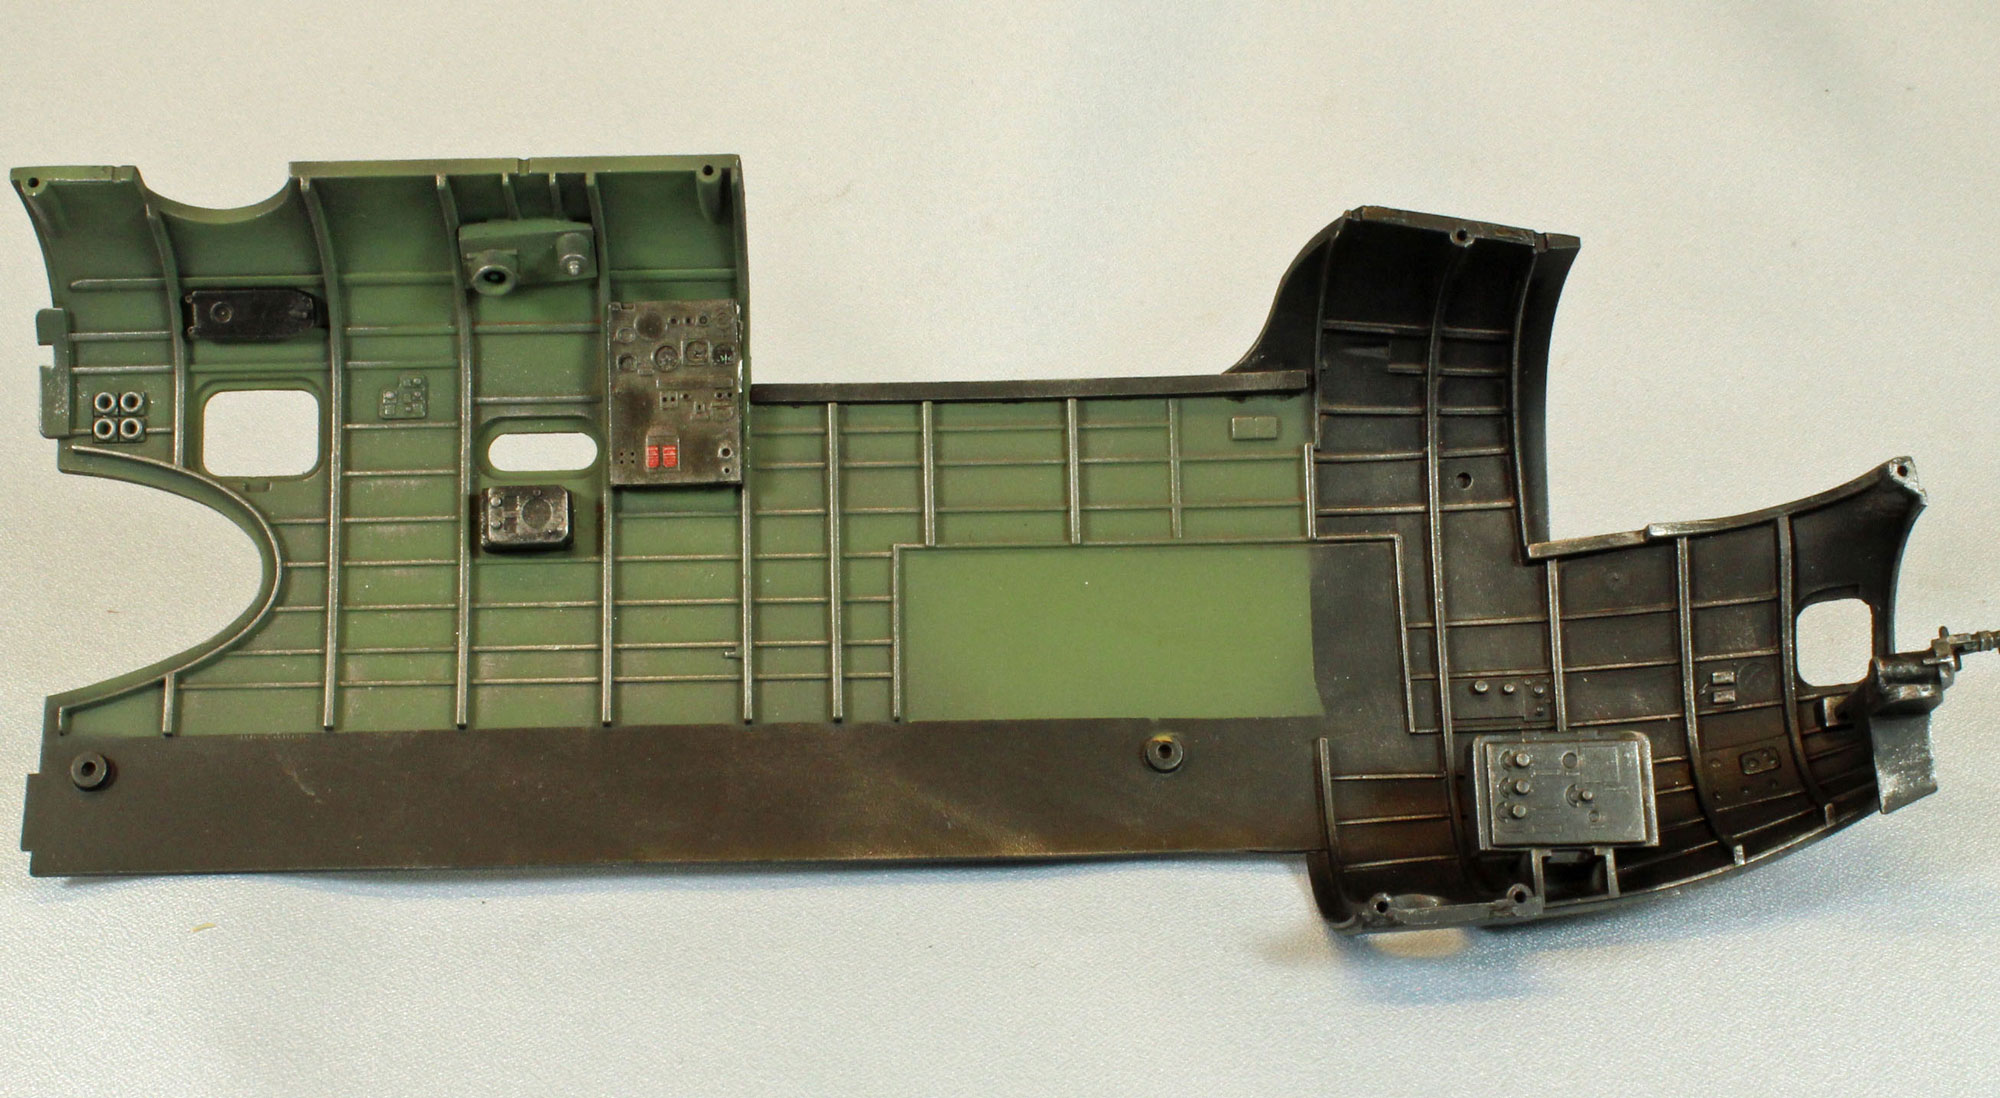
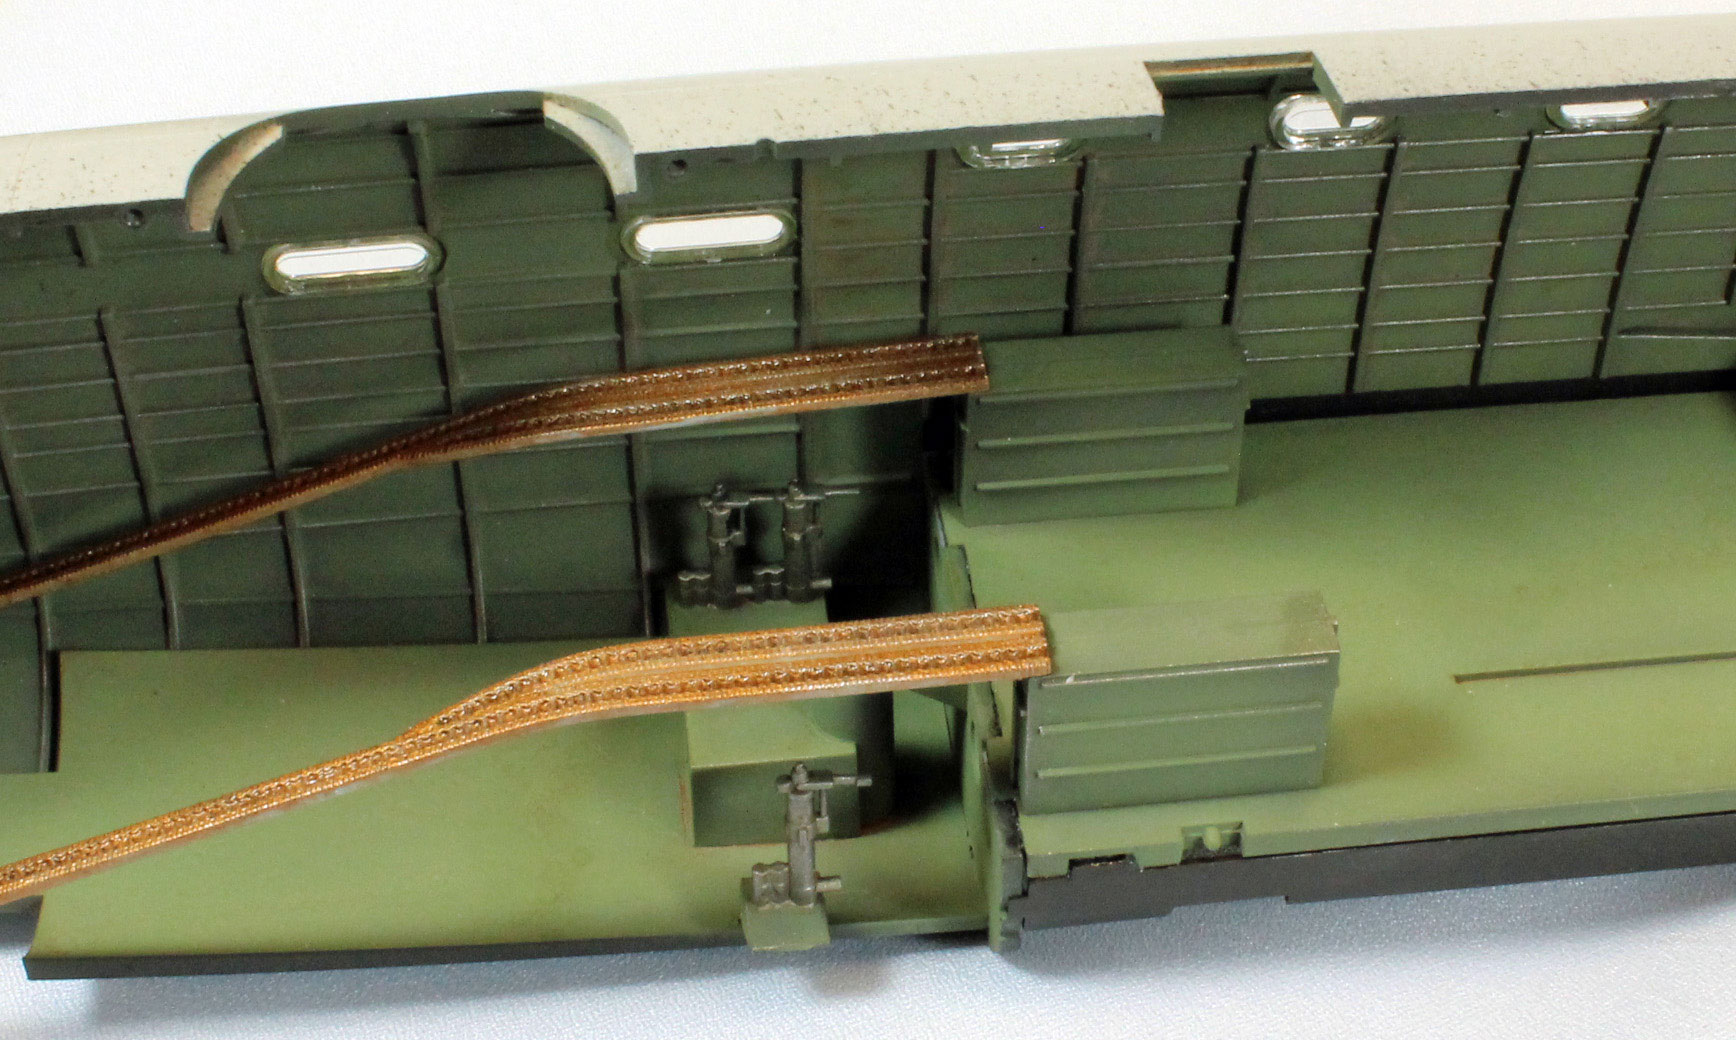
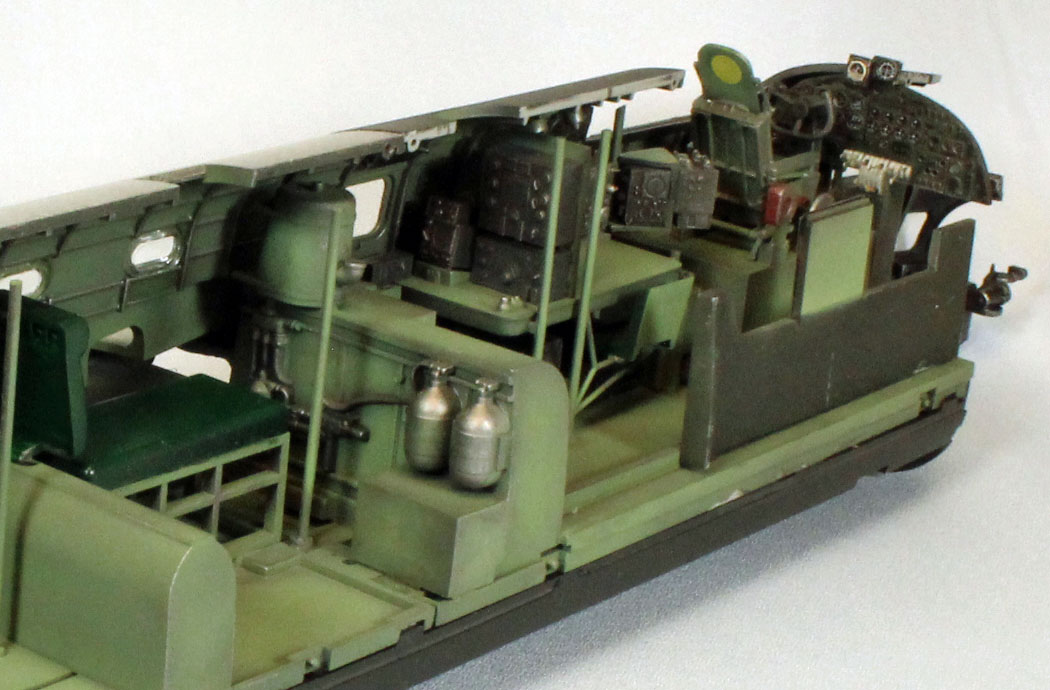
The interior walls of the fuselage are completely detailed with ribs and stringers, and the kit comes with an excellent start on a full interior.
The initial release of the kit (including mine) was shipped with a second, complete clear fuselage (all four parts) for showing off this myriad of internal detail included. Unfortunately, the clear parts were stamped from the same molds, it appears, as the normal opaque parts which means that all that beautiful rib-and-stringer-detail obstructs what could be a clear view of the interior. I felt that if the clear parts were detail-free, the effect HKM was looking for would have been perfect. That said, separate molds for clear parts like that might have pushed the cost of the kit even higher than it is.
The wings are a marvel of (slide-mold?) engineering – each is molded in a single, wrap-around form, opening aft where the flaps and ailerons are attached. In other words – there is no seamline along the leading edges – significant since the wings of the hulking ‘Lanc’ are very thick. The outboard tips of each wing are separate and are also designed as single, hollow pieces that attach along natural panel lines. Underneath there are large cutouts for the engine/wheel assemblies inboard and engine nacelles outboard. By designing the wings this way, the unique Lancaster dihedral is built in. One more absolutely brilliant decision to mention about the wings; they are detachable by sliding them forward and out – making transportation and storage of this behemoth relatively simple. In fact, with a little work, the kit box itself can be reinforced and used to carry the completed aircraft to shows and such. Smart.
Two types of propeller blades are provided, (a slightly pointed set and a set of more angular ‘paddles’, the former being correct for this kit. The main wheels are delivered in two halves each, and are ‘pre-flattened’. Bomb Bay stores include 18x500lb bombs and 1x4,000lb HC Bomb.
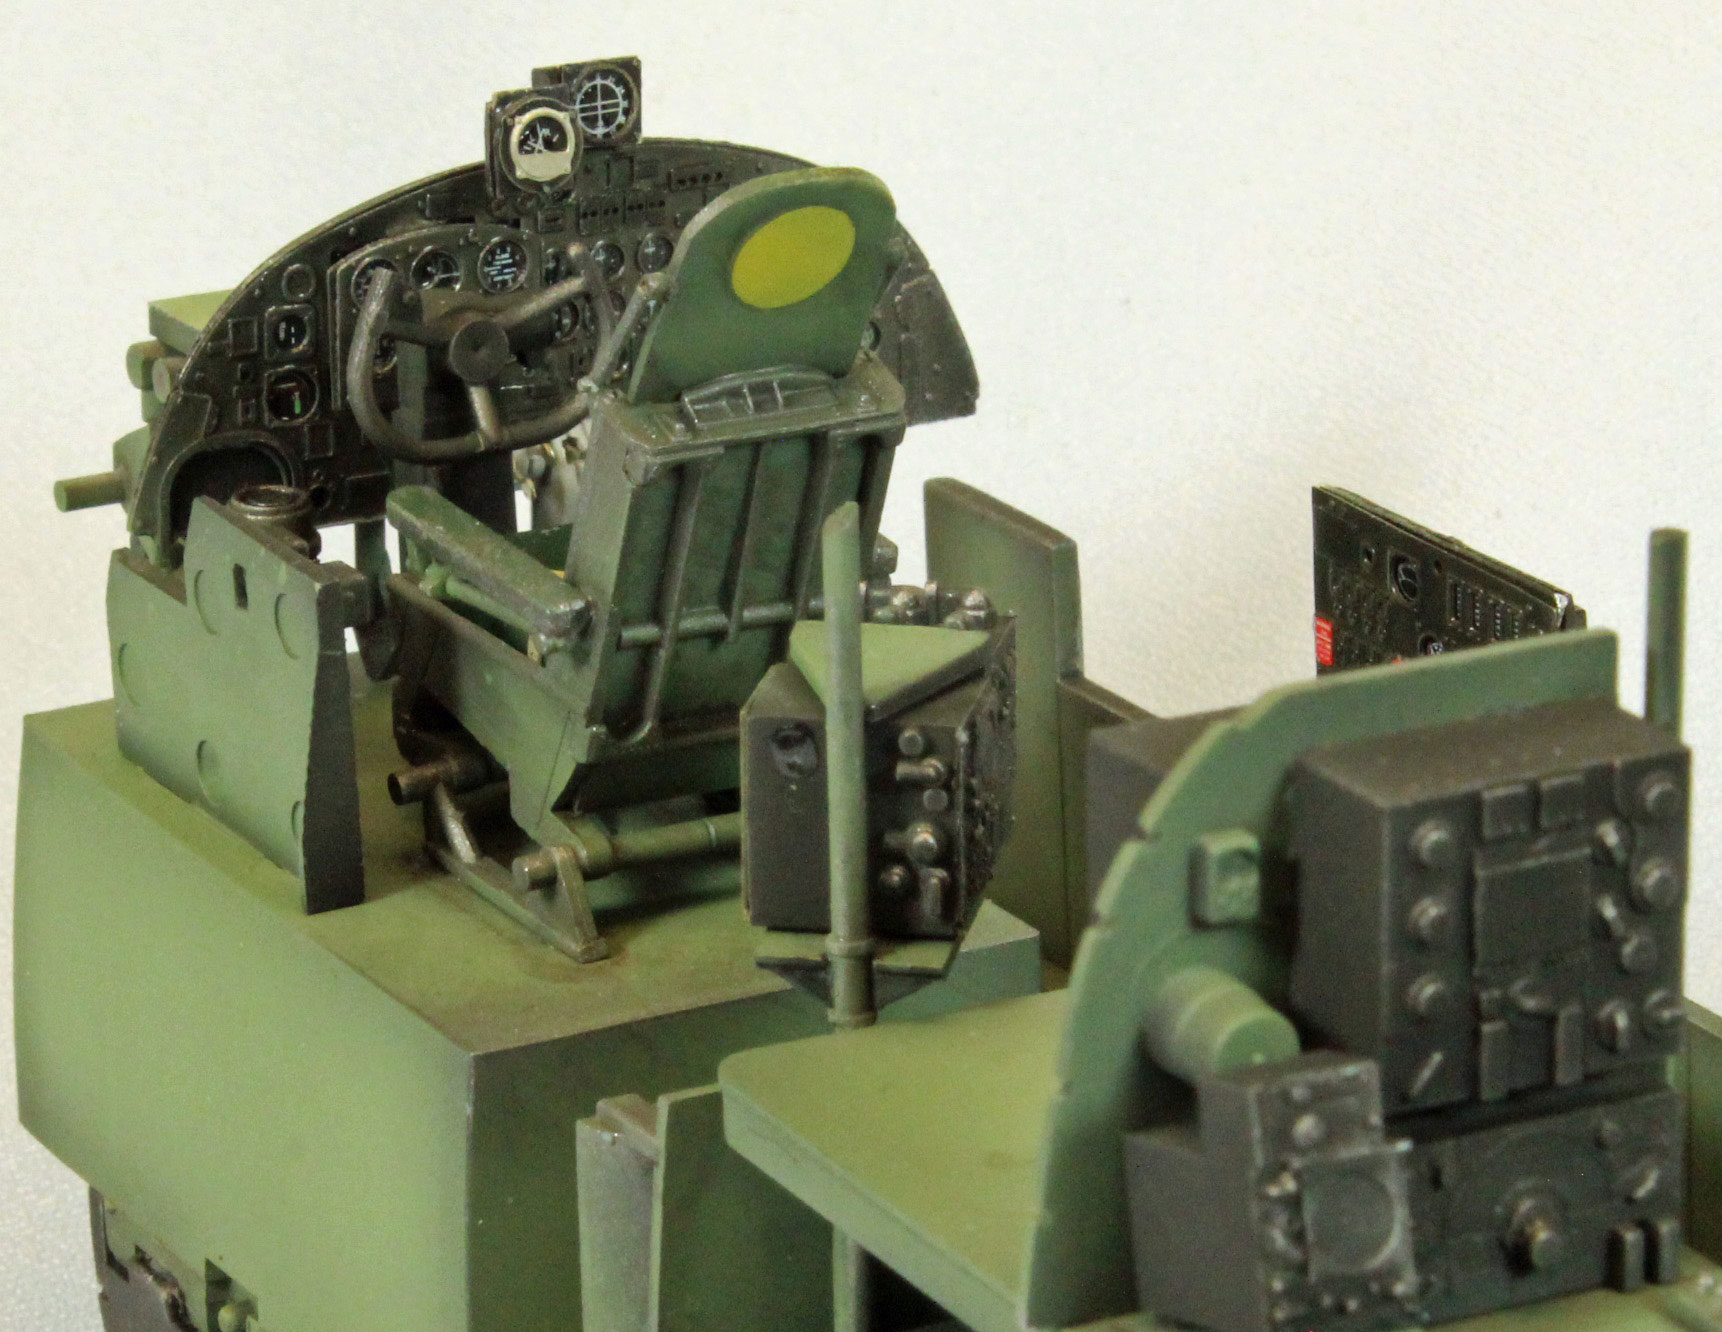
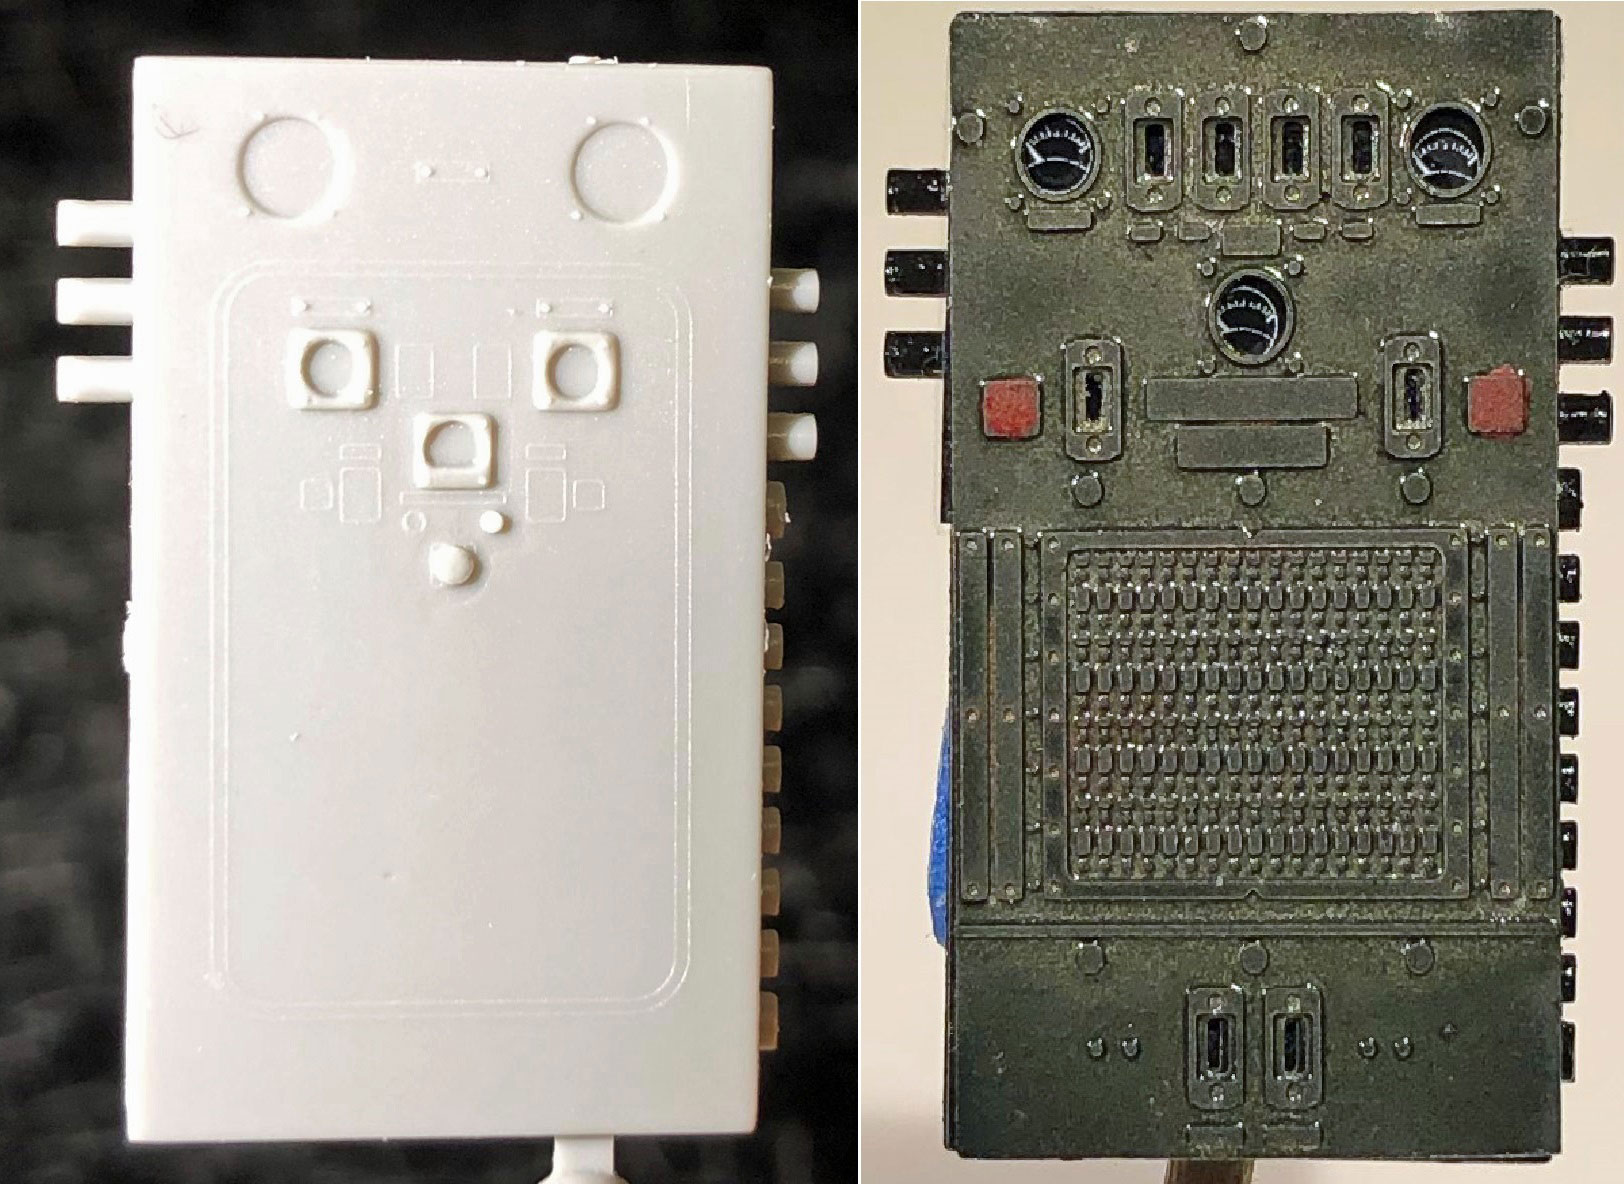
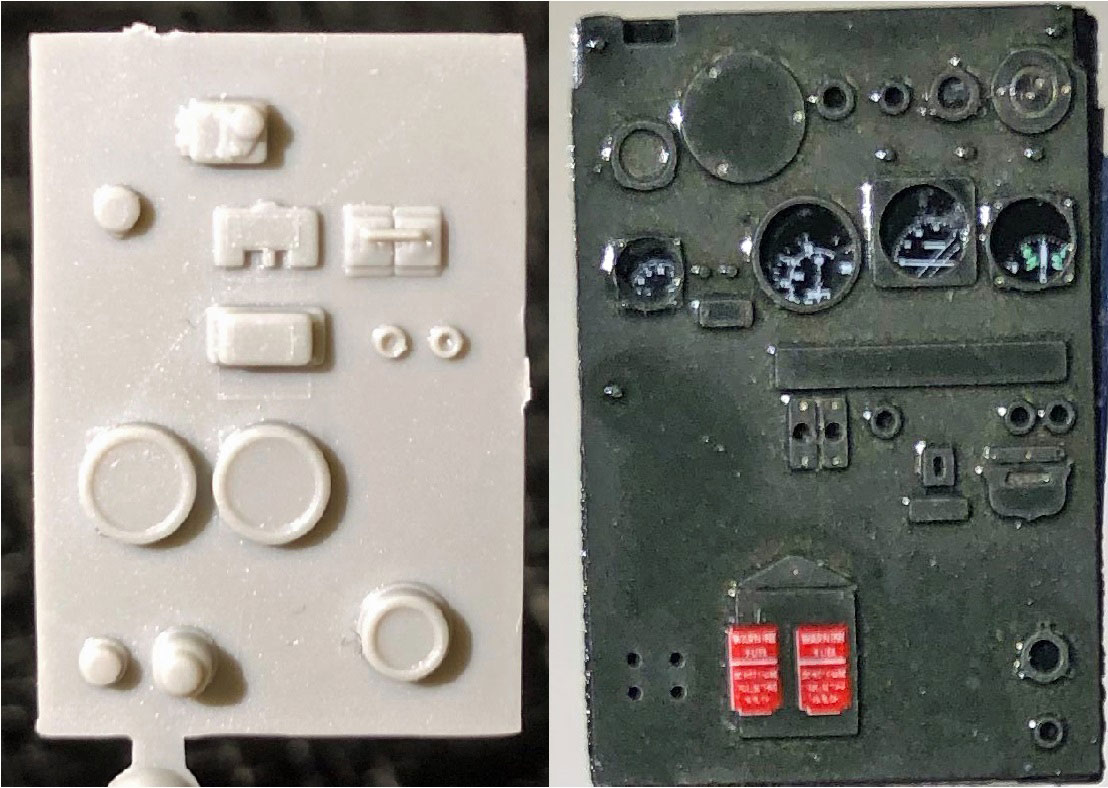
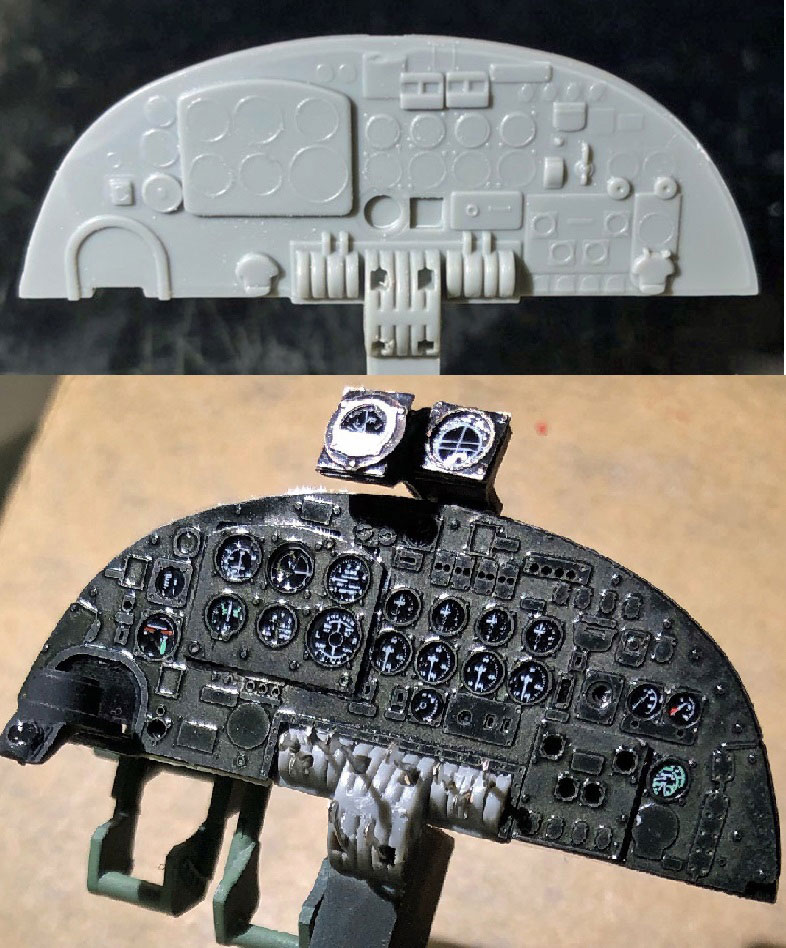
I was disappointed in the lack of detail offered with the cockpit control console and the three additional control panels in the kit, portions of which were simple, flat surfaces, surprising for a kit in this scale. To compound matters, HKM chose not to include any decals or stencils for these panels, leaving a somewhat daunting task of detailing these items up to the modeler. Fortunately, Airscale stepped up with a beautiful after-market set made of clear plastic parts, photo-etch and decals. You can find the set here: https://airscale.co.uk/store.php#!/1-32-Scale-Avro-Lancaster-B-Mk-1/p/121136238/category=16104112
The kit comes with the following three decal schemes represented – the color schemes are identical:
- B Mk.I, W4783/AR-G, No. 460 Squadron (RAAF), Binbrook, UK, May 1944
- B Mk.I, R5868/OL-Q, No. 83 Squadron (RAF), Wyton, UK, June 1943
- 3. B Mk.I, R5868/PO-S, No. 467 Squadron (RAAF), Waddington, UK, May 1944
Paint call-outs are made by reference to the following paint brands: AK Interactive (acrylics), Tamiya (acrylic-lacquers), and Gunze/Mr.Hobby (lacquors).
Finally, HKM chose to go with a single, small fret of photo-etch, and I know I wouldn’t be the first in line to congratulate them on this decision. A subject of this size, with a huge amount of PE, would have been a completely different modeling experience, and not nearly as enjoyable - at least not for me.
The Instructions
The instructions are printed in a large format, side-bound, black and white booklet which I found a little ungainly with everything else on my workbench. As a consequence, the first thing I did was to cut this beautiful booklet up into separate pages (!!), and organize these into three sections: 1) what I’ve done, 2) what I still need to do, and 3) finish options/paint chips/parts map. Cutting down the booklet allowed me to use single pages on my workbench, as well as separate parts map & painting keys for easier access. This is a big model, and a big instruction booklet – by doing this I could make room for both on my bench.
One thing HKM does that I really appreciate is to use up sprues in rough order of assembly. That kind of thing really helps on projects of this size – some of the sprues are two feet wide! The two-page Parts Map is complete, but many of the part numbers on most of the images of the sprue trees are unreadable, even with an Optivisor. A combination of small size and heavy ink is the cause here.
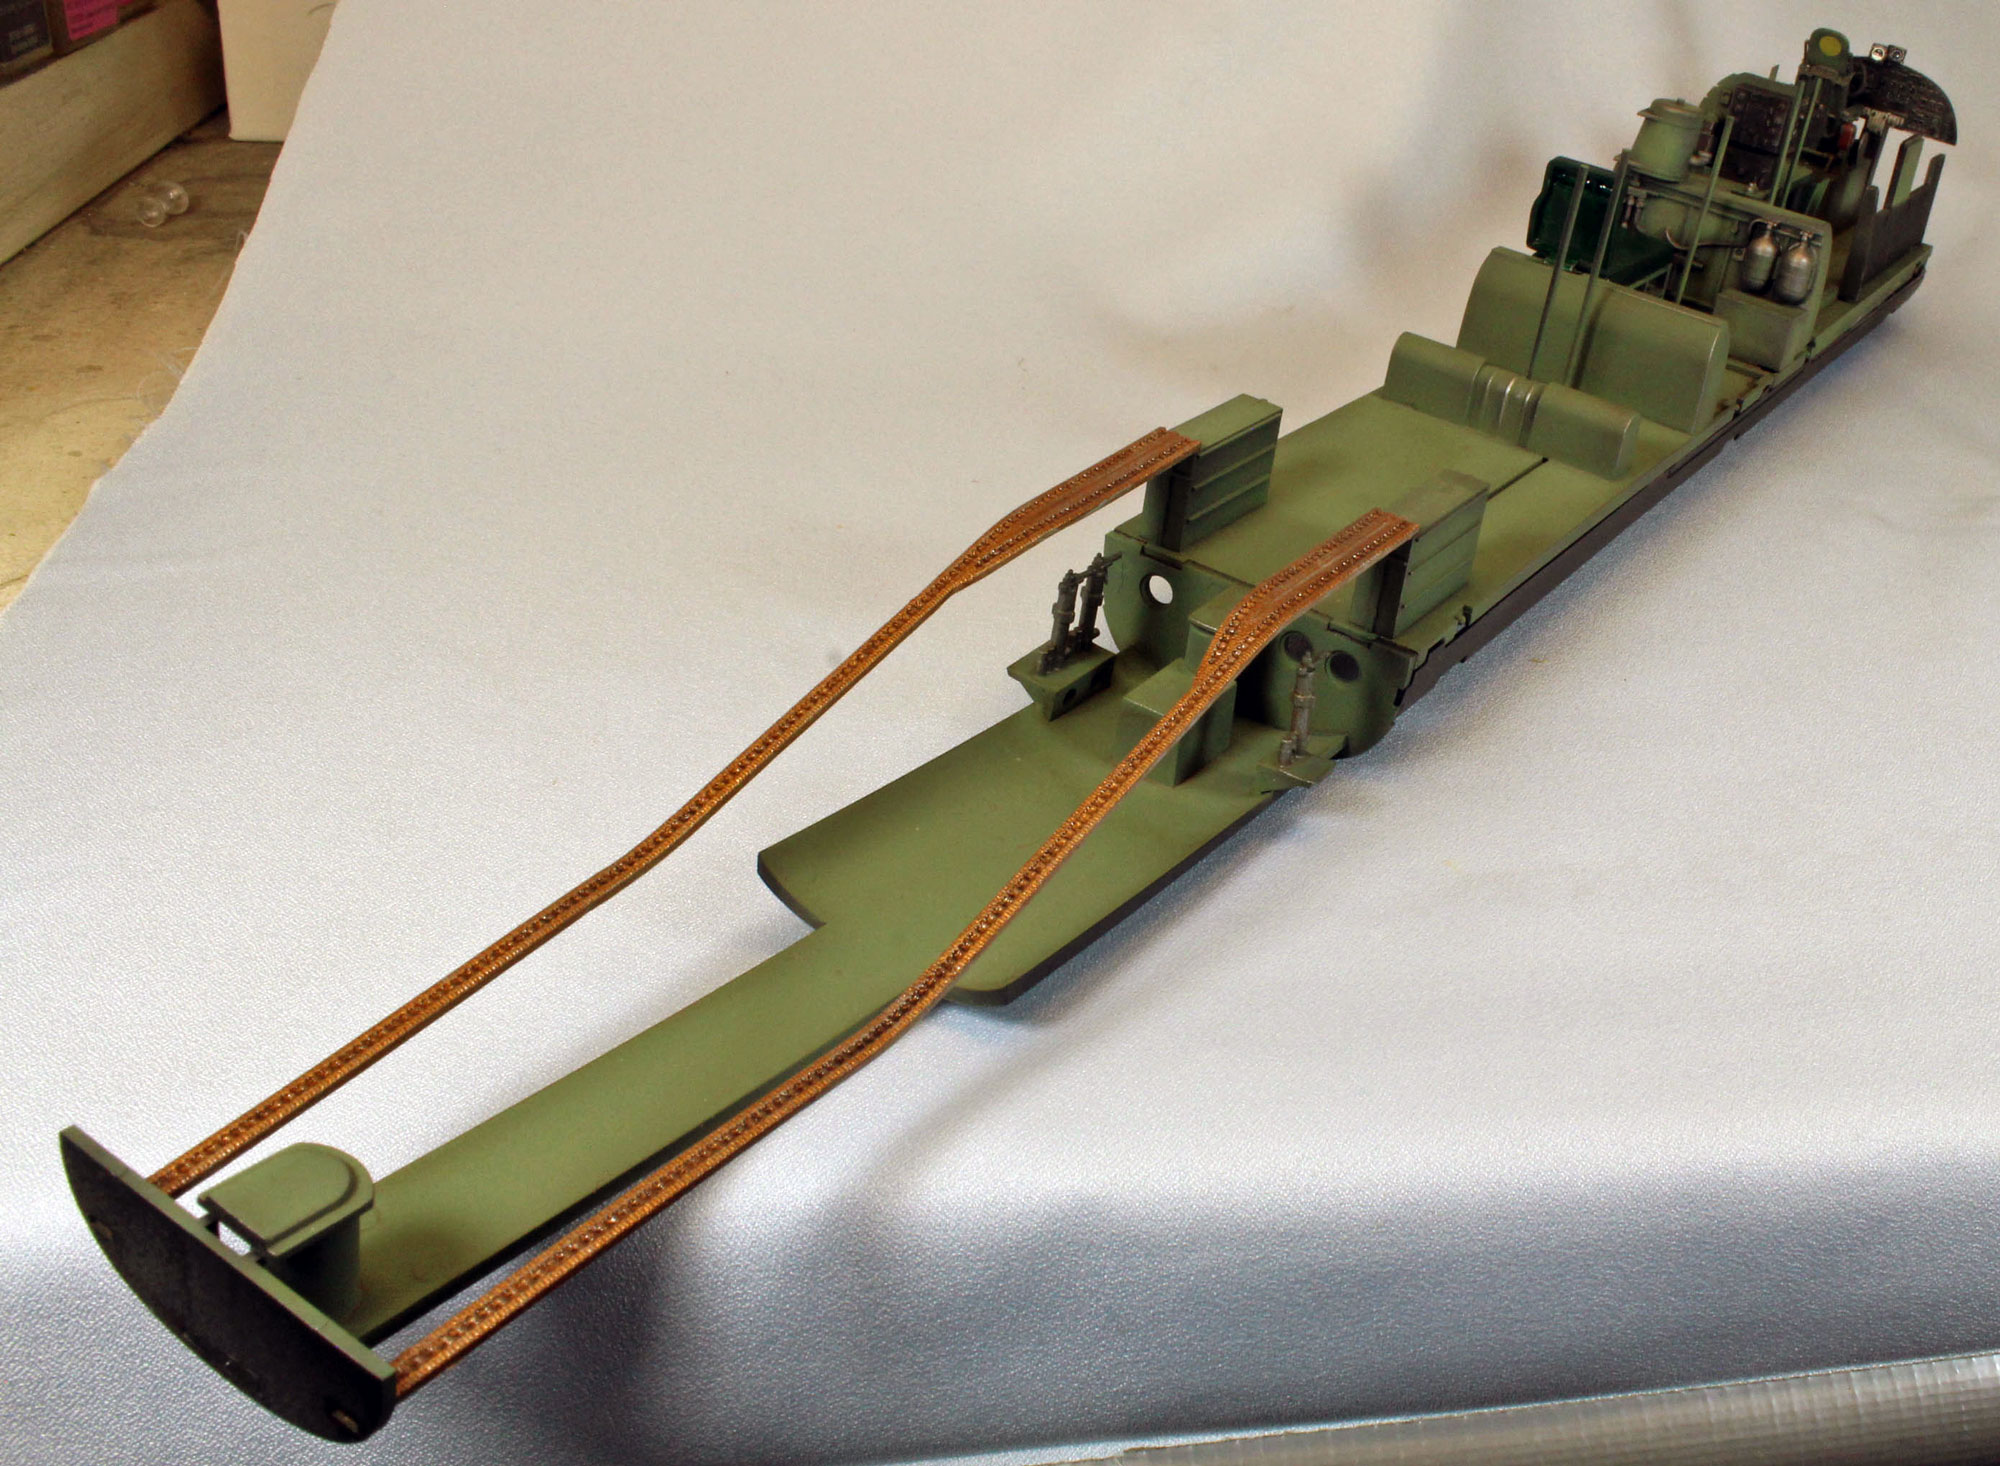
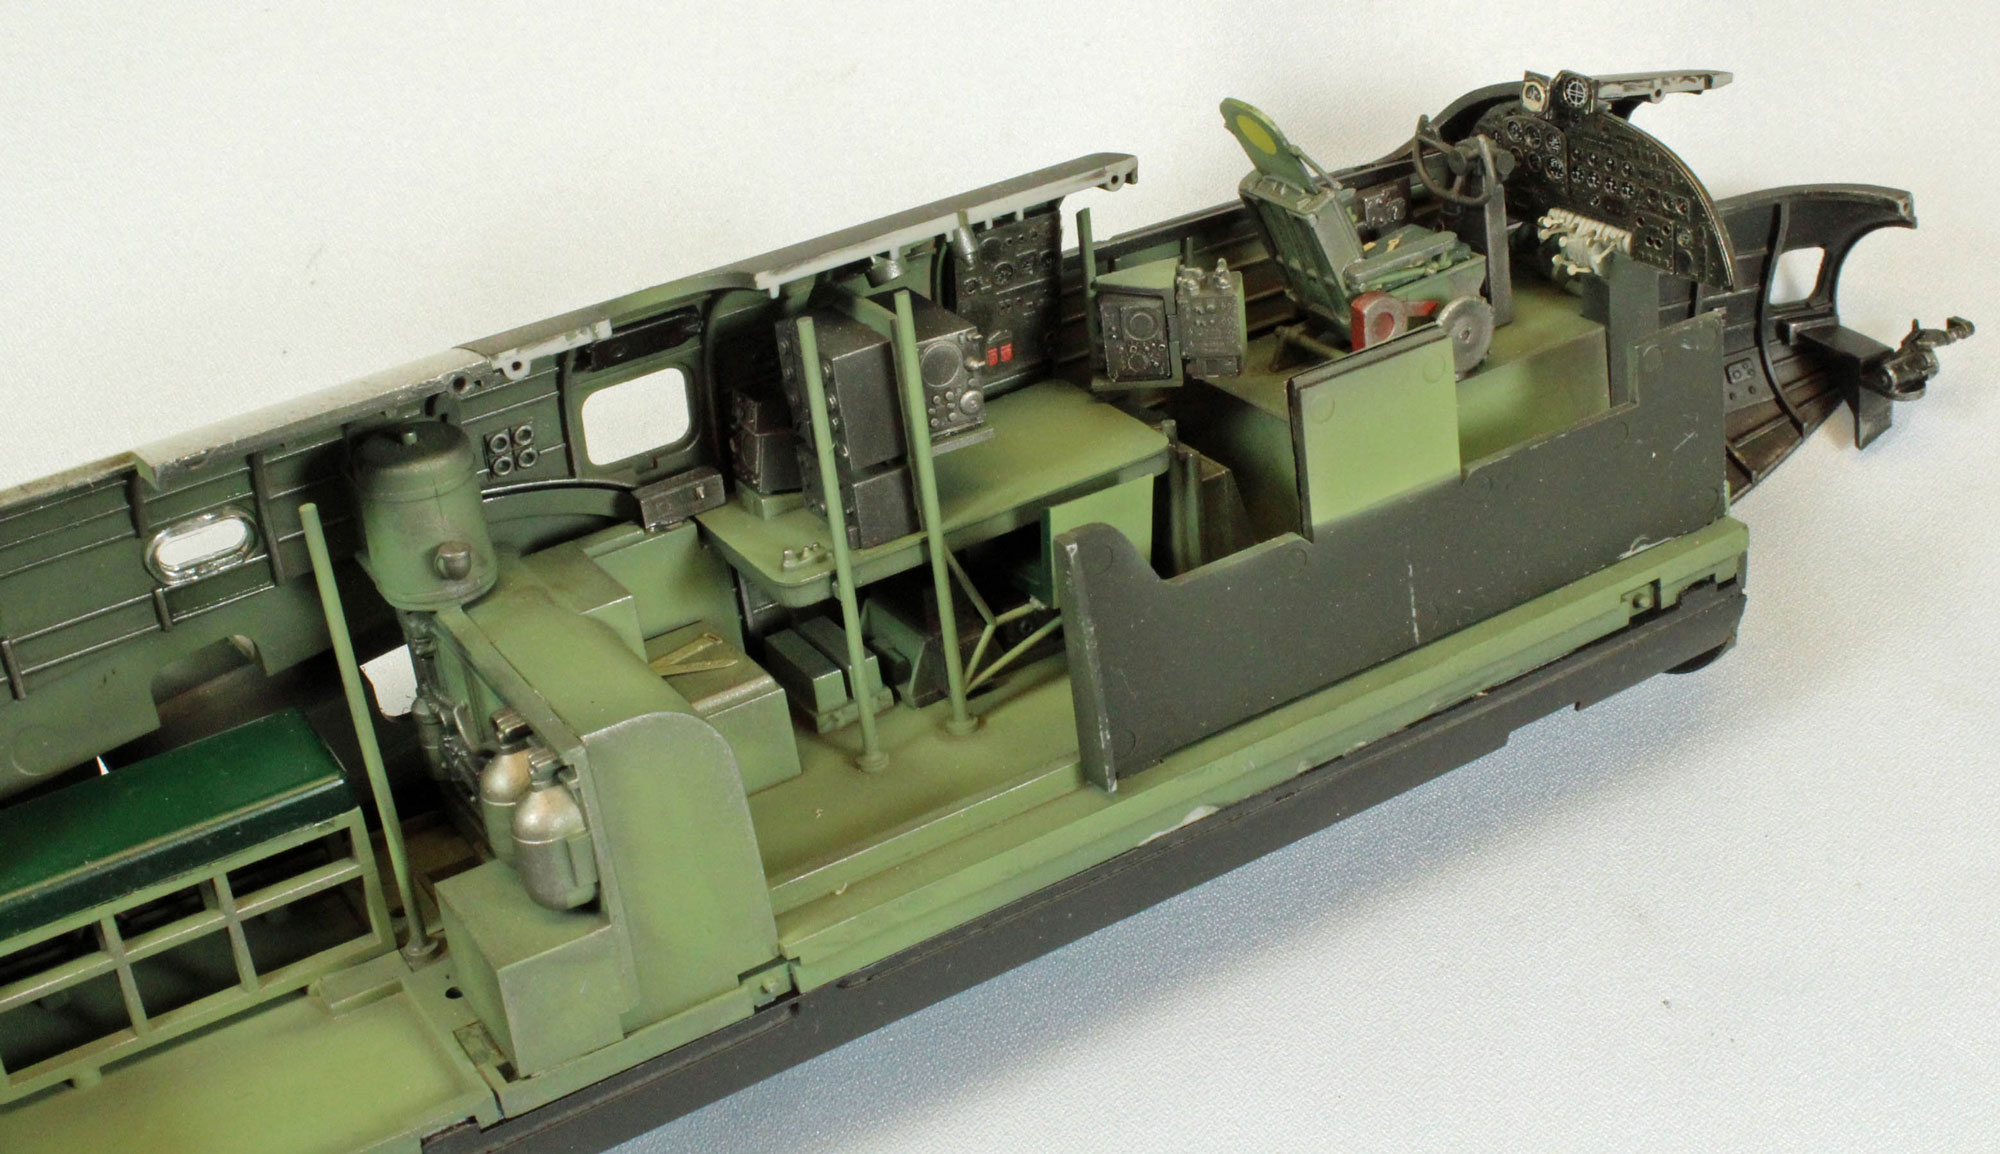
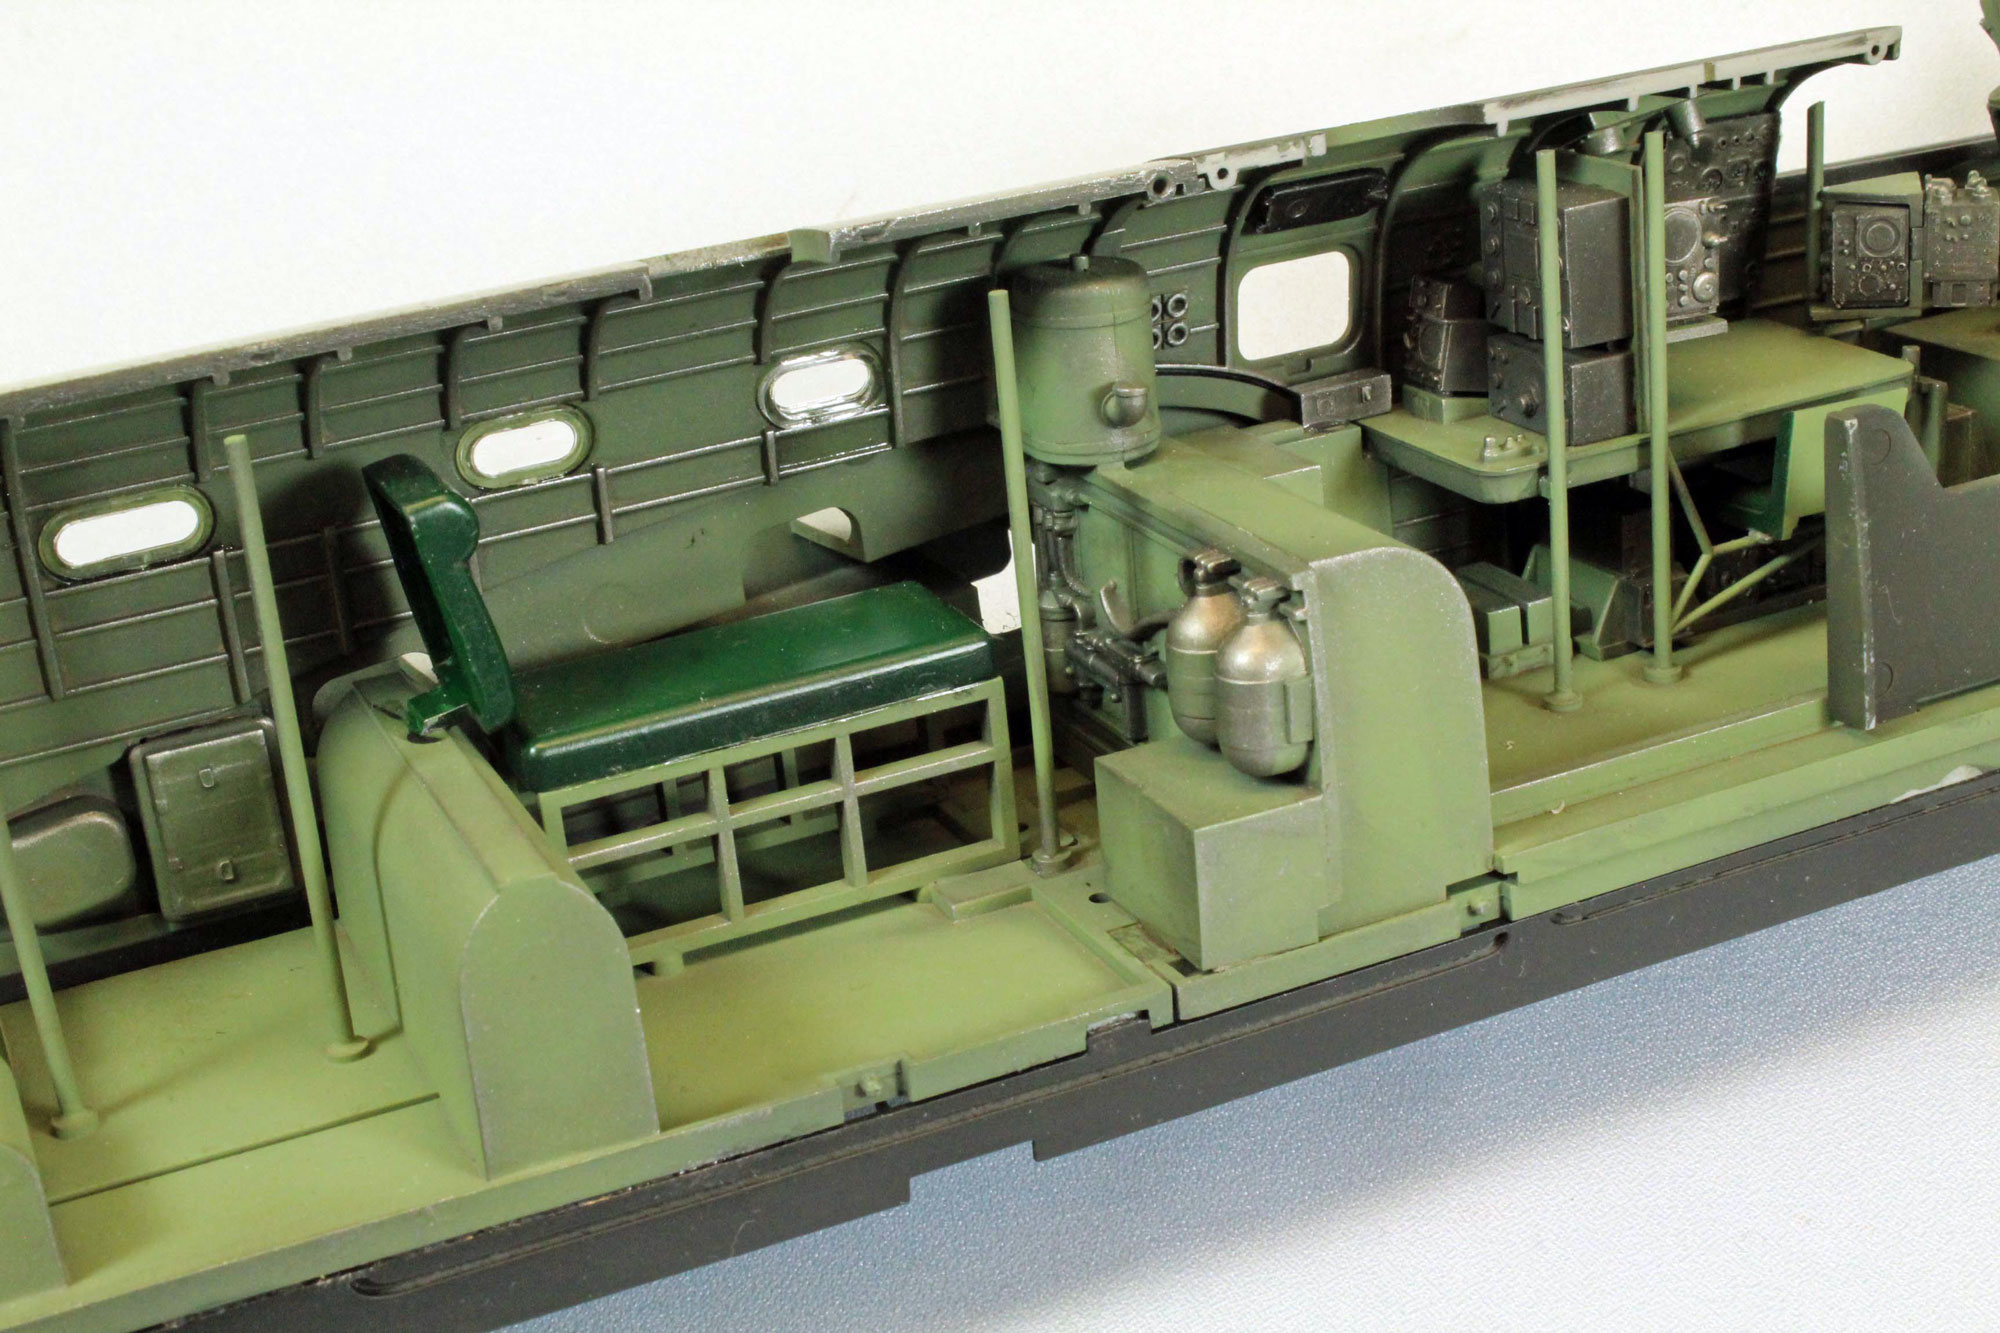
The Build - Interior
HKM has designed the interior of the Lanc as three distinct sections that connect together in tandem before being pressed into the port fuselage half. The front two sections hold the cockpit and crew area, taking up the space above the cavernous bomb bay. The aft section’s singular distinction is that it holds the long runs of ammunition for the rear turret.Curiously, the assembly of the three sections is spread out, interspaced with unrelated sections of the aircraft (gun turrets, tail assembly, ordinance, and canopy). Had all three sections been addressed together, an economy of scale could have been realized in painting and weathering. If the modeler takes the time to carefully study the instructions beforehand, this diversion in the sequence in assembly becomes obvious.
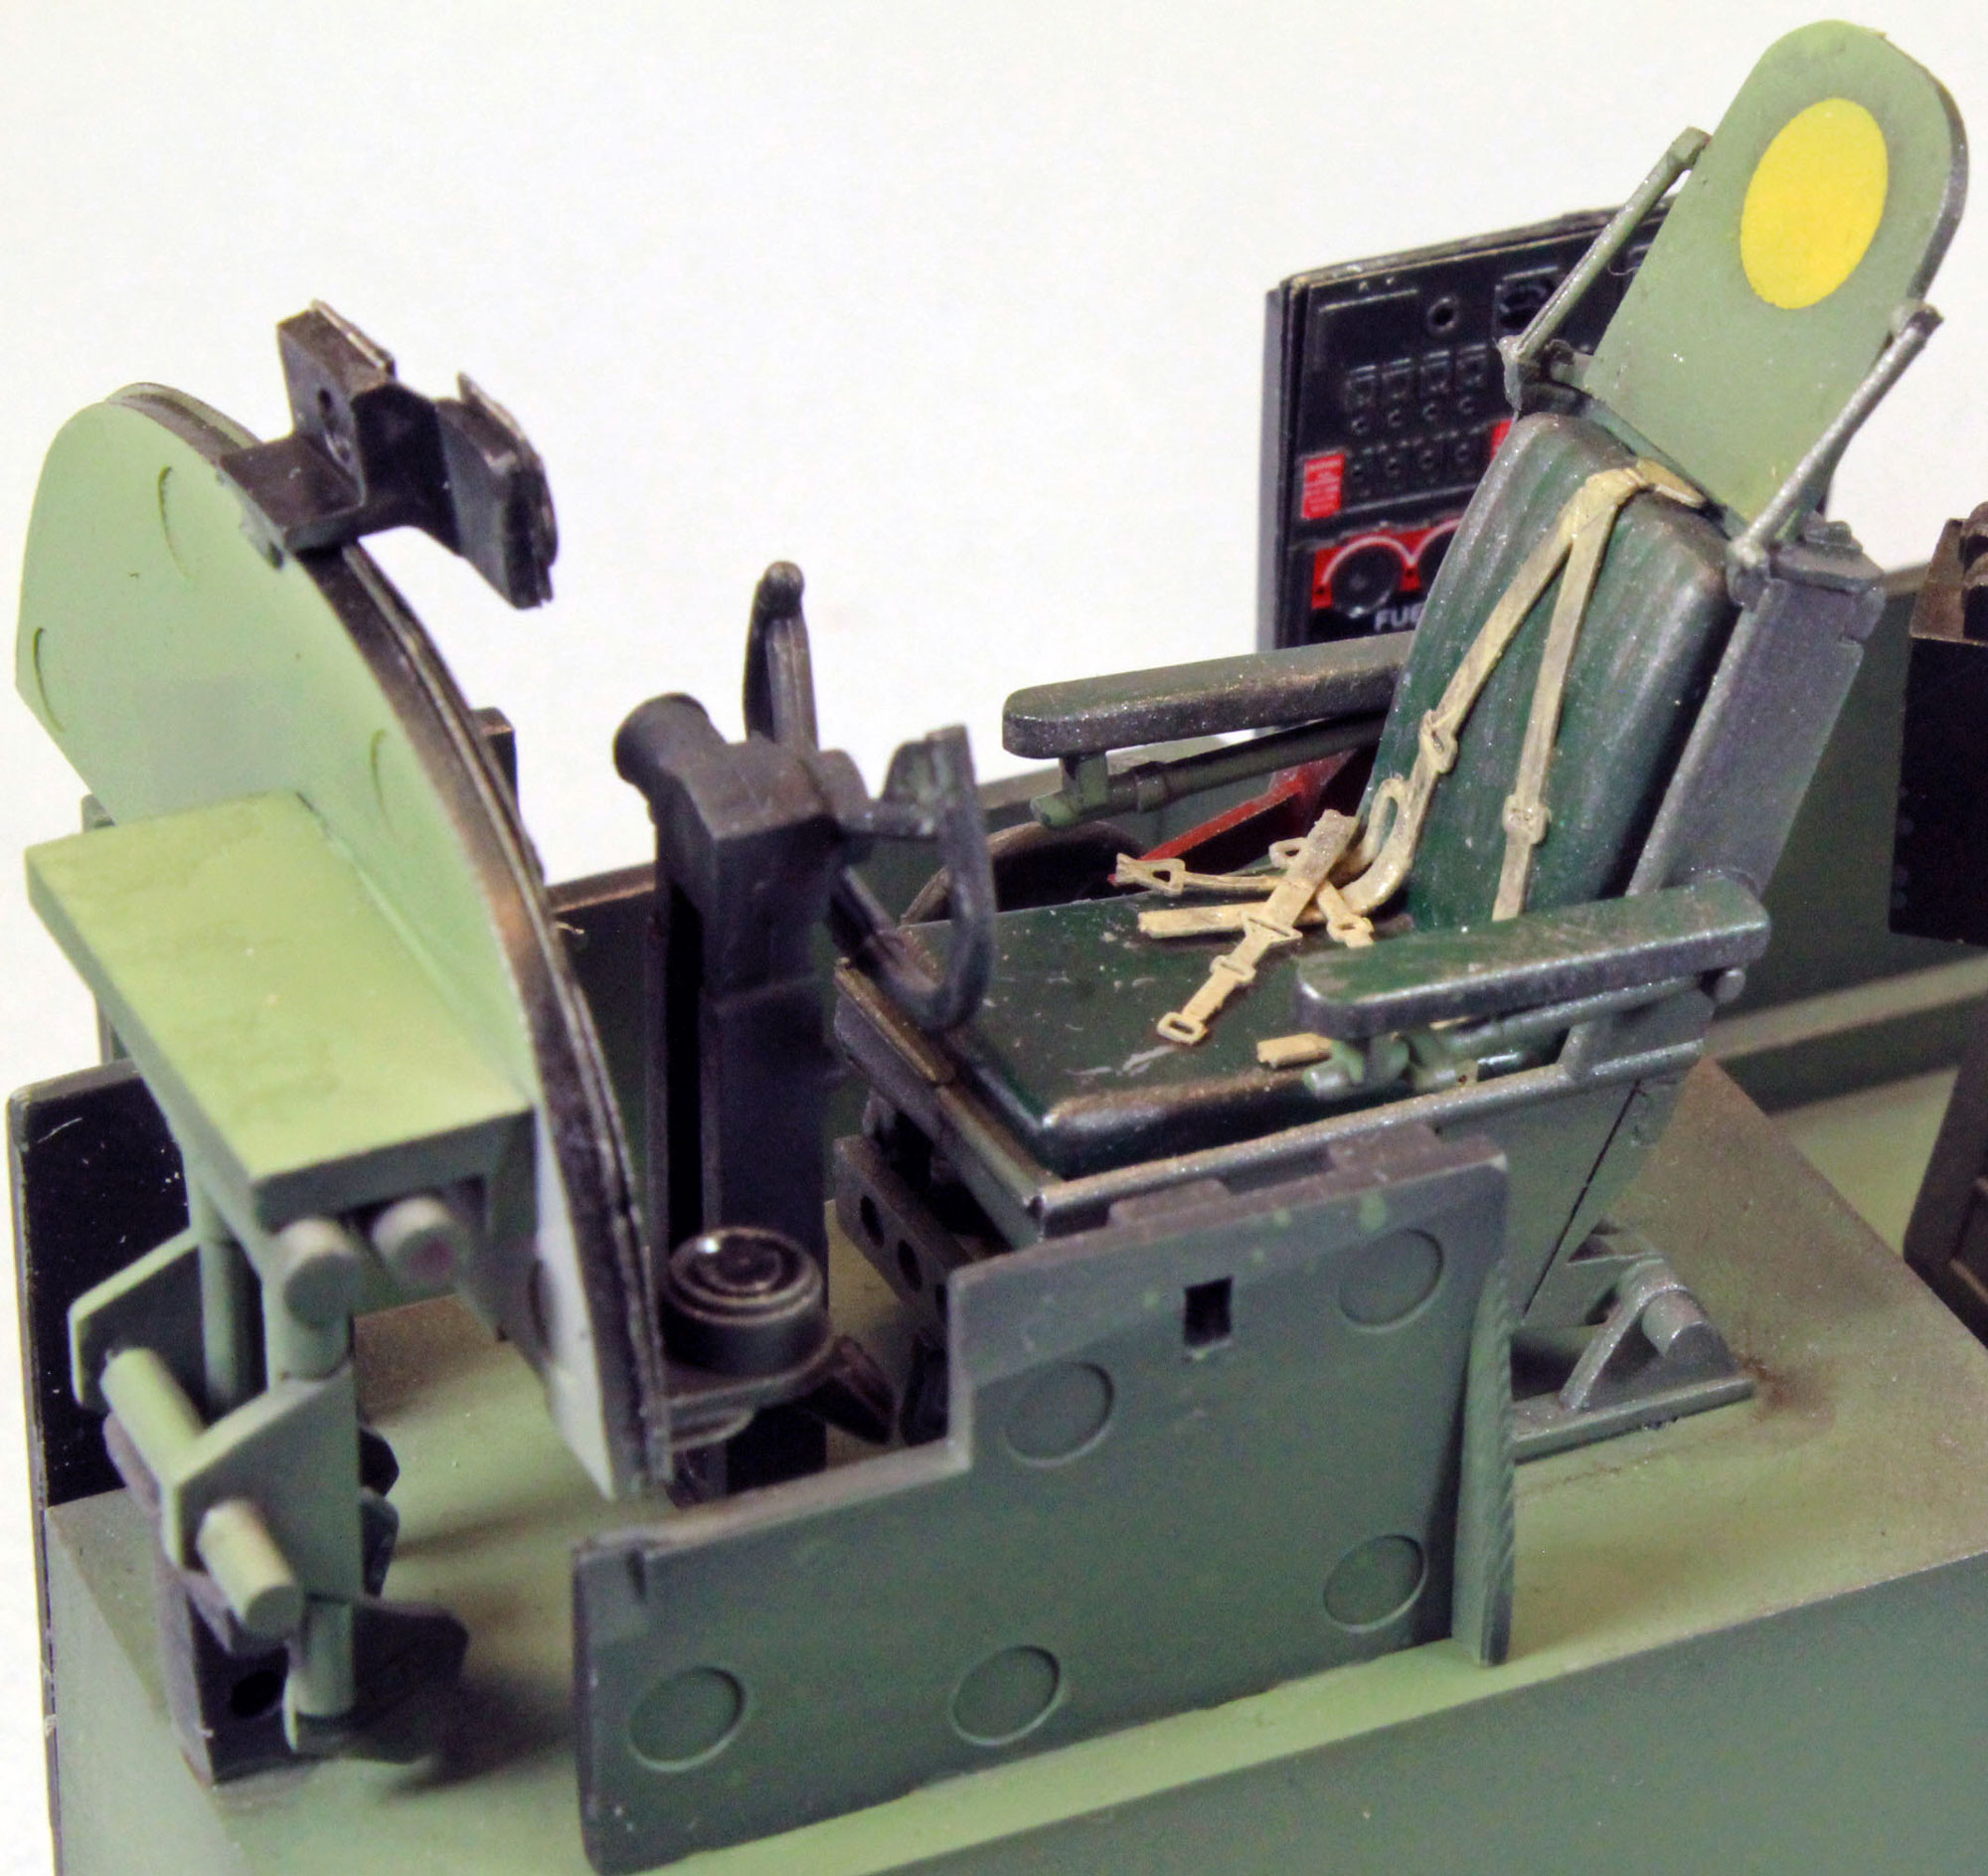
Assembly begins with the forward cockpit section. HKM provides rudimentary PE seat belts for the pilot’s seat, as well as the other crew stations. The various boxes, panels, pedals, etc. contain enough detail without overwhelming the build with tiny parts. That said, some of the detail is a little sparse, such as the control consoles mentioned earlier. The Airscale replacement set fits well in the kit, and even though the expense is a little dear when considering the cost of the HKM kit itself, it is well worth the investment, in my opinion.
The plastic windows that push in from the inside along the fuselage are thick, crystal clear and of good quality. HKM thoughtfully included a generous gluing surface that surrounds each piece, easing assembly and helping to avoid ‘pop-offs’ once the fuselage is closed up. You can wait until after painting the interior to insert the windows – there is access to all of them around the interior detail while the fuselage halves are apart.
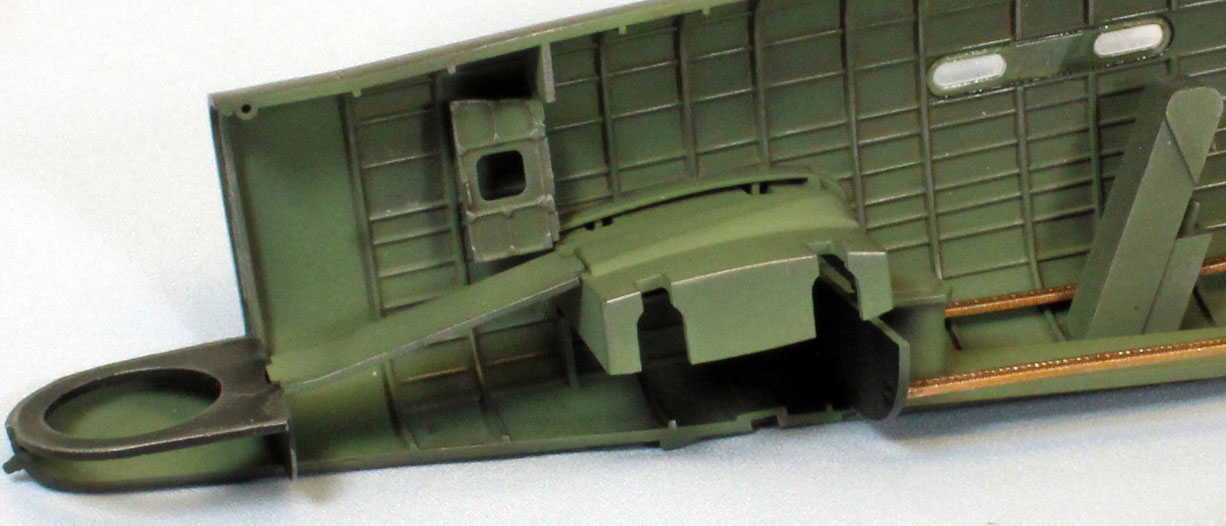
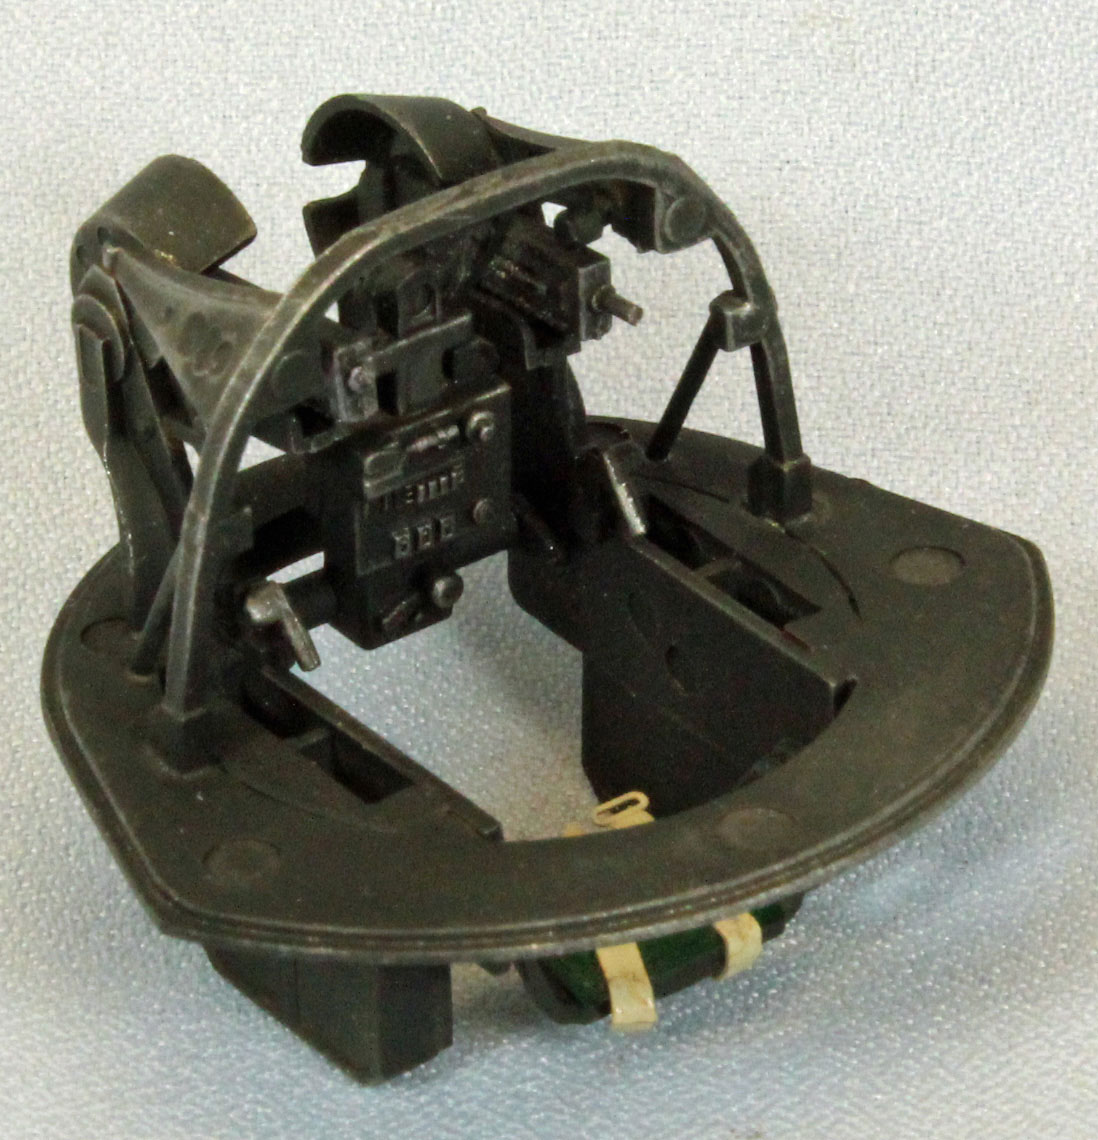
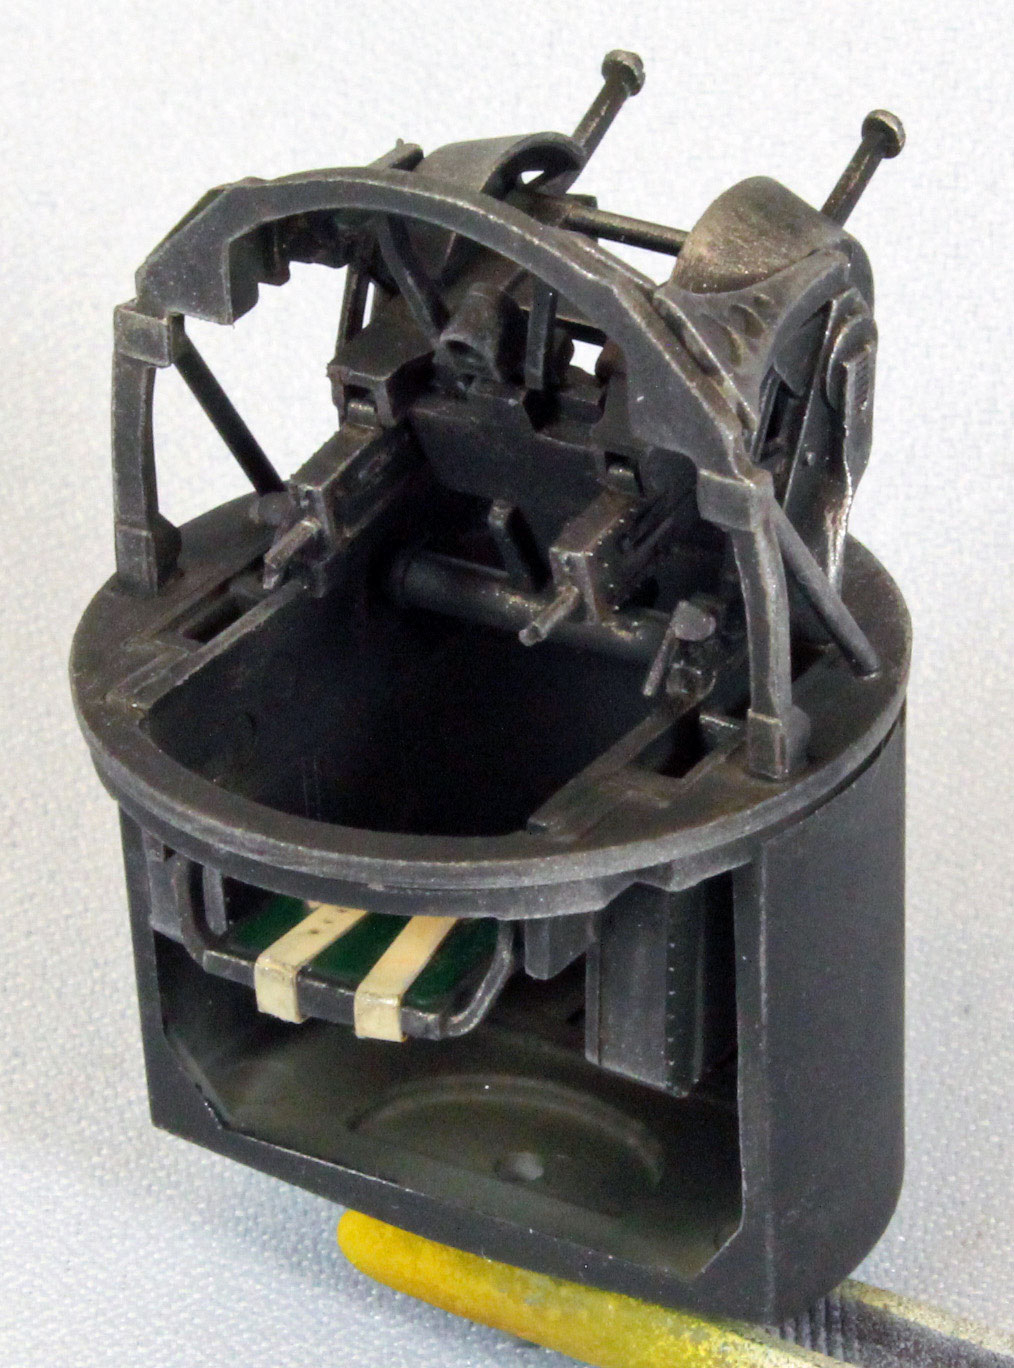
Gun Tubs
The first real issue I had with the build was with the three gun assemblies. Each one, completely different from the others (in typical British fashion), were a challenge involving moving parts, vague instructions and (somewhat) poor fit. I found that if I inserted the gun tubs into their respective bases early, I could control at least some of the fit problems. On the positive side, HKM designed each emplacement to accept both the gun barrels as well as the clear plastic parts separately, after painting and assembly, thereby simplifying those steps considerably.
Tail section
Everything is big on a 1/32nd scale Lancaster, and the tail section is certainly no exception. Luckily, once assembled, the elevators, rudders and stabilizers literally snap together, with a discernable and satisfying ‘chunk’. And while the fit here is perfect, there is a flaw in the molding. HKM somehow got their drawings mixed up – two stabilizer “tops” make up one horizontal tail plane, while the remaining two ‘bottoms’ make up the other – you get to pick. Since the only way to tell one apart from the other is by the rivet detail and panel lines, I chose to use them as is – I felt that with paint the error will hardly be noticeable. On the other hand, for many modelers, this will be something they will want to correct. Luckily, a good treatise on how to do that can be found online here: https://www.youtube.com/watch?v=XRXSpN5OyXk&t=531s
Painting and Finish
All three interior sections come together as a series of small components that, for the most part, share just a few colors. Not wanting to make a dozen trips to the spray booth, I assembled just the parts that made up each color group, attached each group to a sticky board, and assembled the final components after painting.I wanted to show typical wear and tear on the interior, so I first laid down a pre-shade coat of Tamiya XF-69 NATO Black on the interior of the fuselage halves as well as the contents of all the sticky boards. I did this to fill in the recesses and create a shadow effect near the flat surface edges, adding depth for the subsequent coats to come. I then hit the various groups of parts with Tamiya XF-71 RAF Interior Green and X-5 (Gloss) Green for the green leather seat cushions. I used XF-7 Flat Red for the fire extinguisher and XF-3 for the large yellow roundel on the armor plate behind the pilot’s head.
The clearances on this model are very tight, so once everything was dry, I carefully scraped the paint off any surfaces that would take glue, and then built up the main cockpit described in Steps 1-11, leaving off the pilot’s seat and control console. I attached the PE seat belts to the green seat cushion with superglue, and carefully painted them using Vallejo Model Air 71.075 Sand Ivory before applying a wash of Mig Dark Brown around the buckles. Once dry, I attached the seat cushion to the seat and attached that assembly to the main deck. Once in place, I weathered the seat to match its surroundings. I then hit everything with a filter using Mig Brown Wash heavily thinned with Mona Lisa spirits.
The instrument panel and various side instrumentation consoles were painted Tamiya XF-69 NATO Black, and detailed with Tamiya X-11 Chrome Silver, Vallejo Model Air 71.085 Ferrari Red over Model Air 71.001 White, and washed with Mig Brown Wash oil wash, and Vallejo Panzer Aces 312 Leather Belt for the trim wheel and all cables.
Lastly, I drybrushed just about everything with AK Interactive ‘True Metal’ Gun Metal. This product comes in a tube and has a waxy texture that lends itself well to this particular technique.
Conclusion
When I started this project, I was a little intimidated. I had not built a large aircraft kit in some time; and precious few aircraft kits in the last few years for that matter, focusing mainly on armor. Those that I did build, however, were complex projects and I enjoyed them, so I knew I would be able to build this kit. Now that I’ve finished the cockpit and interior, I find myself really excited about the remainder of the build coming up. This, to me, is a clear personal indicator that HKM has a real winner in its big-scale Lancaster. The fit of the parts, with few exceptions, is nearly perfect (which always helps), but other decisions by HKM will also make it a lot of fun to build, such as the design of the clear plastic parts, the one piece wings, and a very-light reliance on PE.
I recommend this kit to all modelers who are up to the small challenges that a kit with so many parts will offer. I suggest that you make your big decisions up front, spend the time to carefully clean the parts thoroughly once separated from the sprues, and dry-fit everything. HKM has put a lot of effort into making sure the parts fit, and if they don’t, there is a good chance that you’ve got something wrong. Slow down, use your references, and enjoy the journey!
Next segment: Wings, Canopies, Wheels and Engines. Last Segment: Final Assembly and Finish
I would like to thank Hong Kong Models for providing this kit for review, and to IPMS USA for giving me the opportunity to review it.