Reviews
Armor
British Armored Car Saladin Mk. 2
by Eric Christianson
 Model: British Armored Car Saladin Mk. 2 –
“Back Label Series”
Reviewed by: Eric Christianson, IPMS # 42218
Scale: 1/35
Company: Dragon Models
Price: $69.99
Product/Stock #: 3554
Website: Dragon Models
Product Web Page: View
Product provided by: Dragon Models USA
Kit Background
The Black Label collection from Dragon Models offers an interesting range of novel model kits. Their latest offering, a 1/35th scale Alvis Saladin Mk.II FV601, is a 6-wheeled armored car widely used by the British Army from 1958 onwards, as well as by many other militaries. Production ended in 1972, by which time 1,177 examples had been manufactured. The 11.6-ton Saladin featured a turret mounting a 76mm L5A1 gun and a coaxial M1919A4 machine gun, and it was operated by a crew of three. A Rolls-Royce B80 Mk.6A engine powered the vehicle to a top speed of 72km/h. Saladins were widely used in Oman during the Dhofar conflict from 1972-76, in Cyprus during the 1970s, in the defense of Kuwait (1990) and in the Sri Lankan Civil War. The British eventually replaced the Saladin with the Scorpion CVR(T).
Background
The heavy PanzerFunkwagen was a large but very fast and highly versatile addition to the German Army. The original 6 Rad (6 wheeled) versions were based on a 6x4 truck with an armored body, and were eventually replaced in 1937 with the 8 Rad versions. During the replacement, the Sd.Kfz. (Sonderkraftfahrzeug, ‘special vehicle’) numbers were carried directly over; differentiation is made by the addition of 6-Rad or 8-Rad in the vehicle's name.
These vehicles were used for the traditional cavalry missions of reconnaissance and screening. They scouted ahead and to the flank of advancing mechanized units to assess enemy location, strength and intention. Their primary role was reconnaissance, but they would engage similar or light units and at times attempt to capture enemy patrols. They appeared throughout the war in various guises and first saw combat in the campaign against Poland and in the Battle of France. Later, they saw use in both the USSR and North Africa, but extreme climatic conditions in both these areas proved too severe for the vehicle. On the Eastern front, adverse ground conditions immobilized 150 Sd.Kfz 232s during the first wet season of the campaign. The speed of the eight-wheeled cars made them the best scouting vehicles that Rommel had for long range reconnaissance across the wide desert territory in Africa.
Opening the box
Right off the bat, there is something very unusual about this Dragon box – if you shake it, you hear the contents rattling around! Opening the box, you will find vast acreage of unused space – along with a nice, little enjoyable project. Unfortunately, one thing you won’t find in the kit is the turret-mounted M1919A4 machine gun shown on the box art, nor the interior hatch detail on the box art, or even the markings for that matter! That said, the plastic is crisp and flash free, and the surface detail is excellent - what we have come to expect from Dragon.
The contents of the box include:
- Main lower hull and upper hulls, and turret packaged separately.
- 6 sprues in soft, light grey plastic, packaged in a single bag.
- Separate baggie containing six DS tires.
- 1 small sprue of clear plastic
- 1 small sheet of PE containing a single mesh screen.
- 1x8-page blue and white instruction sheet with 20 steps.
The kit comes with six schemes represented, using the ubiquitous Dragon blue-and-white three-view drawings, and a small, perfectly registered sheet of decals from Cartograph of Italy. One nice surprise with the decals: the inside (clear) portions of the two relatively large triangles are removed (not printed), so if you use that scheme, the decals simply disappear into the background camouflage.
The Instructions
This is a brand new kit from Black Label, so every part in the kit will be used (!) – a rarity for Dragon. Aside from a single, minor error in Step 10, the instructions are excellent.
Things to consider before starting
The build sequence is pretty straight forward: upper hull, lower hull and suspension first, fenders, and finally the turret and gun.
The turret can be built separately and dropped on last, as well as the DS wheels which are brilliantly designed – more on that later.
Dragon goes through a lot of effort to allow the suspension and wheels to articulate, but in the end there is so little play in the wheels that if I built this kit again, I would simply line things up and glue ’em down. Working with the articulated parts was a little annoying since pieces kept falling off as the hull was handled early on.
The build-it-all-and-then-paint-it approach will work (it’s what I did) but it still pays to plan ahead.
The Build
Upper and Lower Hulls The simplified engineering and good fit of everything lets you breeze thought most of this kit, starting with the hull detail. You can optionally show the hatches open, but no interior detail is provided, and the inside of the large front hatch contains sink marks that, if left open, will have to be filled at the very least. In Step 4, the placement and orientation of two rocker bars (A62/63) is easy to see if you find them in the image in Step 5. Starting in Step 5, Dragon has developed a unique approach for representing the piping along both sides of the lower hull. The eight sections slip in only one way and the seam lines line up with the natural elements of the vehicle. Nice design here!
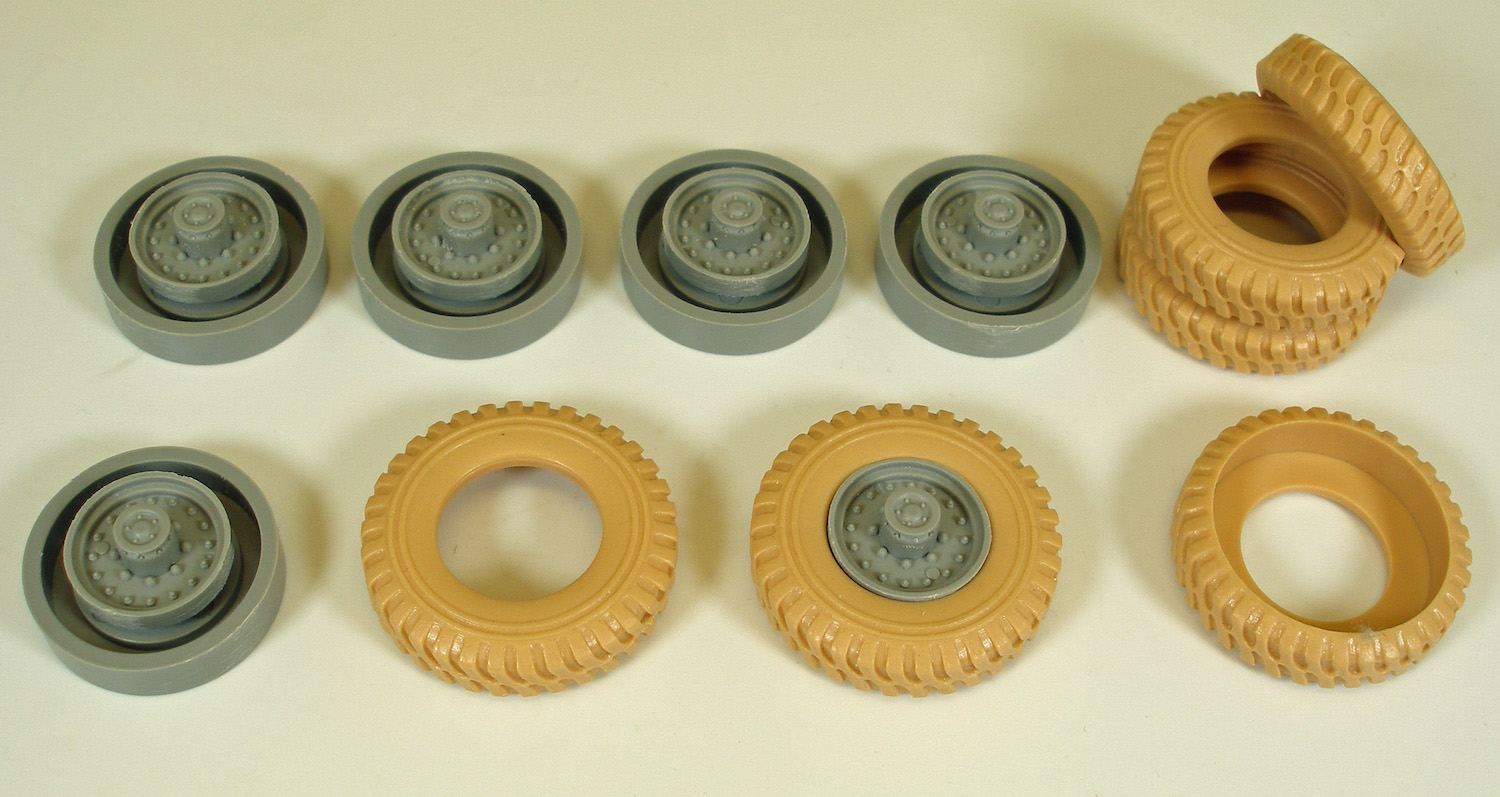
The Wheels
I really liked the unique engineering and design of the wheels in this kit. I am big fan of Dragon’s DS material, and its use here is a big plus for me. In a perfect world, I’d prefer plastic tires with a separate tread ring around the outside to avoid the normally unavoidable middle seam, but DS tires are a close second choice. What’s more, Dragon has designed the wheels to be easily painted separate from the tires, and you can choose to attach the wheels first, then the tires, or keep them both off until the end of the build allowing full access to the detailed lower hull.
In Step 8, I attached the six parts (B12) so I could see where the wheels would eventually line up, but I left the wheels off for the time being. With everything Dragon got right about the wheels, there is one design issue that was left wanting. Each wheel has at least one connecting bar, the front wheels sporting two each, and these bars can’t be attached easily to the inside of each wheel. Since the attachment points are not visible on the completed model, I simply glued the bars so that they had the proper orientation, and then snipped of the ends so they wouldn’t interfere with the fit of the wheels later on. Done and done.
Fenders
The two, busy fenders came together well, with the only issue being the placement of front extensions (Parts A26/A27). These two parts are plainly visible up front so correct placement is important. While you can skip to Step 20 to see what they should look like, I suggest waiting until the fenders are attached to the lower hull before putting these two pieces on. Parts A33 in Step 10 should be labeled B33.
Photo Etch
The single mesh screen included in the kit does not come with a fold line to fit the slight rise in the middle of the engine intake. Furthermore, the location where it is supposed to go is not level front to back, so the mesh either fits in the front, or it fits in the back, but not both. I ended up leaving the PE off. If the intake molding is correct, then you might try using some nylon mesh that will conform to the odd shape of the intake.
Main Gun and Turret
The turret comes together perfectly. The single piece, slide-molded barrel is hollowed out at the business end. I glued the two hatches closed as there is no interior detail provided in the kit. I replaced the two over-scale antenna with brass ones from Orange Hobby, and coiled up some twisted string and secured the ends to represent spooled cable before attaching the spool to the rear of the turret. The turret has some really nice weld lines that some may argue are inaccurate since they bulge outward instead of inward, but I think they look great. Once everything dried, I attached the fenders and dropped the turret on top, leaving the wheels off for painting. Off to the booth!
Painting and Finish
I wanted to finish my Saladin using the two-tone scheme represented on the box top. I also wanted to try out a new product called Panzer Putty, which is specially made to assist in airbrushing hard-line camouflage on uneven armor surfaces – perfect for the Saladin.
Pre-shade
I started by airbrushing a primer/pre-shade coat of Gunze Mr. Finisher 1500 Black to give the plastic some grip for the following coats, and to fill in the recesses and create a shadow effect near the flat surface edges, adding depth for the subsequent coats to come.
Camouflage and Post-Shading
Once the primer had a chance to de-gas, I sprayed on a coat of Vallejo Model Air 71.092 Medium Olive for the dark green, feathering it into the background black in the recesses and undercarriage. Once that was dry, I laid down a pattern for the light green color using Panzer Putty (see section below titled ‘Using Panzer Putty’) and carefully sprayed Vallejo Model Air 71.012 Dark Green, ironically, for the lighter green shade.
After removing the putty, I mixed lighter versions of both colors using a drop of white and went over each section to add a little depth. I used Tamiya X-11 Chrome Silver for the headlights and carefully pushed on the clear lenses – a tight fit here, no glue was required. I used a silver quilters pencil to highlight various surfaces and details, including the thread ‘cable spool’.
Using Panzer Putty
 Part of the reason I wanted to build the Saladin was to try a new product called ‘Panzer Putty’. This rigid, stretchable material has some of the properties of Silly Putty, and other properties that are unique. Called an ‘intelligent’ putty by the manufacturer (http://www.mxpression.com/miscellaneous.html), Panzer Putty is specifically marketed to assist in airbrushing hard and soft line camouflage over the uneven surfaces typically found on armor kits. A YouTube video is available online showing how it is used.
Some experimentation was needed but eventually I got the knack of it. I stretched it into a ¼ inch ribbon and cut two-inch segments from that. The putty does not have any tack whatsoever except to itself, which was frustrating at first, but I was able to anchor one end of each strip by wrapping it around something, pushing it into some detail, or touching it to another piece of putty to fix it in place. I then used tweezers to ‘design’ the curves I wanted. Tweaking it here and there took some effort but I had everything finished and ready for painting in about 10 minutes. I found Panzer Putty no more difficult than using masking tape and/or blue tack, etc., but its unique properties distinguish it from those other mediums.
The key at this point was to wait about 10 minutes for the ‘intelligence’ to take over (☺), meaning to let the putty settle down over the myriad of bumps and crevasses on the surface of the model. I wanted a sharp edge so I used a tool to flatten any twists or rope-like sections, getting the top edge of the putty as close to the surface of the model as possible. Over at the paint booth I found I could carefully paint on one side of the ¼ inch of putty without any problem. A minute later, I easily lifted the putty (remember – no tack present whatsoever) to reveal a perfect demarcation line between the colors. 30 minutes after putting the used putty back in the tin, it had re-settled into its original blob form and become rigid once again. By the next morning the paint from the airbrush had disappeared altogether, leaving the same shiny, black ‘putty puck’ that came in the mail. I can honestly say that this first experience was good enough for me. So long masking tape, Panzer Putty is here to stay!
DS Tire Treatment
I painted the DS tires using Model Master US Army Helo Drab, and then applied a wet slurry of Mig pigments (European Earth, Dry Mud and Dark Mud) thinned with Mona Lisa Paint Thinner. The DS wheels reacted differently than expected. The color left behind after I brushed the excess pigment off was darker than expected – essentially the color of the wet pigment. It can be removed using thinner but usually the pigment goes on darker than it dries. Strange.
Decals
With painting finished, I hand-brushed the surface areas that would be receiving decals with a coat of Future floor polish to give the decals a smooth surface to slide on to. Once the Future was dry I went about applying the decals using the Red and Blue MicroSol and MicroSet products without any problems. Once the decals were dry, I hand-brushed another coat of Future to seal the edges. Both license plate decals were just a little too big for the surfaces that received them and had to be trimmed. I felt the red color on the unit designation decals was a little too neon/dayglow red, but I lacked any credible color references to confirm that. Some of the markings on the box art were not included in the kit, and some of the decals on the sheet were not called out in any of the six scheme options.
Filters, Washes, Flat Coat
Once the decals were sealed, I gave the entire vehicle a couple of filter layers using Mig Wash Brown oil mixed with Mona Lisa, and a pin-wash using Mig Dark Wash straight from the bottle. Once satisfied, I sprayed a coat of Vallejo Flat Varnish to kill any remaining shine and blend everything together.
Conclusion
This kit was a lot of fun to build. Coming on the heels of a far more complex model before it, the Saladin was a veritable breath of fresh air! The parts (and there aren’t very many of them) fit nearly perfectly, the design of the wheels is brilliant, and the instructions are accurate and clear. I felt that Dragon captured the funky, hunkered-down look of the Saladin as well. Some modelers will want to trick out the interior since there are three large hatches that could be opened to expose a lot of added detail, and the articulated wheel hardware can probably be modified to get some really nice wheel positioning done, but for me, this kit was perfect as is. This is my fourth Black Label build, and I think Dragon really nailed it this time. I recommend this kit for all modelers and all skill levels.
I would like to thank Dragon Models and Dragon USA for providing this kit for review, and to IPMS USA for giving me the opportunity to build it.