
Reviews
Armor
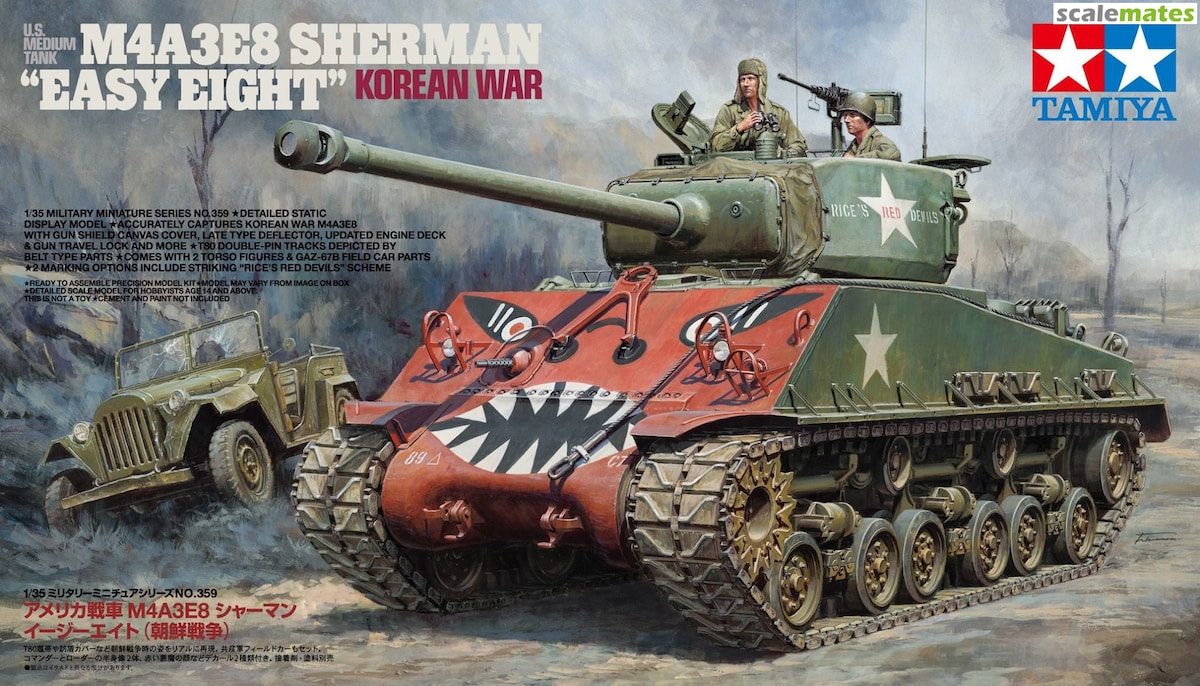
M4A3E8 Korean War Sherman
by Eric Christianson
 Model: M4A3E8 Korean War Sherman
Reviewed by: Eric Christianson, IPMS # 42218
Scale: 1/35
Company: Tamiya
Price: $54.00
Product/Stock #: 35359
Website: Tamiya
Product Web Page: View
Product provided by: Tamiya
Summary
Tamiya has enhanced their recently released M4A3E8 Sherman to represent the Korean War variant, including the colorful ‘Devil’ scheme. Several new sprues, new track, decals, and other odds and ends round out the new offering, including a complete, 2-sprue complementary kit of the Russian GAZ67B Field Car equivalent of the Willys Jeep. One thing is for sure – the kit this new version is based on is one of the finest armor models ever produced by Tamiya. And that is saying quite a lot – for just a pure, modeling experience, it just doesn’t get any better.
After World War II, the U.S. kept the M4A3 '"Easy Eight" in service, with either the 76 mm gun or a 105 mm M4 howitzer. The Sherman remained a common U.S. tank in the Korean War, where it fought alongside the M26 Pershing and M46 Patton. The M4A3(76)W HVSS Sherman and T-34-85 were comparable and could destroy each other at normal combat ranges, although the use of High Velocity Armor Piercing ammunition, advanced optics, and better crew training gave the Sherman an advantage. The M4A3(76)W HVSS Sherman, using 76 mm HVAP ammunition, destroyed a total of 41 enemy tanks from July–November 1950. The lighter M4A3(76)W HVSS tank became the preferred U.S. tank in the later phases of the war in Korea, due to the mechanical reliability of the M4, its ease of maintenance, and its drivability compared to the M26 tank. The U.S. Army replaced the M4 in 1957, but continued to transfer Shermans to its allies, which contributed to widespread foreign use.
Opening the box
This is a Tamiya armor kit – which means it can be described in five words: not many parts, perfect fit. As always, there is something for every kind of modeler in here. For those new to modeling, Tamiya kits are easy to assemble and come with excellent instructions and sprues that are laid out and numbered logically. For those who enjoy the painting and weathering part of building a model, Tamiya kits quickly and painlessly become excellent canvases upon which they can apply their artistic talent. For modelers who go for accuracy, Tamiya has the industry clout that insures a variety of after-market products that enhance what they get in the box, products that these modelers would most likely want to purchase anyway, no matter how accurate or inaccurate the original kit is. One thing everyone gets, however, is an enjoyable build and a perfect-fitting model.
It wouldn’t be a modern Tamiya armor kit without some oddities; such as nylon string for tow cables, figures and rubber-band track. Each of these has their benefits and downsides, but they come together just fine to produce a stunning AFV.
The contents of the box include:
- Lower and upper hulls and turret packaged separately
- 7 sprues in soft, dark green plastic, packaged separately (Sherman)
- 2 sprues in soft, dark green plastic, packaged separately (GAZ67B)
- 2 lengths of ‘rubber band’ track, which take both paint and glue
- 2-ft long piece of string for use as tow cables
- 2 small sprues polycaps
- 1 large sheet of Tamiya decals, perfect registration
- 1 small clear sprue containing lenses and goggles for two figures
- 1 16-page, black and white instruction booklet with 35 steps (both models)
- 1 full-color foldout (8 pages) showing paint schemes, decal placement, and photos of the Sherman in combat, as well as a short but interesting history of the vehicle in Korea.
The kit comes with the following two finishing schemes:
- ‘Rice’s Red Devils”, C Company, 89th Tank Btn, 25th Inf. Div. Han River Basin 1951
- C Company, 70th Heavy Tank Btn, 1st Cavalry Div., near Chilgok, September 1950
Paint callouts are provided for Tamiya Acrylic-Lacquers.
The Instructions
The instructions are excellent; but curiously, do not include a parts map. Beginners will find the pages full of quick hints and images showing where to trim, cut, use tweezers for small parts, etc., etc. A ten year-old could build a nice model from this kit using these instructions. There are two slightly different versions of the Sherman in the box - labeled ‘A’ and ’B’ – that coincide with the two schemes listed above. Each type requires slightly different parts in several places, and Tamiya clearly distinguishes where this happens in the instructions. In several places, Tamiya has even stamped the part numbers on the parts themselves to assist in assembly.
The Build
Looking through the instructions for my notes I find that there is very little written besides the occasional ‘Cool!’ and ‘Nice!’. The build simply goes right along without a hitch.
Make sure to open several holes in the main hull and turret with a drill, as shown, before assembling the major parts.
Tamiya includes poly-caps that can be slipped into the drive sprockets and return wheels so that they can easily be removed and replaced during painting, if desired. Each bogey consists of four parts, plus the wheels – a far cry from the dozen parts or so from other manufacturers. Once fitted, the twelve wheels on each side can easily be aligned using a ruler as the glue dries.
I painted and weathered the commanders hatch (Step 21) and the machine gun (Step 27) separately so that the clear vision ports would not be fogged up when the rest of the vehicle was painted, and the gun could be detailed. Similarly, I treated the canvas mantlet cover (4 parts, Step 24) separately so that the color could be slightly different than the background green and easily painted. All three were added at the end of the build.
The Track
Tamiya has included a new set of rubber-band track, differing slightly from the previous –E8 kit. The detail is excellent, and it takes glue, paint, and weathering materials just fine. There is enough elasticity to stretch around the drive sprockets and return wheels yet still appear taught once installed.
While the track was still in two lengths, I gave the runs an initial airbrushed coat of Tamiya Iron. Once that had a good chance to dry, I applied a ‘splotchy’ coat of Mig Wash Brown from the bottle, and, while still wet, applied Vallejo Light Sienna Pigment on both sides. After that had a chance to dry, I applied a coat of Uschi Chrome pigment on the part of the track that touches the pavement, spread on with my finger. I did not use a fixer because I feel it changes the color and texture of the finish, so I very carefully glued the track lengths and stretched them over the running gear. From then on, hands off!
The GAZ67B
As wonderful as the –E8 build was to experience, the same can’t be said for the Russian GAZ67B included in the kit. Clearly the ‘jeep doppelganger’ was from another manufacturer; the fit of some of the parts, especially around the doors and chassis, was poor and the plastic made of a different material. Still, it was a pleasant surprise to see the addition in the Sherman kit. If the GAZ wasn’t in the same box as the Sherman, I might not have noticed the flaws so much.
Painting and Finish the AFV
As a U.S. Army combat vehicle, the M4A3E8 Sherman is going to be U.S. Army green, period, so my challenge would be to try and put as much life as I could into all that monochromatic finish. I wanted to use the darker Olive Drab from the Tamiya line of paints since this vehicle comes from a different theater (and war) than what I normally model in. Just to change things up a little.
Primer, Pre-Shade and Hairspray
I remain a stalwart believer in using cheap rattlecan primers when I can. Accordingly, I started by applying a primer coat using Krylon Color Master with Durable ColorMax Technology rattlecan (Flat Black) enamel paint. This is the third rattlecan primer I’ve tried, and I’m glad I kept going because this stuff is a superior product, drying super thin and very, very tough - not to mention cheap and quick.
Once the hot enamel had a chance to de-gas overnight, I toned down the ‘very black’ tire portions of the wheels with Tamiya NATO Black. Once that was dry and set, I shot the lower chassis with hairspray to make it easier to clean up overspray later when I applied additional coats of paint.
I next applied Tamiya Flat White to the upper surfaces that would be exposed to sunlight, and the front of the hull which would be painted red. This will insure that the camouflage coat to come will lay down in different shades, depending of the underlying color.
I followed this with a light overall coat of Tamiya Olive Drab, except for the front, which I covered with Tamiya Flat Red, after masking the sides and top to control overspray. The red color looks garish, but I knew that after weathering it would be fine. I removed the side masks and let that dry overnight.
Next I masked off the front hull and added an overall post-shade coat of lightened Tamiya Olive Drab using 50/50 Dark Yellow, which I also used for the canvas mantlet cover parts and ammunition case for the M2 that I had fixed to a sticky board.
Pulling off the front mask, I inspected my work and touched up areas that contained overspray.
Decals
Once the paint was dry, I sprayed the areas that would receive Decals with Future, straight from the bottle and let that dry overnight.
Once the Future was dry I set to applying the decals. Tamiya’s decals are a little thicker than most, and stick pretty well once they touch the plastic, so make sure you apply plenty of wetting agent before placement. Once in place, the decal setting solution I normally use (MicroSet) was simply not up to the task with these decals, even after three coats. I then tried using Gunze Mr. Mark Softer without much better results, deciding that I risked damaging the finish with any more fuss.
Tamiya has printed the three ‘nose’ parts as one decal – I chose to cut this decal into three pieces to better fit them around the barrel lock. Otherwise, everything went on as expected.
On-Board Detail
Once the decals were on, I painted the wooden portions of the various pioneer tools with Tamiya Buff or Desert Sand, and the steel parts with (first) Tamiya NATO Black and then a quick rub using Uschi Chrome pigment applied with a rubber-tipped artist’s blender. I used the same process for the two machine guns.
I then airbrushed Future over the entire vehicle to seal the decals and to prepare the surfaces for washes, trying to avoid the track as much as possible.
Once the Future had dried overnight I started the weathering process. To give the wooden parts of the tools more depth, I brushed on a little Mig Wash Brown oil paint straight from the tube and let that set overnight. Since the surfaces were covered beforehand with Future, the oil paint will be easy to work with. In the morning I carefully removed most of the oil paint using a Q-tip, leaving the areas near the latches and metal parts darker than the center of the wooden shafts. I then let a little black wash puddle up on the horizontal surfaces of the metal axe and shovel heads. When dry, I think this gives them a convincing look of used steel.
Pin Wash, Streaking
With a glossy coat still on the model, I applied a pin wash to highlight the detail all over the vehicle, starting with Mig Dark Wash (aka Raw Umber) mixed 10:2 (Mona Lisa thinner to Wash) applied with a small, long-bristled, red sable brush, concentrating on the panel lines, recesses, buckles, pioneer tools, etc.
Next I added dots of Wilder Products ‘Bright Ochre’ and ‘Grey Blue’ filters here and there, swirling and pushing the enamel paint around using a small brush damp with Mona Lisa.
Finally, I used two of the new Mig Oilbrushers (enamel paint applicators) – Dark Mud and Ochre – the latter shade as a dot filter on the horizontal surfaces, and ‘Dark Mud’ for streaking vertical surfaces and lining the recesses and edges to add grime deposits. The goal of all of this was to break up the overall green color as much as I could without making things look garish.
Once satisfied, I gave the entire model a coat of Vallejo Matt Varnish, mixed 50/50 with Vallejo thinner and a couple drops of Liquitex Flow-Aid, and followed that with a light dusting of the tracks and bogies using Vallejo Model Air Light Brown.
Conclusion
What more can I say about Tamiya kits? There is something for every kind of modeler in each kit, the fit is perfect and the instructions are excellent. Even the rubber-band track was detailed, fit well, and took paint/glue perfectly.
I recommend this kit for all modelers; Beginners to Advanced. This is one fun model to build.
I would like to thank Tamiya USA for providing this kit for review, and to IPMS USA for giving me the opportunity to build it.


