Reviews
Tools
Mission Models Paints
by Eric Christianson
 Product: Mission Models Paints
Reviewed by: Eric Christianson, IPMS # 42218
Scale: N/A
Company: Mission Models
Price: varies - $5.75 for paints
Website: Mission Models
Using Mission Models Paints
I have been on a quest these past few years; a quest to wean myself from distillate-based paints. Not just those that include the words ‘lacquer’ or ‘enamel’ (or whatever the heck Floquil is using these days) in their titles, but also away from paints that thin best with distillates, like Tamiya’s line of pseudo-acrylics, whose bottles still sport a flammable symbol.
For the past two years I have been experimenting with pure acrylics; starting with LifeColor, moving through AK Interactive, and Gunze, and finally settling on Vallejo’s excellent line of airbrush paints. Acrylic paints are better for my health, better for the environment, and they free me from my heavy, uncomfortable, distillate mask while airbrushing, replacing it with a simple, light, paper particulate mask.
Historically, airbrushing acrylic paint has been, at best, a compromise. Acrylics are not easy to tame, at times, unpredictable, and not nearly as forgiving as almost any other type of paint, when airbrushed.
Until now, that is.
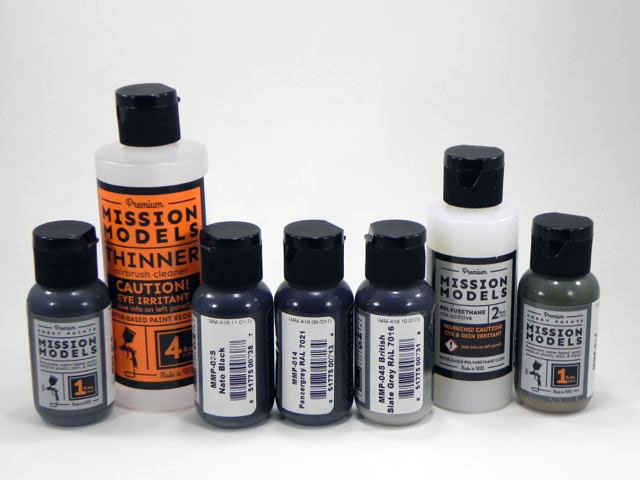
I recently became aware of a new kid in town; Mission Model Paints (MMP), whose line of acrylics have become available in a limited number of colors - but more are on the way, I am told. MMP is sold with their own thinner, and a third component that goes by the catchy name of ‘Polyurethane Mix Additive’ (PMA). These three components, when mixed together correctly, literally break the rules of acrylic painting. No longer a compromise, these products produce an airbrushing experience that re-sets the bar. A chemist might be able to explain how these products work together, and MMP’s website is also a good source of technical information, but as a simple user, I’ll just convey my own experience with these products.
First – the mix ratio. While MMP’s website and YouTuber’s have come up with an array of different mixing ratios, my friend John Miller (of Model Paint Solutions - https://modelpaintsol.com/) came up with the following suggestions and I concur – these ratios work the best for me as well, and most importantly, produce reliably consistent results.
Note: Make sure to hold the bottles completely upside down (vertical) to get single drops to come out of all MMP containers, otherwise the product dribbles out and it’s harder to control specific amounts.
Thinner Mix
Thinner Mix = 1 drop MMP Polyurethane Mix Additive (PMA) to 10 drops MMP Thinner. This mix can be made up front and stored, in bulk, to simplify the process.
Base Coat
Paint Mix = 6 drops MMP paint to 4 drops Thinner Mix
Pressure = 12lbs pressure for detail, or up to 20lbs for coverage
The base-coat paint mixture will seem thick – resist the temptation to add more thinner. Your airbrush will learn to ‘breath’ thicker paint, even using the smallest tips.
Post-Shading Coat
Paint Mix = 15 drops of the Thinner Mix to 4 drops of paint. If that’s too much for the job, then go with a paint mix of 8 drops of the Thinner Mix to 2 drops of paint.
Pressure = 12lbs
This thinner version of the paint is more like what I am used to with other acrylic paints like Vallejo, with one big difference – these paints won’t clog; your paint runs true until it runs out. This thinner paint mix dusts on and is absorbed into the background paint, building up color until it reaches the effect you want.
Primer Coat
Using Mission Models Primer is different than their normal paints – you don’t use their polyurethane (PMA) product with their primers, so you can’t use the ‘Thinner Mix’ described above. You’ll need to go back to their bottle of straight Thinner.
Paint Mix = This is same as the base coat paint: 6 drops primer paint to 4 drops (plain) Thinner
Pressure = 12lbs pressure for detail, up to 20lbs for coverage
So those are the ratios. Regardless of color, those ratios will produce the same results over and over and over again – eliminating one of the most irksome characteristics of airbrushing acrylics.
Now here’s the kicker: try mixing up just that much (4-6 drops of paint), pour it into your airbrush cup, dial the pressure up to about 12lbs., and start spraying. And spray. And spray. Stop in between and go make a sandwich. When you come back, just start spraying again. Did I mention these were acrylics?? I was amazed at how long I could lay paint down with so little product mixed up in my color cup, and how long I could set the brush down and still not experience any drying at the tip, or clogging. Zero. I use about 20lbs. pressure for coverage, which obviously will eat more paint, but even then, this paint seems to last longer than what I am used to.
Time for a real-life test
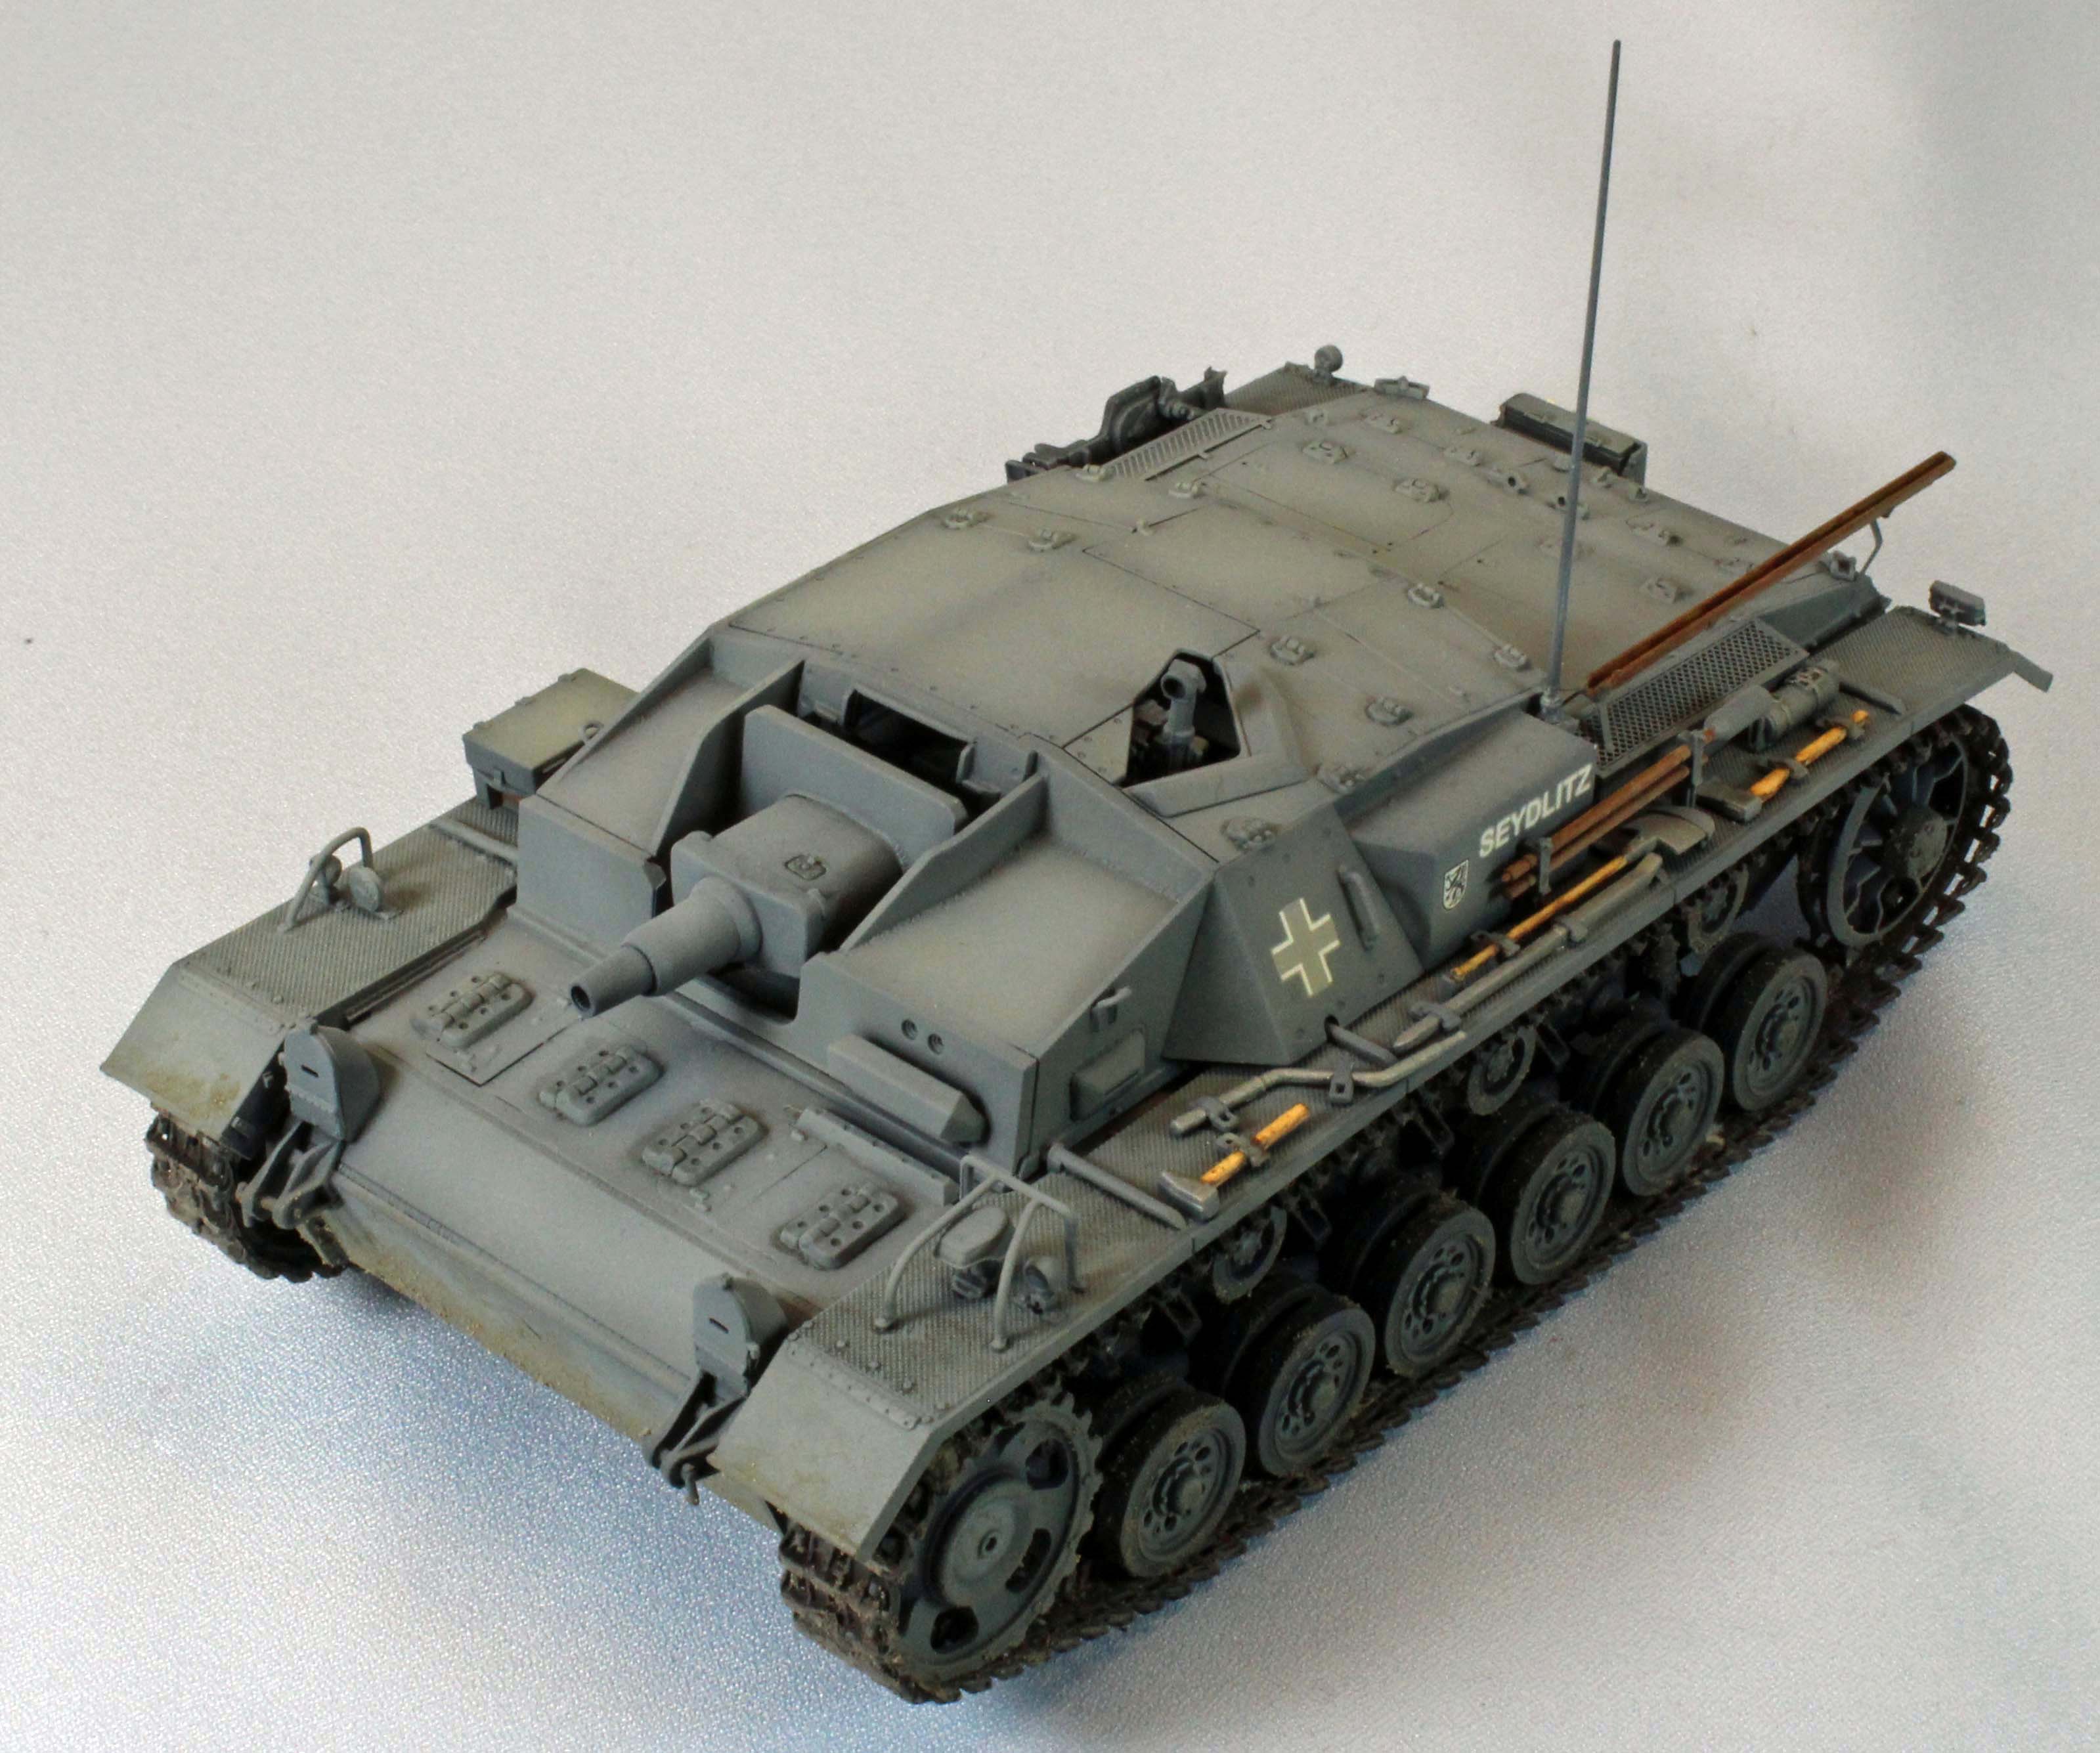
I am currently working on an IPMS build review of the new Dragon Sturmgeschütz III Ausf. C/D (6489) which, unfortunately, I had already primed using black (rattlecan) lacquer primer. You’ll have to experiment with their primer on your own, or go online and watch one of the video’s on it.
The black primer I had used is too black for models (in my opinion), so the first thing I did was to spray the wheels of the Stug with (MMP035) NATO Black. I waited 20 minutes and then shot the wheels with hairspray to make it easier to clean up any overspray later.
I let that dry and then laid down a base coat of (014) Panzergrau RAL 7021, working from the center of each panel outwards, leaving some of the darker shades to show through around the edges. This paint was very dark out of the bottle, with a deep bluish-purple tone to it.
The grey is opaque but can be sprayed in such a way to let the color underneath affect the final tone and depth. Keep the pressure around 12lbs and you’ll have the control you need.
I then mixed up a batch of post-shade color using (045) British Slate Grey and sprayed that for about 20 minutes. Just four drops of paint lasted so long that I feel I overdid it – laying down too much paint and nearly ruining the post-shade effect I wanted. Why? Because when I (should have) stopped I still had so much paint in the cup that the ‘cheap bastard’ in me didn’t want to waste it.
As I said, getting used to this paint requires you to ‘forget what you have learned’, and reset. Learning, I laid down my final post-shade coat of RLM-76 using just 2 drops (!) of paint and 8 drops of Thinner Mix. And I still had paint left over when I was done.
By the way, the RLM paint is part of a new batch of colors about to come out on the market aimed at German aircraft builders. I’ve been told these new colors are accurate; I’ll take their word for it – they look beautiful to me. The new colors include:
- RLM-02 Grau
- RLM-65 Hellblau I
- RLM-74 Graugrün
- RLM-75 Grauviolett
- RLM-76 Lichtblau
- RLM-78 Hellblau II
- RLM-81 Braunviolett
- RLM-82 Lichtgrün
- RLM-83 Dunkelgrün
Decals
Back to the model - I waited about 2 hours and then put the decals on. These were plain white, early-war, Balkenkreuz outline-crosses without fill – a perfect test to see if these paints do indeed allow you to skip the ‘gloss coat’ prior to decaling.
My results were mixed – some of the decals showed no signs of silvering, but both crosses ‘silvered up’, unfortunately. Until I figure what I did wrong, I will continue to lay down a gloss coat under and over decals.
Cleaning
Clean-up is a breeze, although tap water seems to have little effect on removing the paint from the airbrush, so I suspect these paints contain something to protect them from water. The thinner works, of course, as does the company’s own Airbrush Cleaner.
After removing any excess paint with a Q-tip, I sprayed a few drops of thinner through the brush to clear out any paint that was still hanging around, swabbed the color cup with a Q-tip and then sprayed about 10 drops of MMP cleaner before setting the airbrush back on the rack. Occasionally I will pull the needle out and check it for paint or damage, but that’s it.
A final note: the Hairspray Method and Mission Models Paints
I use hairspray on almost everything now – mostly to lay down protective coats to make overspray cleanup easier, and to prepare the overlying coat for chipping and weathering.
This paint works well with the first type of hairspray application, rubbing off easily if there is overspray (ex: on the rubber portions of wheels, pioneer tools, etc.). You can also use their thinner for this task, which works even better than water.
Unfortunately, whether you use plain water, their thinner or cleaner, or any combination of these, paint chipping just isn’t in the wheelhouse for this acrylic paint, a job still best left to Tamiya paints, which naturally react perfectly to hairspray, flaking off in tiny, tiny pieces, allowing complete control. With MMP, as the paint starts to dry, water has less and less effect on it, and if it does come off, the removal of it is hard to control. The MMP thinner and cleaner products basically do what they’re supposed to do, remove the paint altogether.
I am hopeful that MMP can come out with a product (as Vallejo and AK Interactive have) that will allow their paint to be used with this type of weathering technique.
Quest Fulfilled
I have found my new paint; my quest fulfilled. I will continue to use my Vallejo paint investment, and Tamiya will continue to be my go-to choice when I want to use the hairspray weathering technique for chipping. The ease of use and color accuracy of these new Mission Models products, however, makes the choice of my preferred airbrushing paint a simple one for me. Life is simply too short to struggle with airbrushing if you don’t have to.
Did I mention these are acrylic paints?