Reviews
Armor
Tamiya M4A3E8 Sherman
by Andrew Birkbeck
 Model: M4A3E8 Sherman
Reviewed by: Andrew Birkbeck, IPMS # 27087
Scale: 1/35
Company: Tamiya
Price: $53.00
Product/Stock #: 35346
Website: Tamiya
Product Web Page: View
Product provided by: Tamiya
Summary
The M4 series of tanks, popularly known as the Sherman tank, was the most important U.S. medium tank of the Second World War. It fought on every front, from the steamy jungles of the Pacific campaigns, to the dusty baking hot desert environs of North Africa, to the freezing snowy conditions of the Russian front winters. The culmination of the design, at least during WW2, was the M4A3E8 variant, known by the troops as the "Easy 8". This variant first saw combat in Western Europe in December 1944.
The Kit
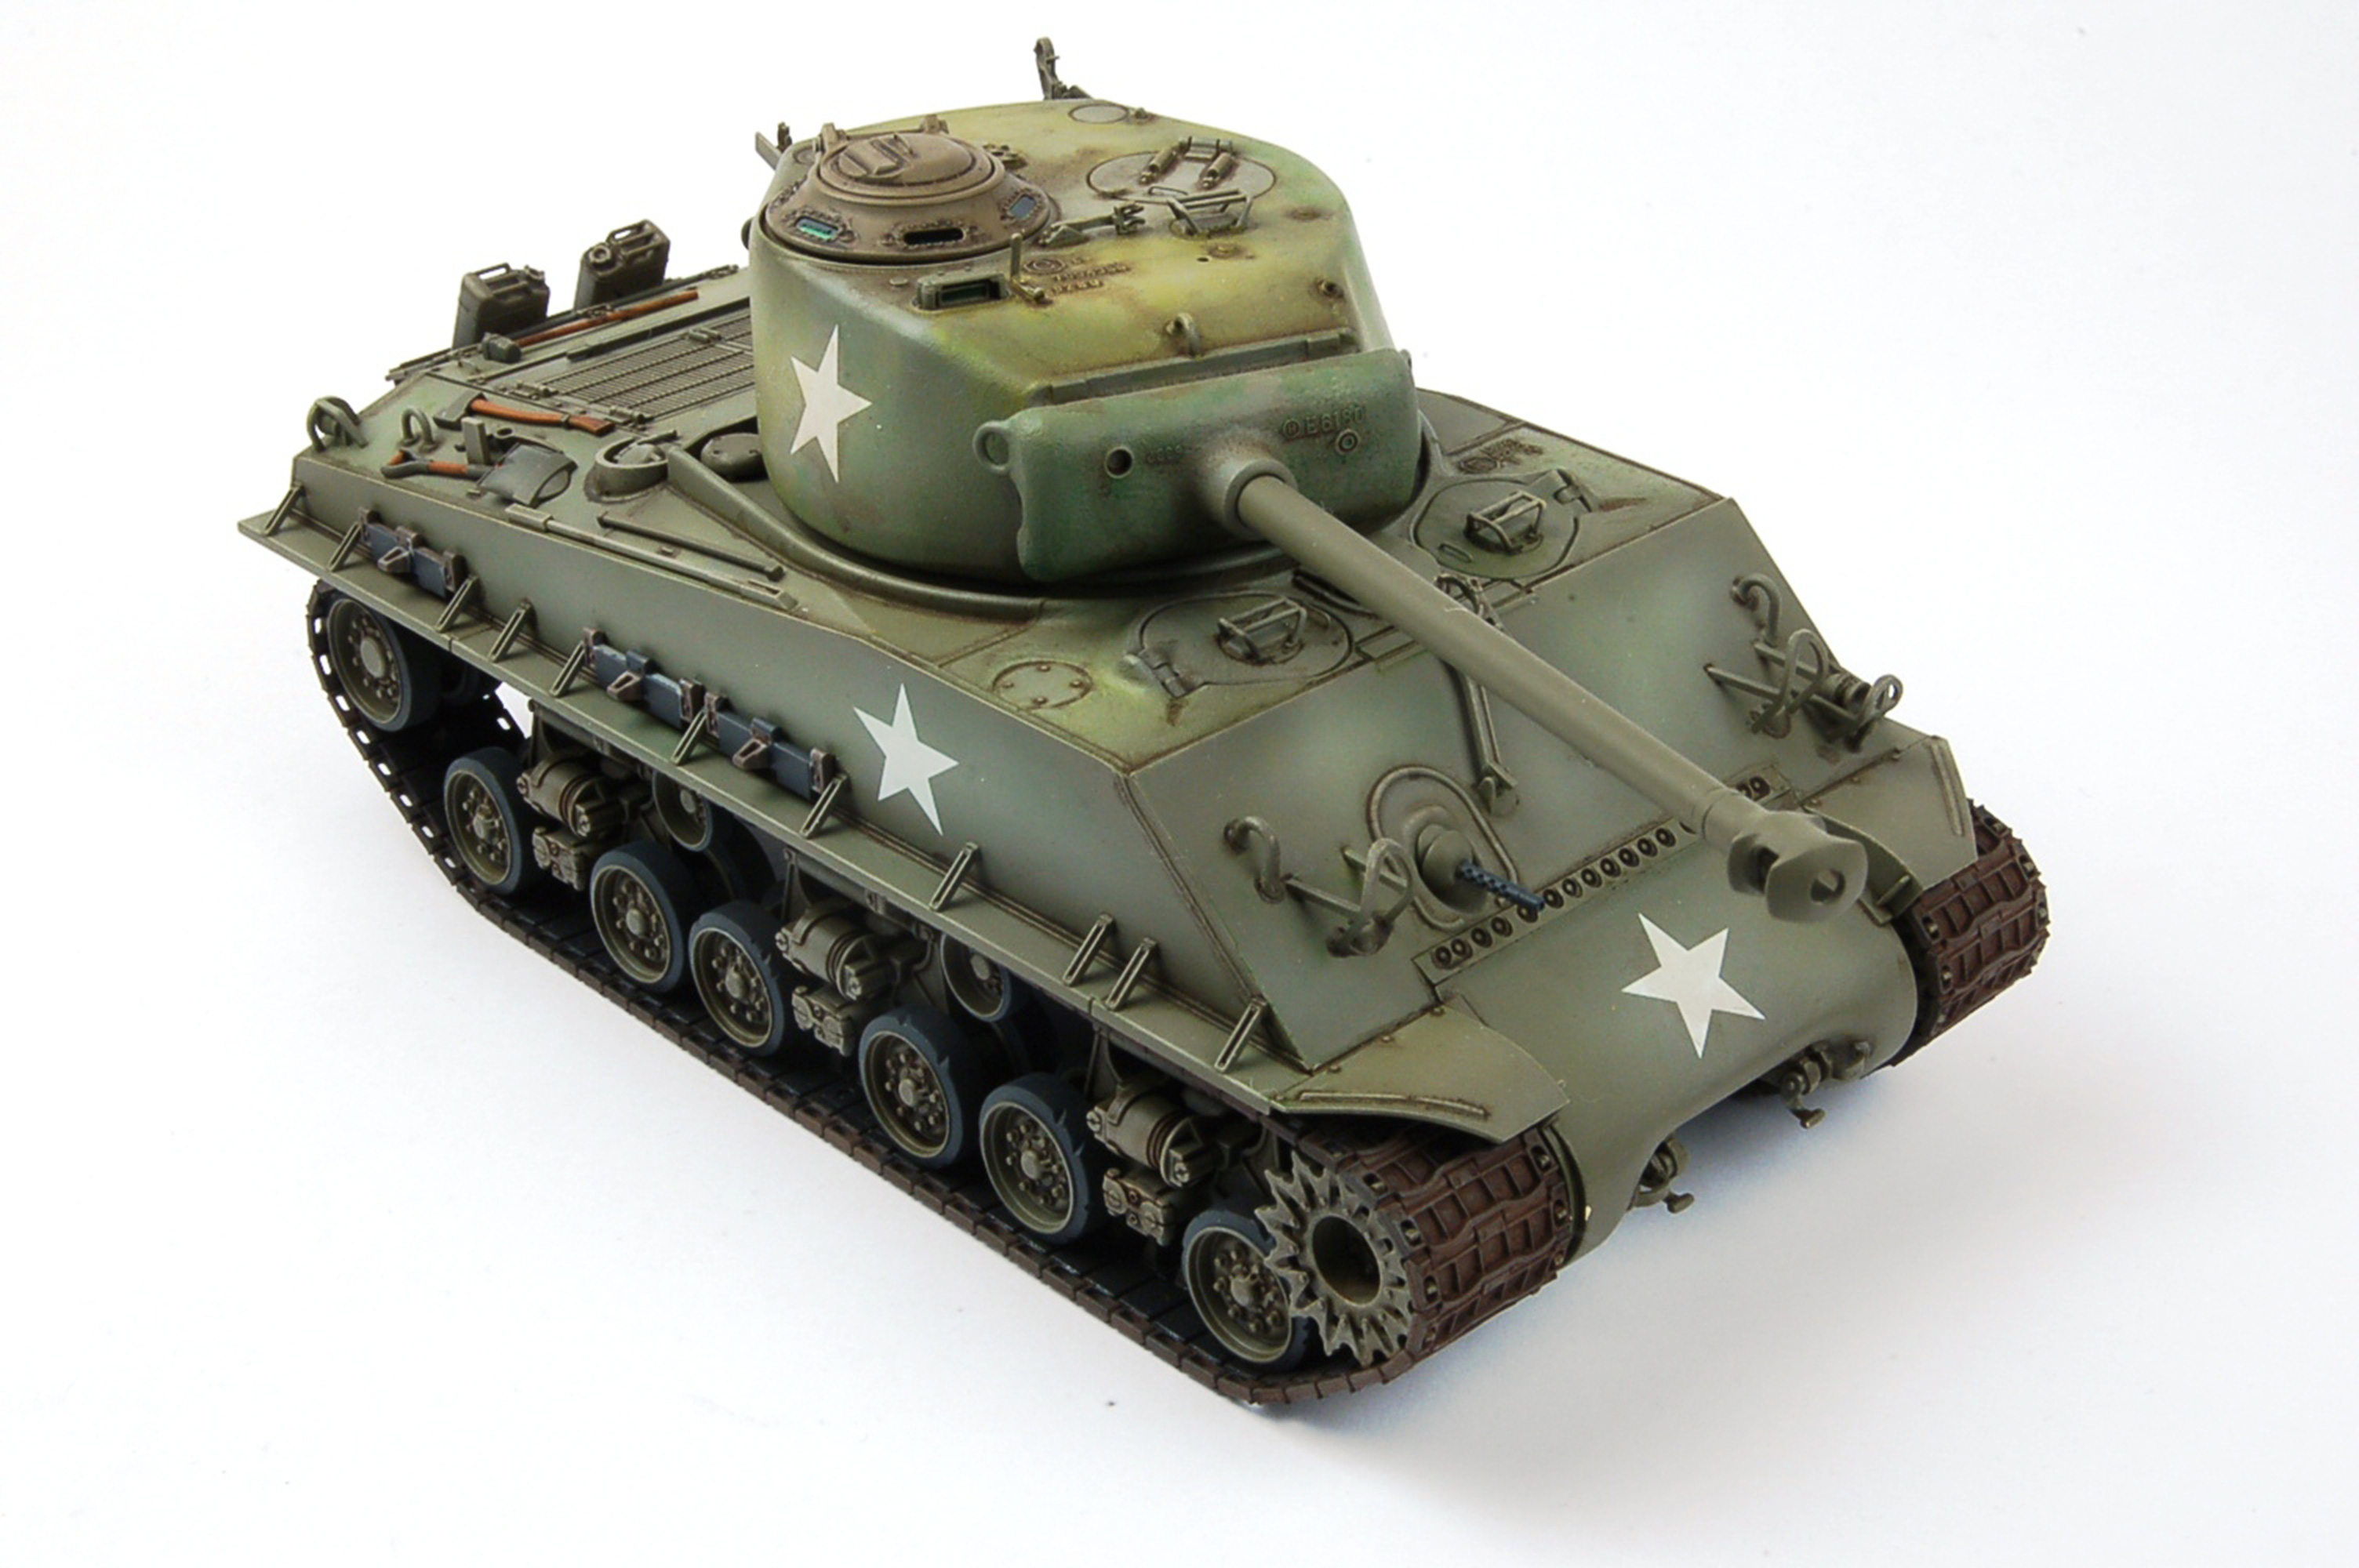
Tamiya first issued an M4A3E8 Sherman in 1/35th scale back in the 1970s. It was motorized and I remember it had some of the coolest box art I had ever seen. I purchased the kit, built it, and drove it round and round my living room floor! Fast forward to 2014, and Tamiya decided to do something rather interesting. They took the superb Tasca M4A3E8, and packaged it with Tamiya's own set of four WW2 U.S. Army soldiers. The kit came with individual link by link T-66 steel track, along with photo etched parts for the headlight guards, and was a real gem of a kit.
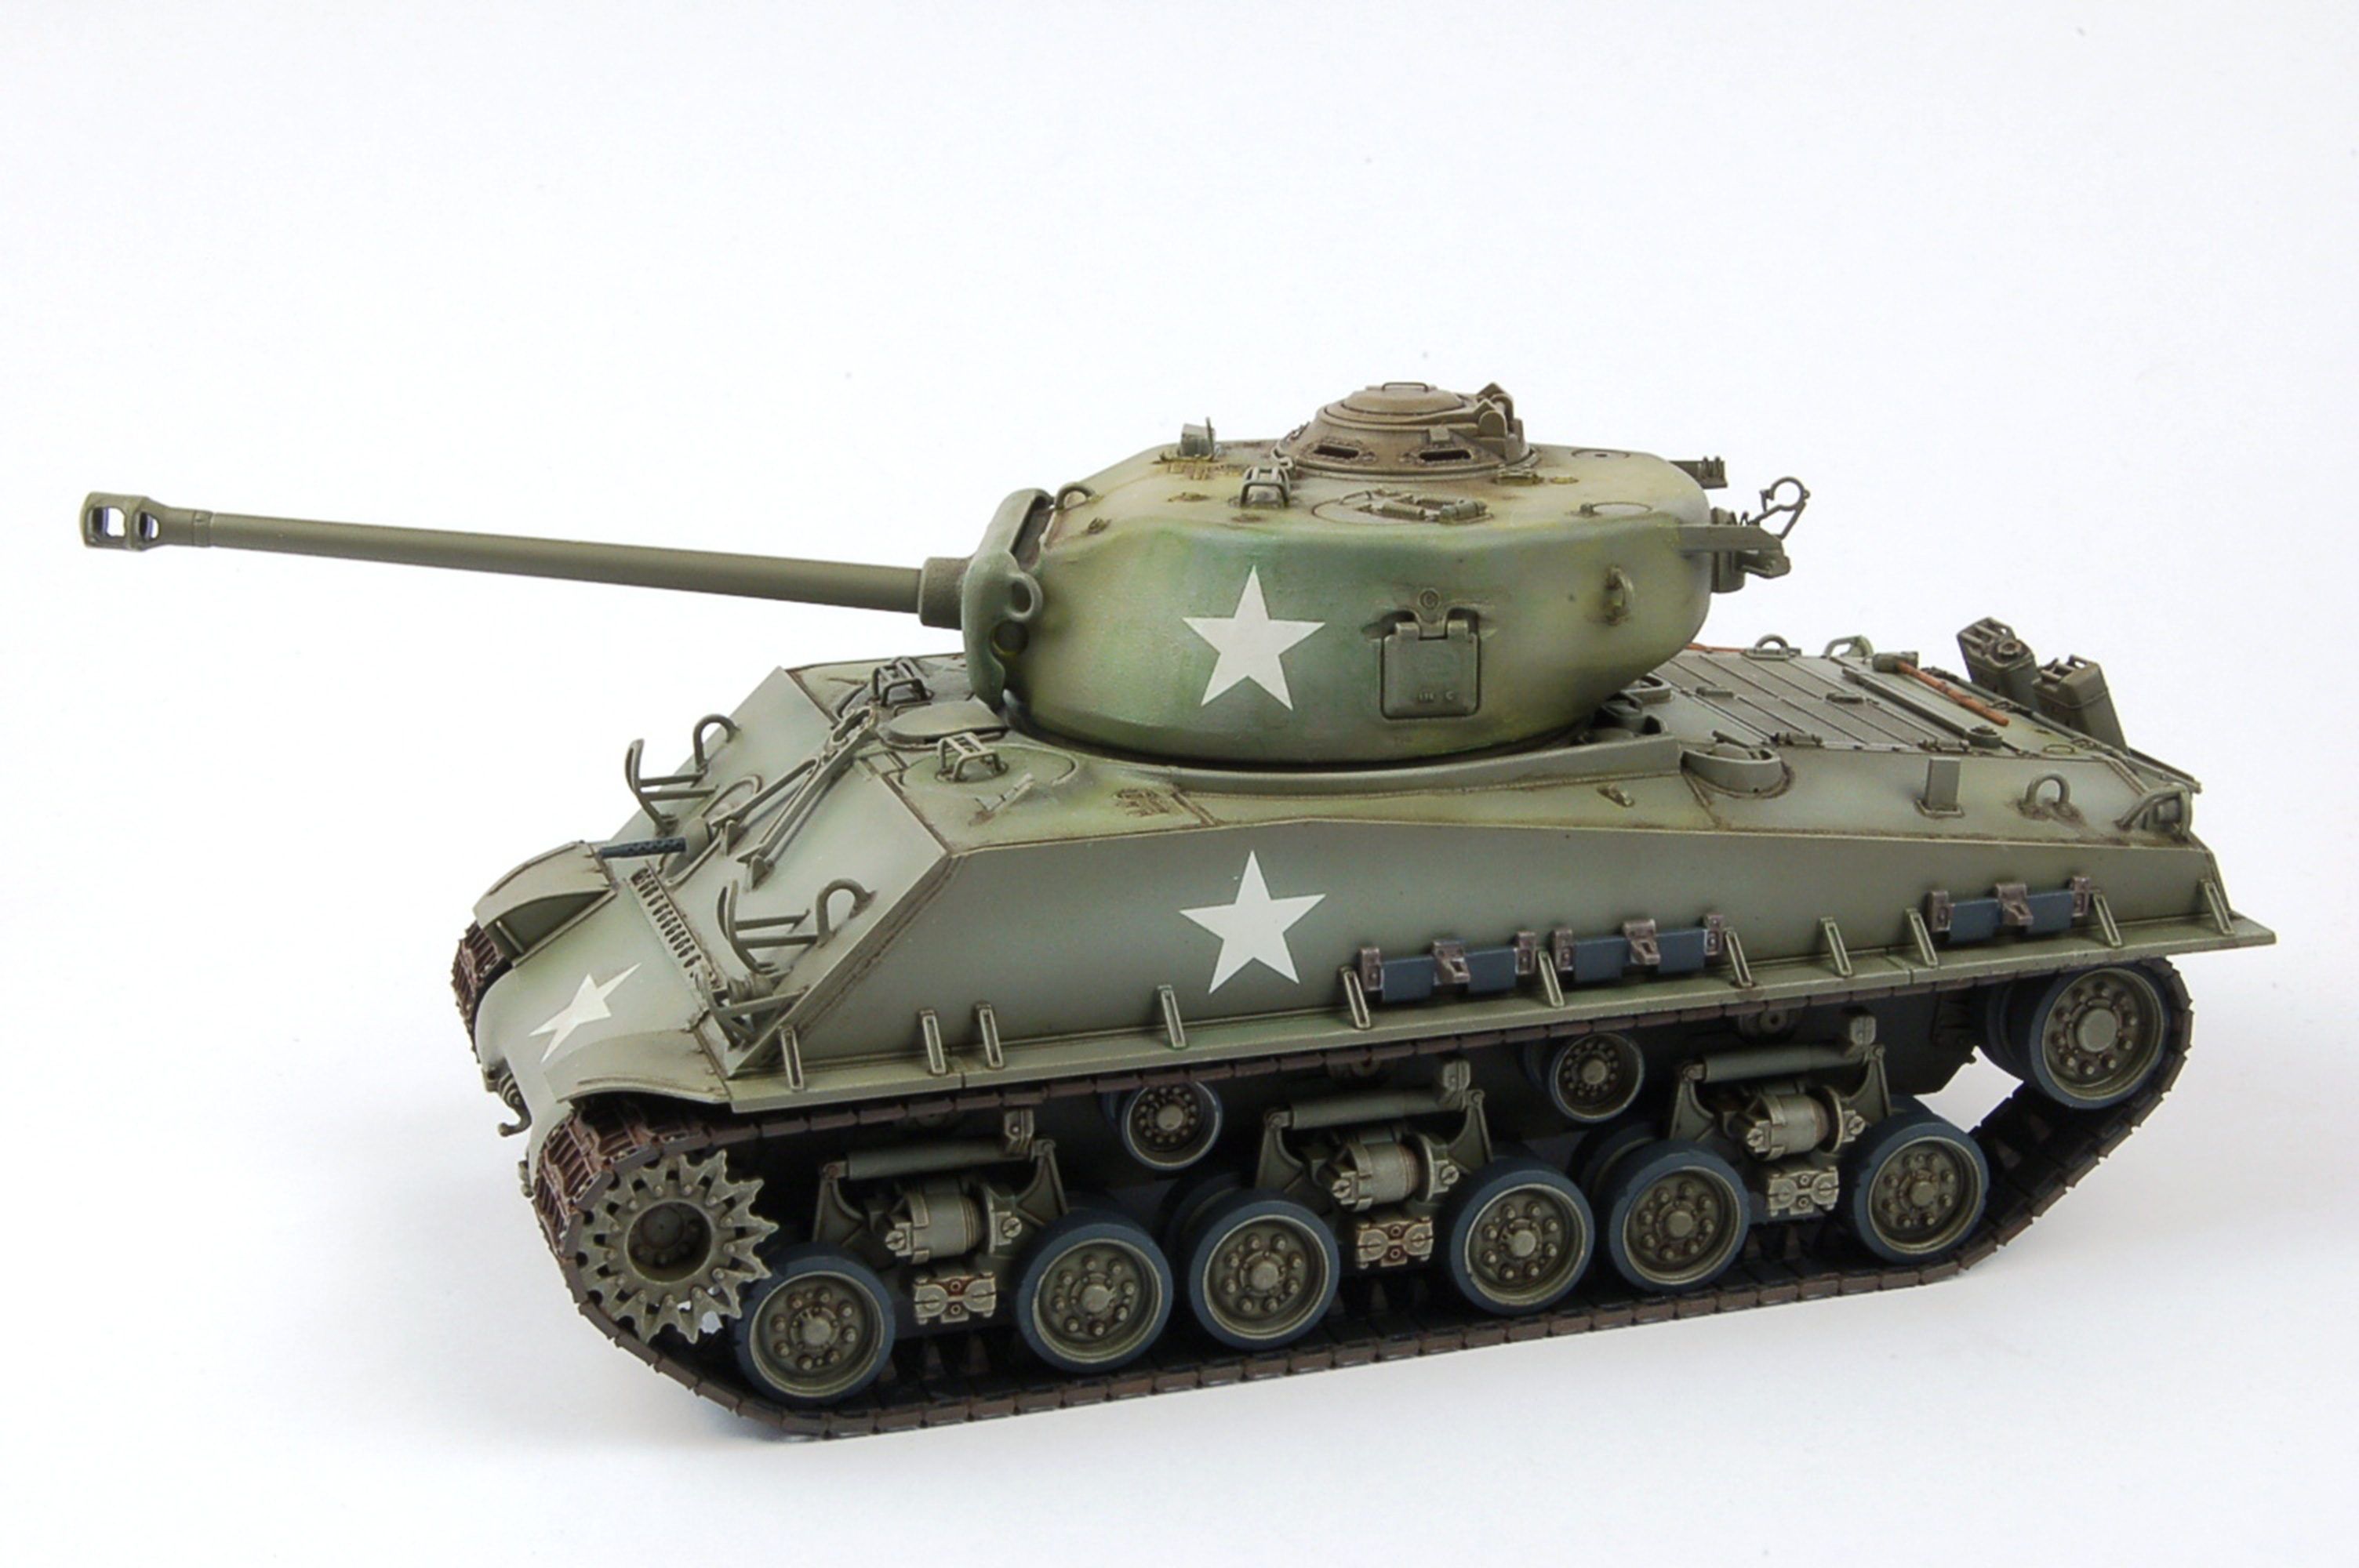
For whatever reasons, Tamiya has now decided to issue their own, new tool, M4A3E8 kit. Instead of individual link tracks, it has single piece “rubber band” type tracks, and there are no photo etched parts contained in this new kit. It is thus an easier kit to assemble than the earlier reboxed Tasca kit. It is also less expensive, retailing at $53.00 vs the Tasca rebox which came in at $75.00 (and currently is listed as “Discontinued” on TamiyaUSA's website). As we have come to expect from Tamiya, this new kit is beautifully molded, in olive green plastic, and the parts are well detailed, devoid of any sink marks or flash.
Construction
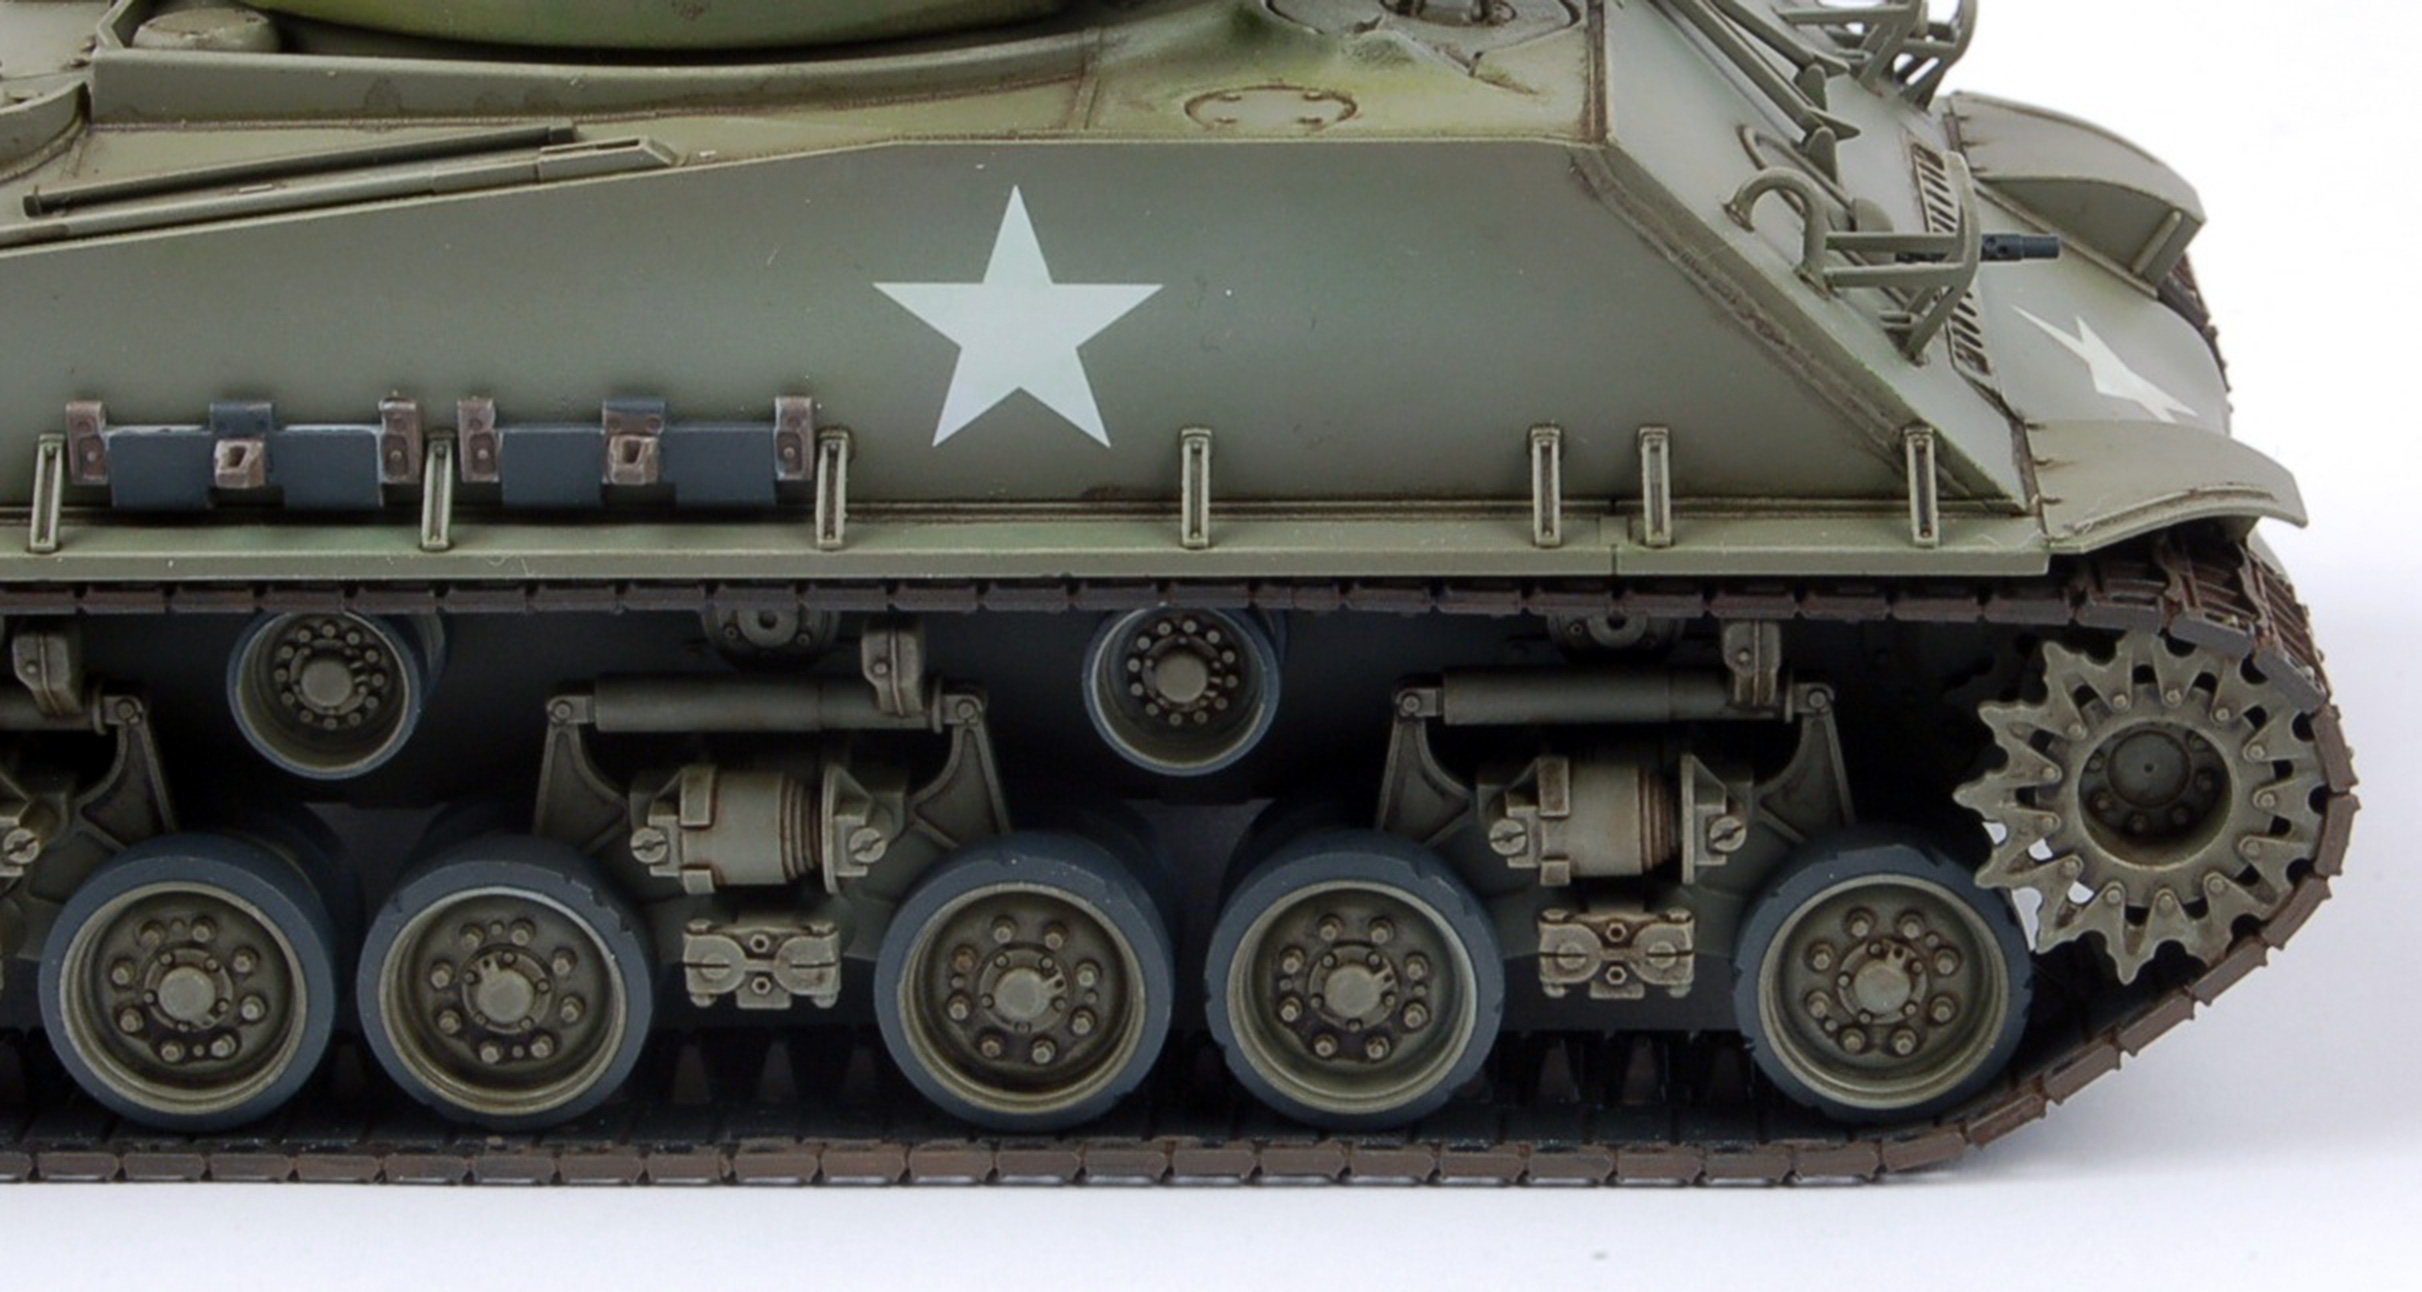
Construction of Tamiya's kit starts with the lower hull, and they have taken a leaf out of Tasca's book, in that the lower hull “tub” is a multi piece affair, consisting of a left and right side piece, an underside piece, plus an engine firewall part that connects the right and left side pieces. Annoyingly, Tamiya continue to ignore the fact that hatch grab handles are not molded on lumps, and so on the rear hull engine access door, part L36, I cut off said lump, and replaced it with a handle made of bent copper wire of a suitable diameter. A nice touch is the fact that the idler wheel arm is a position-able separate part, with a series of tabs that allow the modeler to attach the rubber band tracks taught, as they should be. The HVSS suspension units are four part units, with separate springs, and the road wheels together with the drive sprockets and idler wheels are nicely detailed. The suspension units and road wheels all fit together very well, and the attachment to the hull sides is very positive. The tracks too are nicely detailed for the medium, and can be glued with regular modeling cement. They can also be painted with standard hobby paints, though I advise caution as to the medium used, see later in this review when I discuss the painting of the model.
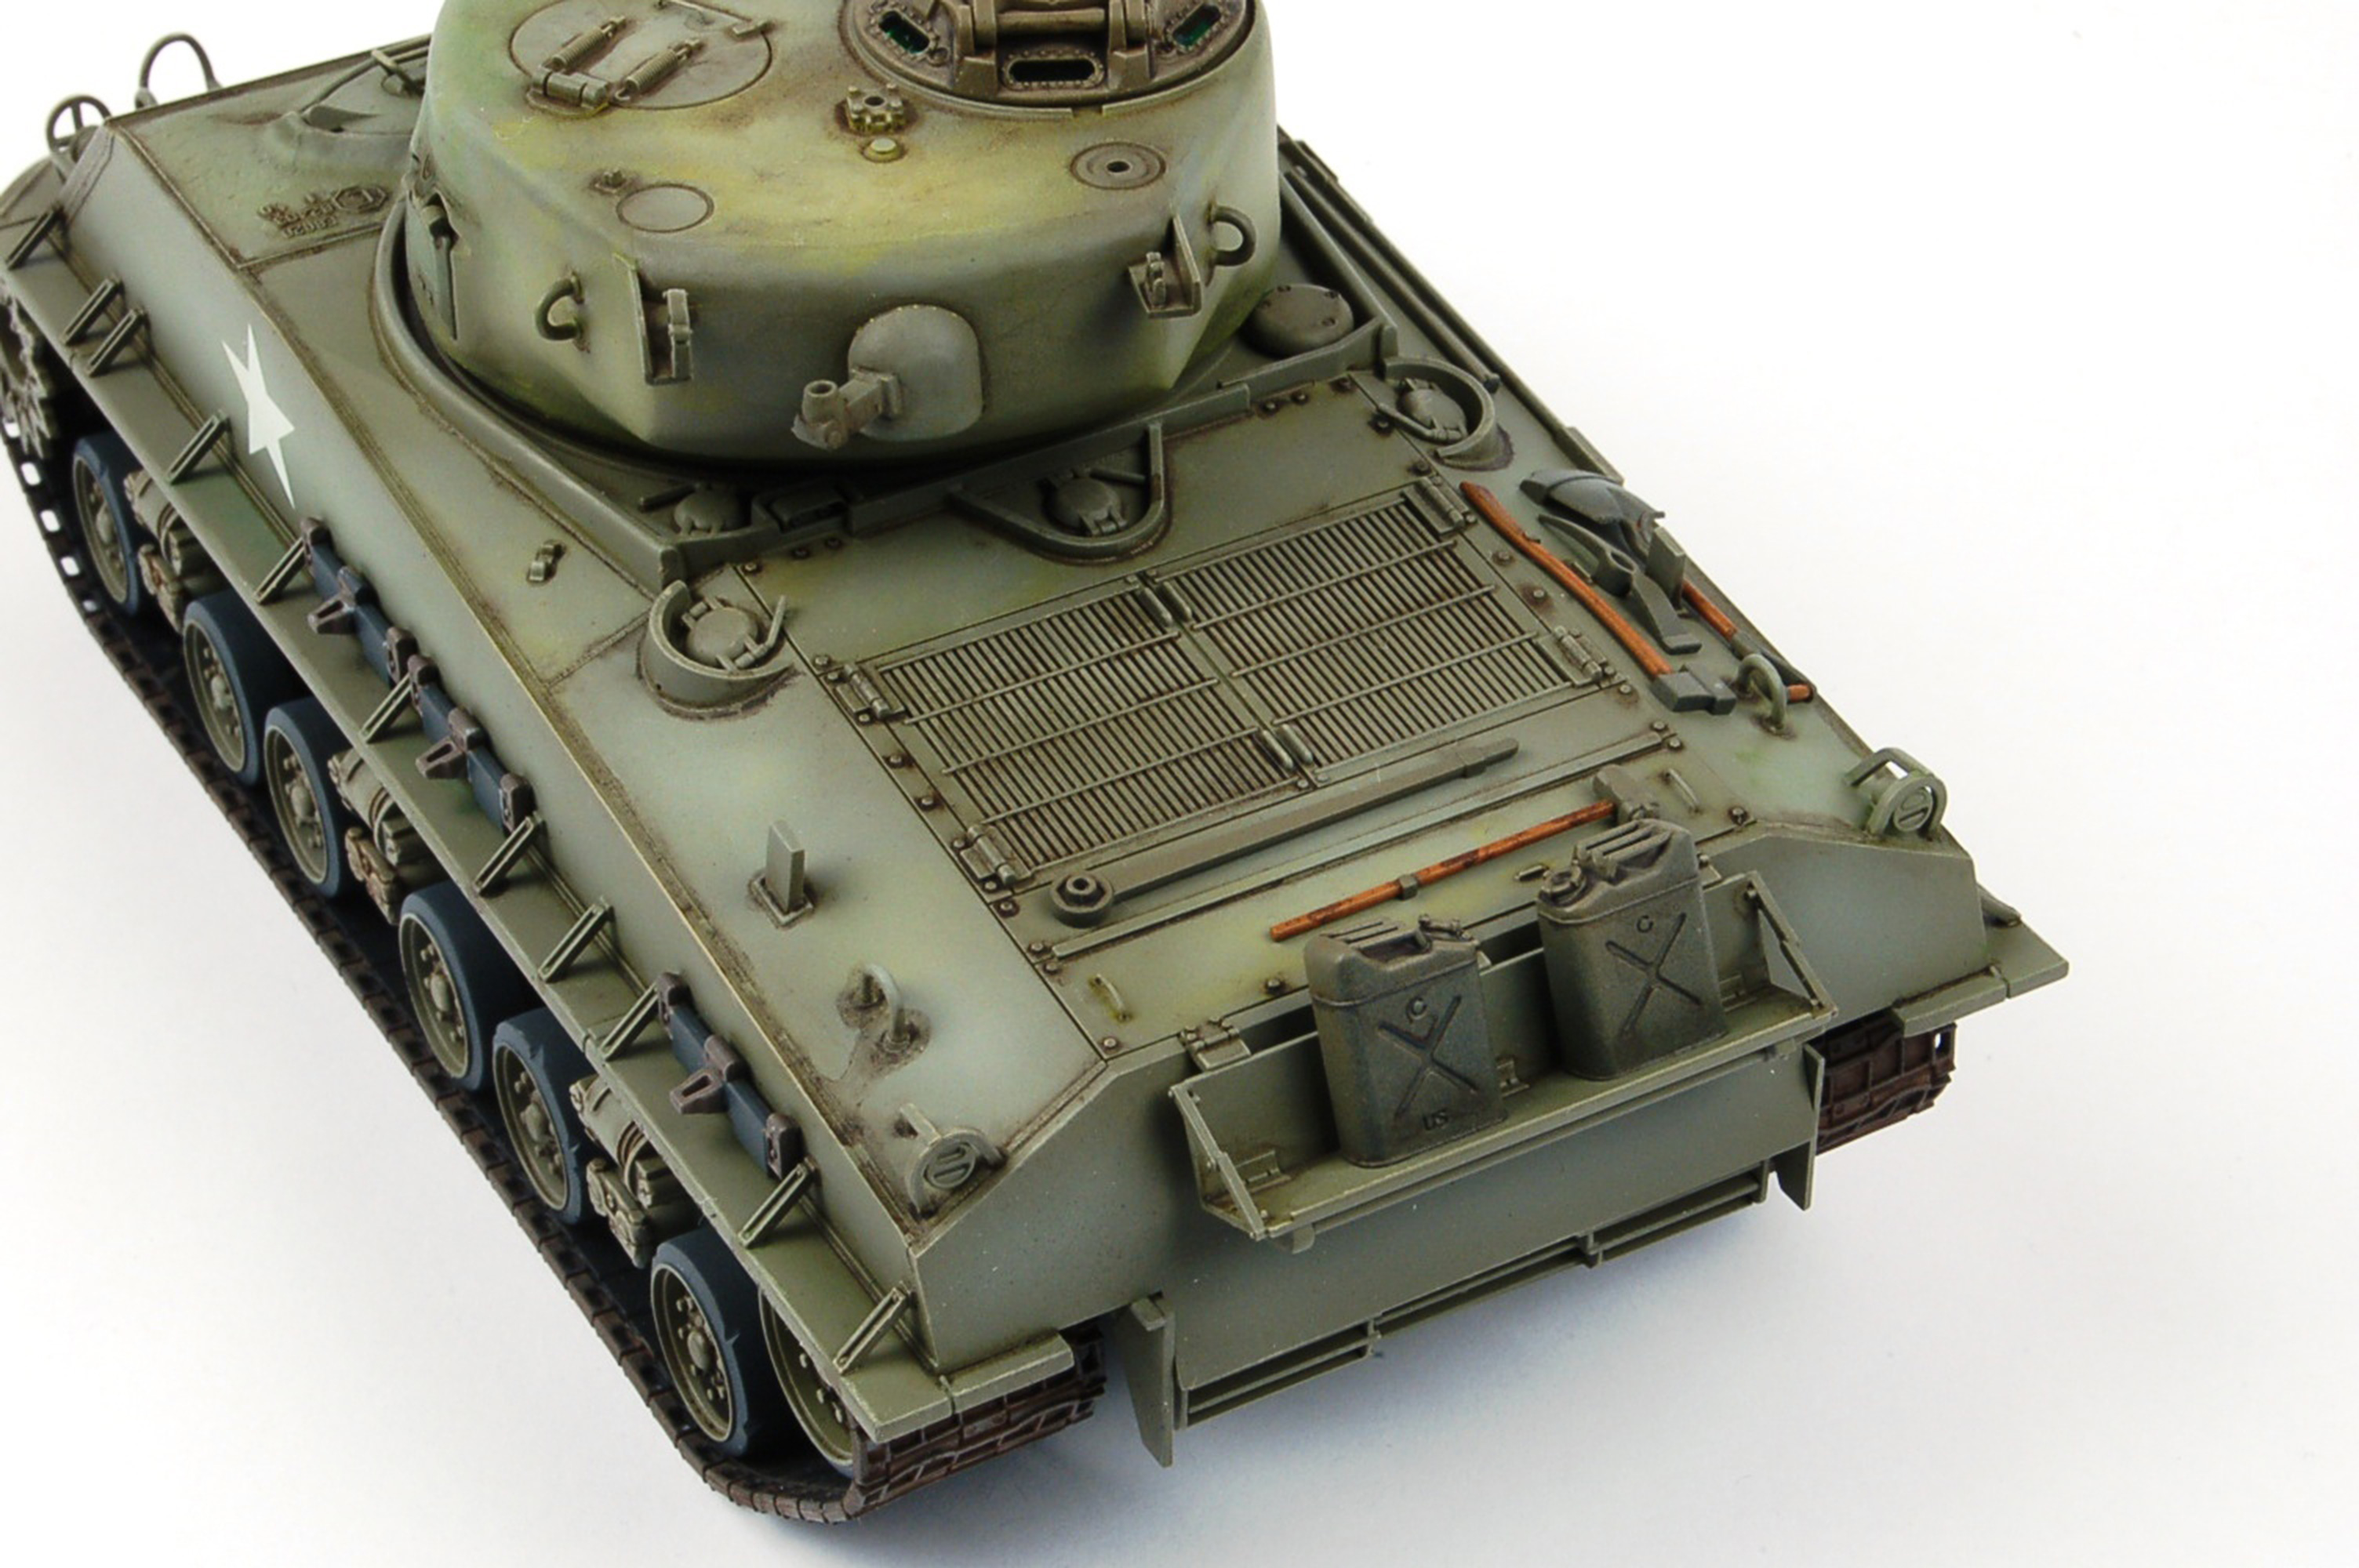
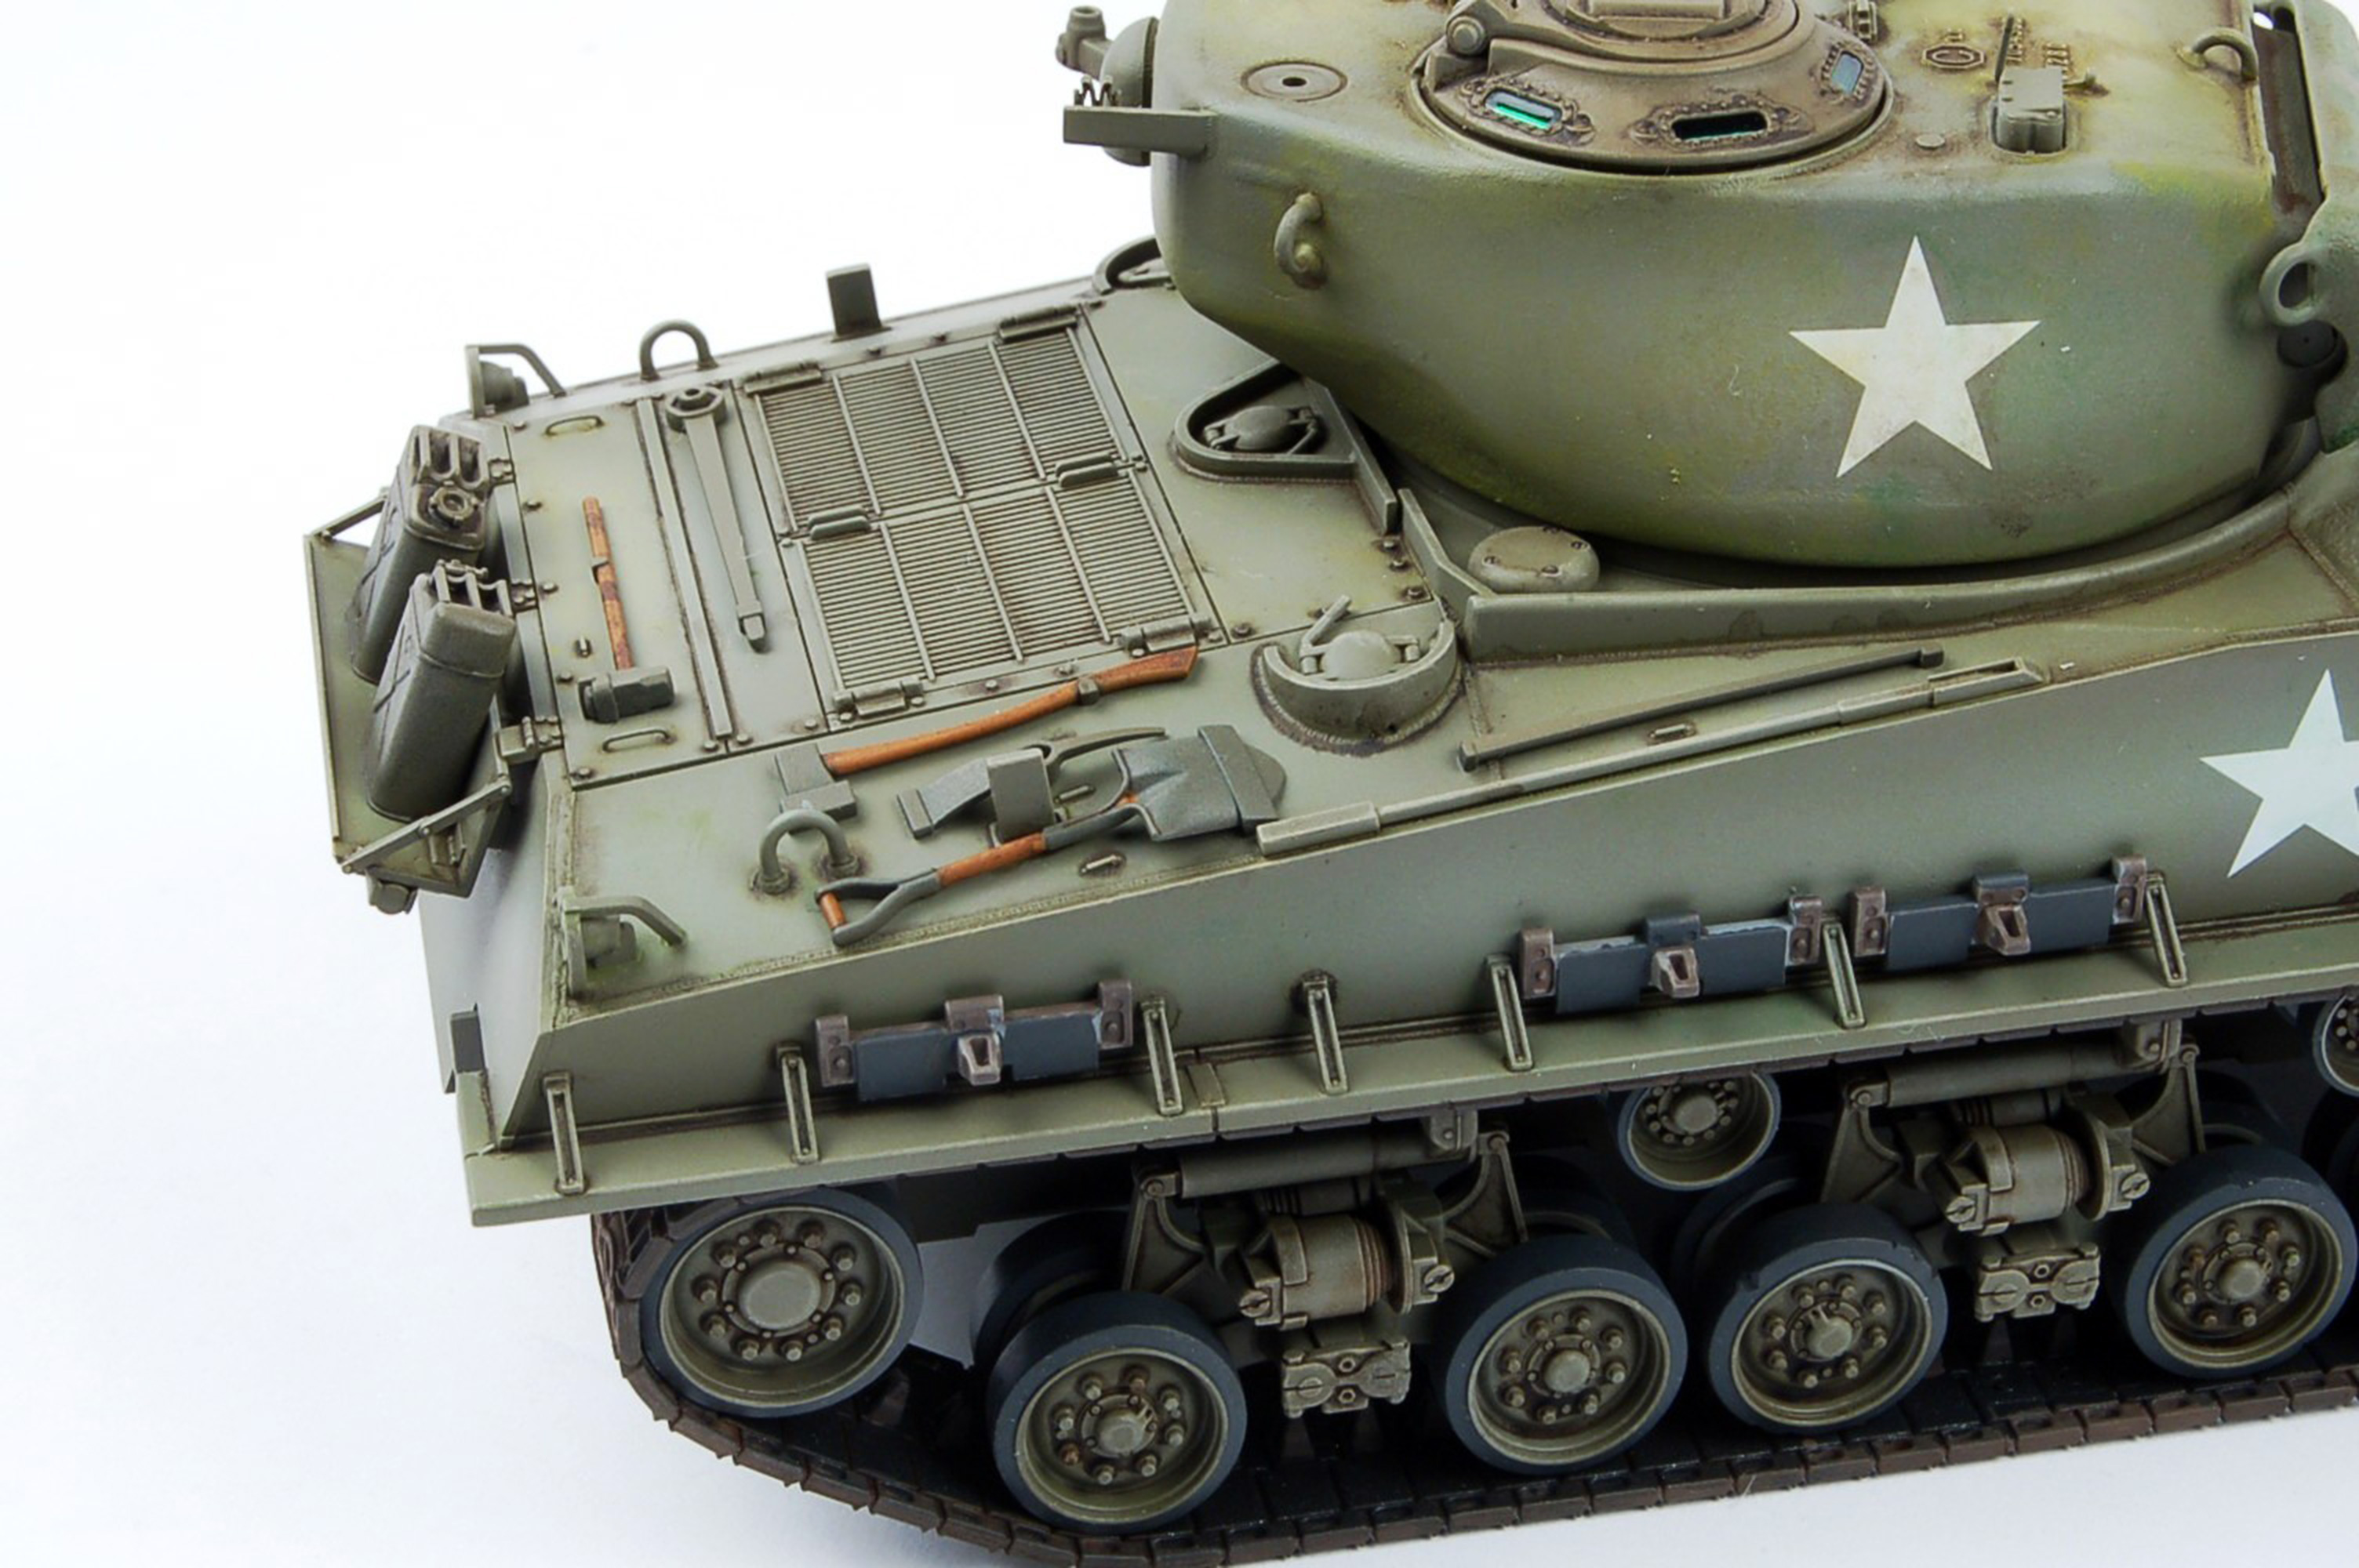
After the lower hull and road wheels are assembled, the instructions have the modeler moving on to the assembly of the upper hull, and Tamiya molds the main fender parts (L12 and L43) in such a way that the sponsons are not wide open, thus avoiding the “see through” effect. Detail on the large main upper hull part, J1, is VERY nice. Nice weld marks where the front glacis plate meets the rest of the hull, very nice cast effects where appropriate, and foundry casting numbers/letters nicely rendered. Sadly, while the separate driver and co driver hatches have nice cast detail, they suffer once more from the blob grab handle, which on my model I replaced with bent copper wire as was the case with the rear lower hull engine access door mentioned earlier.
Tamiya provides their kit with a nicely molded gun travel lock mechanism, but it is a one piece unit, and you can't mount the main gun into it without careful surgery. The kit headlights come in two parts, one of them being a clear plastic lens. The two part horn has one of the few visible ejection pin marks on the back of part L15, but this is easily removed without damaging the detail. The fender support brackets, 11 brackets per side, are finely molded, and nicely detailed. Just make sure they are all lined up properly! The rear deck of the kit is festooned with separately molded on board tools such as a track tightening bar, axe, sledge hammer, pick head and shovel. Detail is good, but they are missing their latch down belts, but these can be easily added with pieces of lead foil and some suitable aftermarket PE buckles if you desire. Two nicely detailed multi part jerry cans are also provided for tossing onto the rear deck stowage ledge.
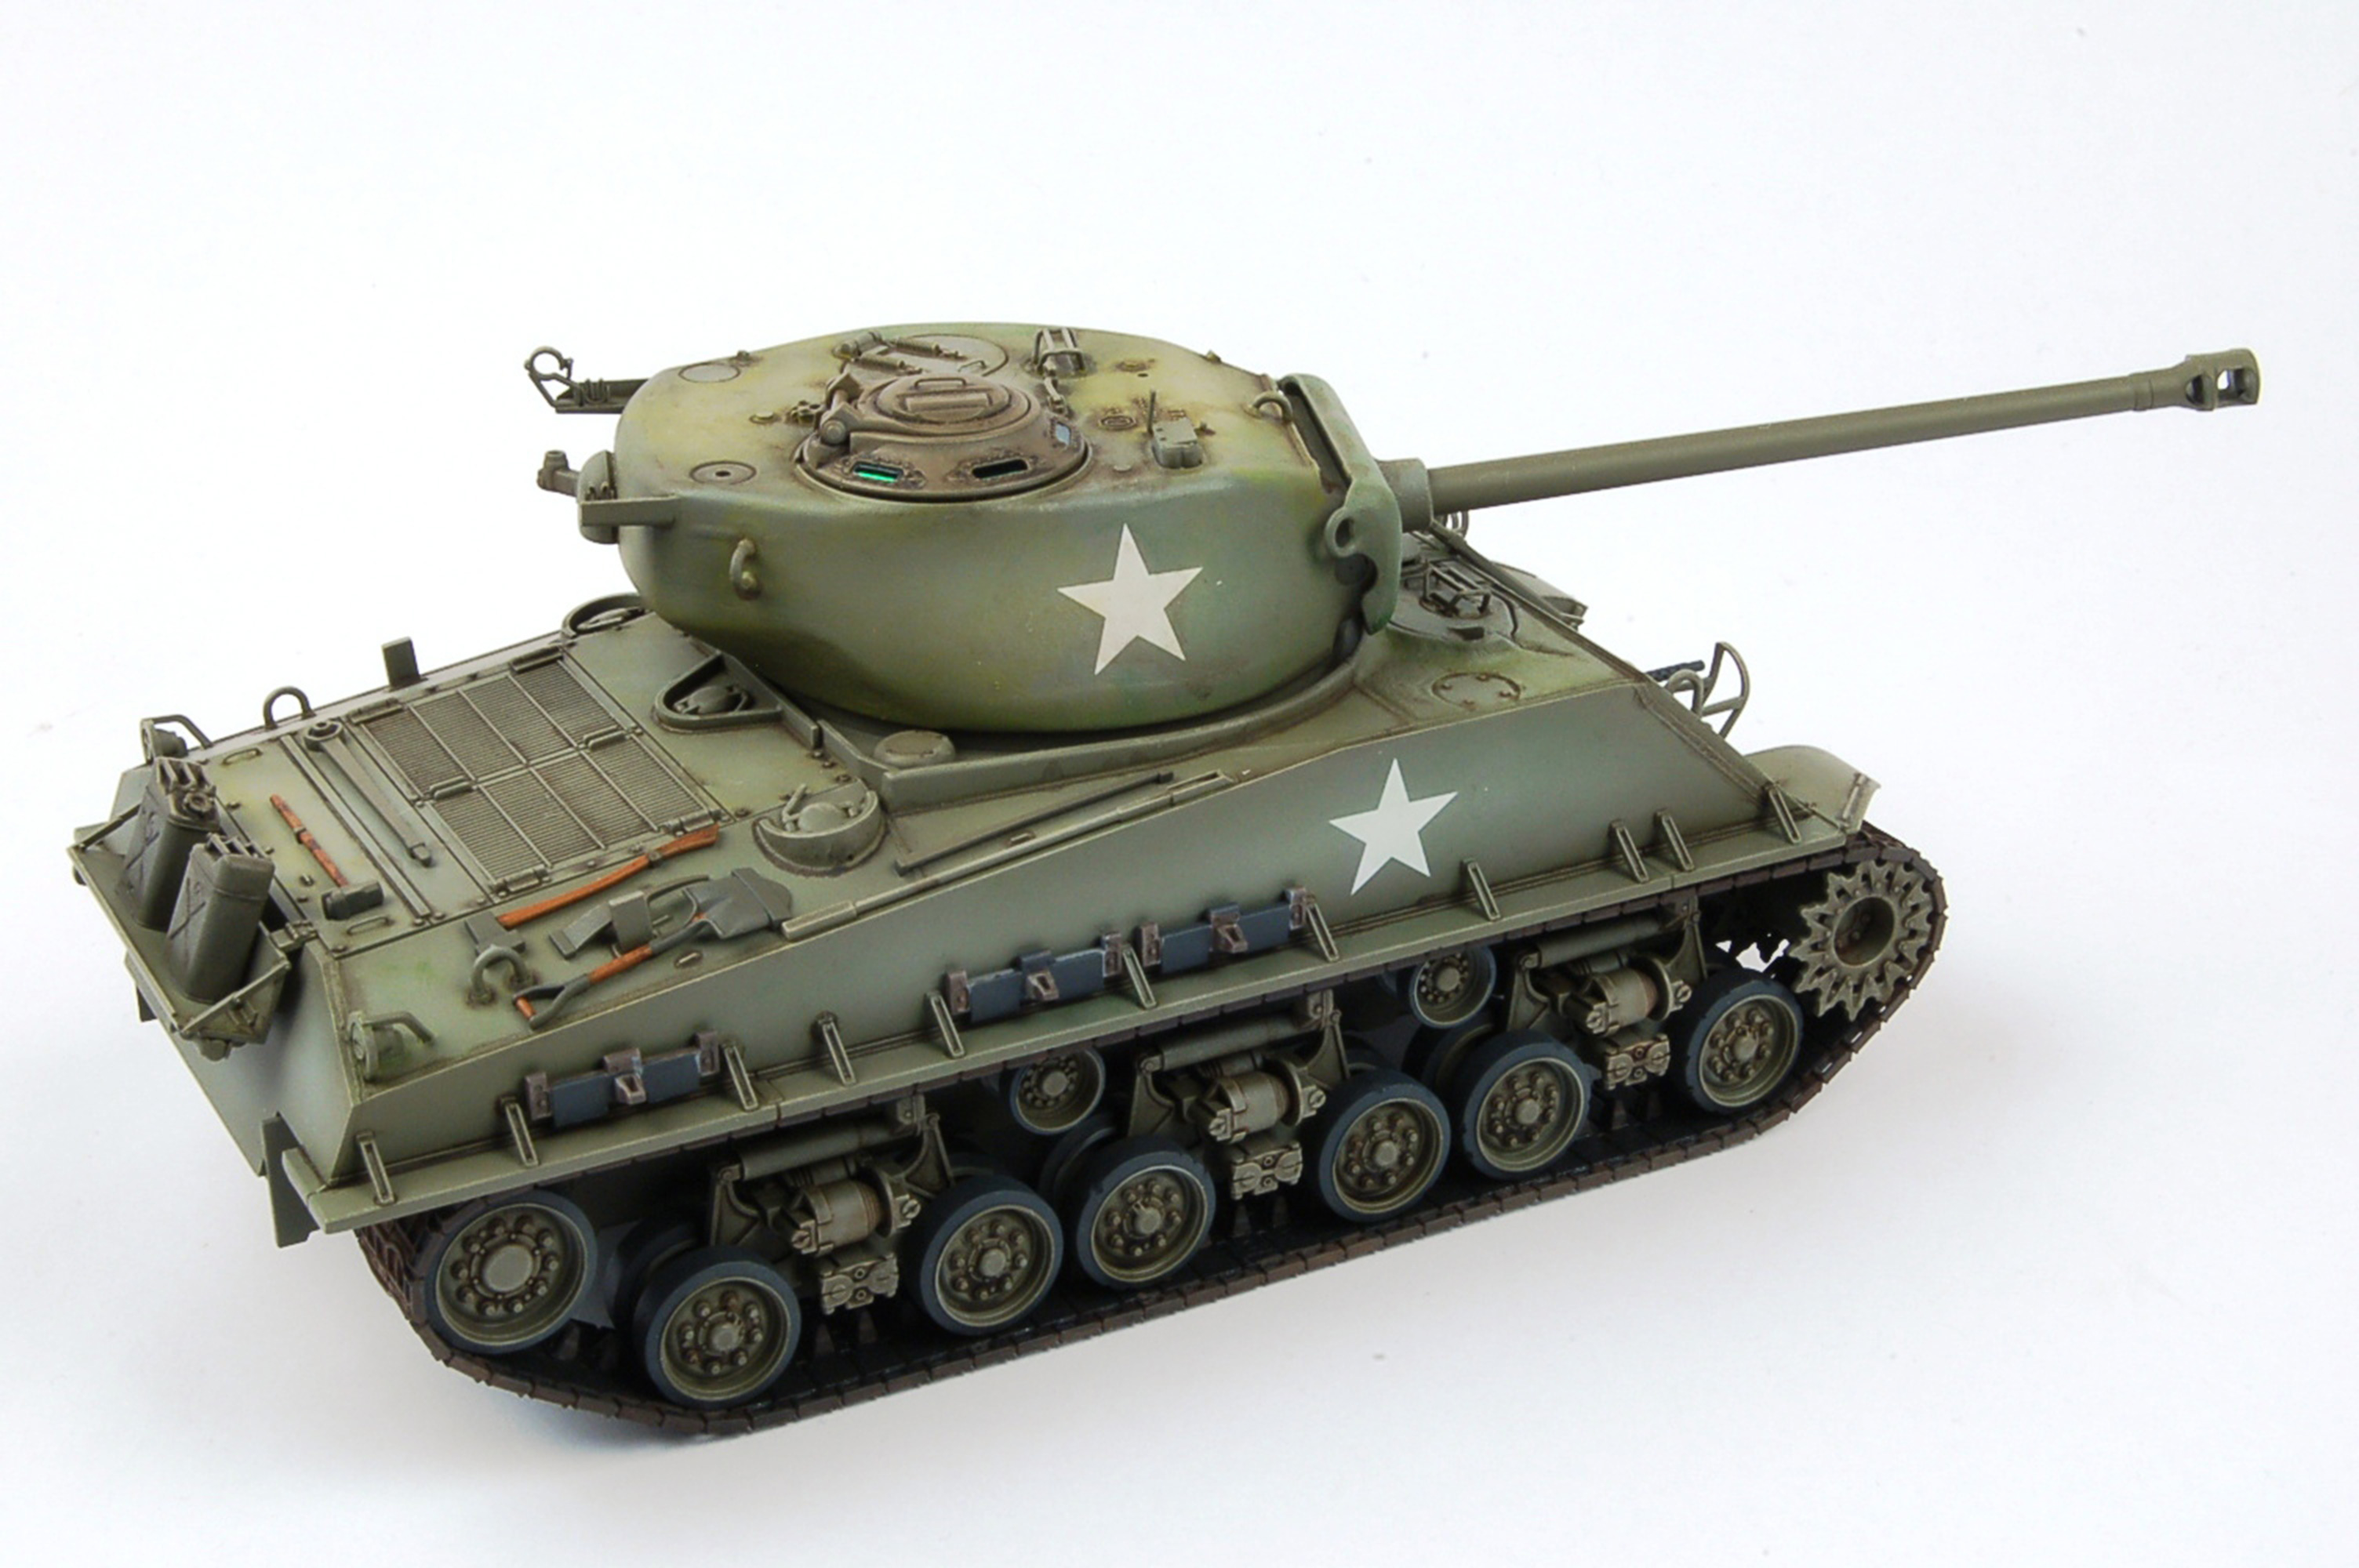
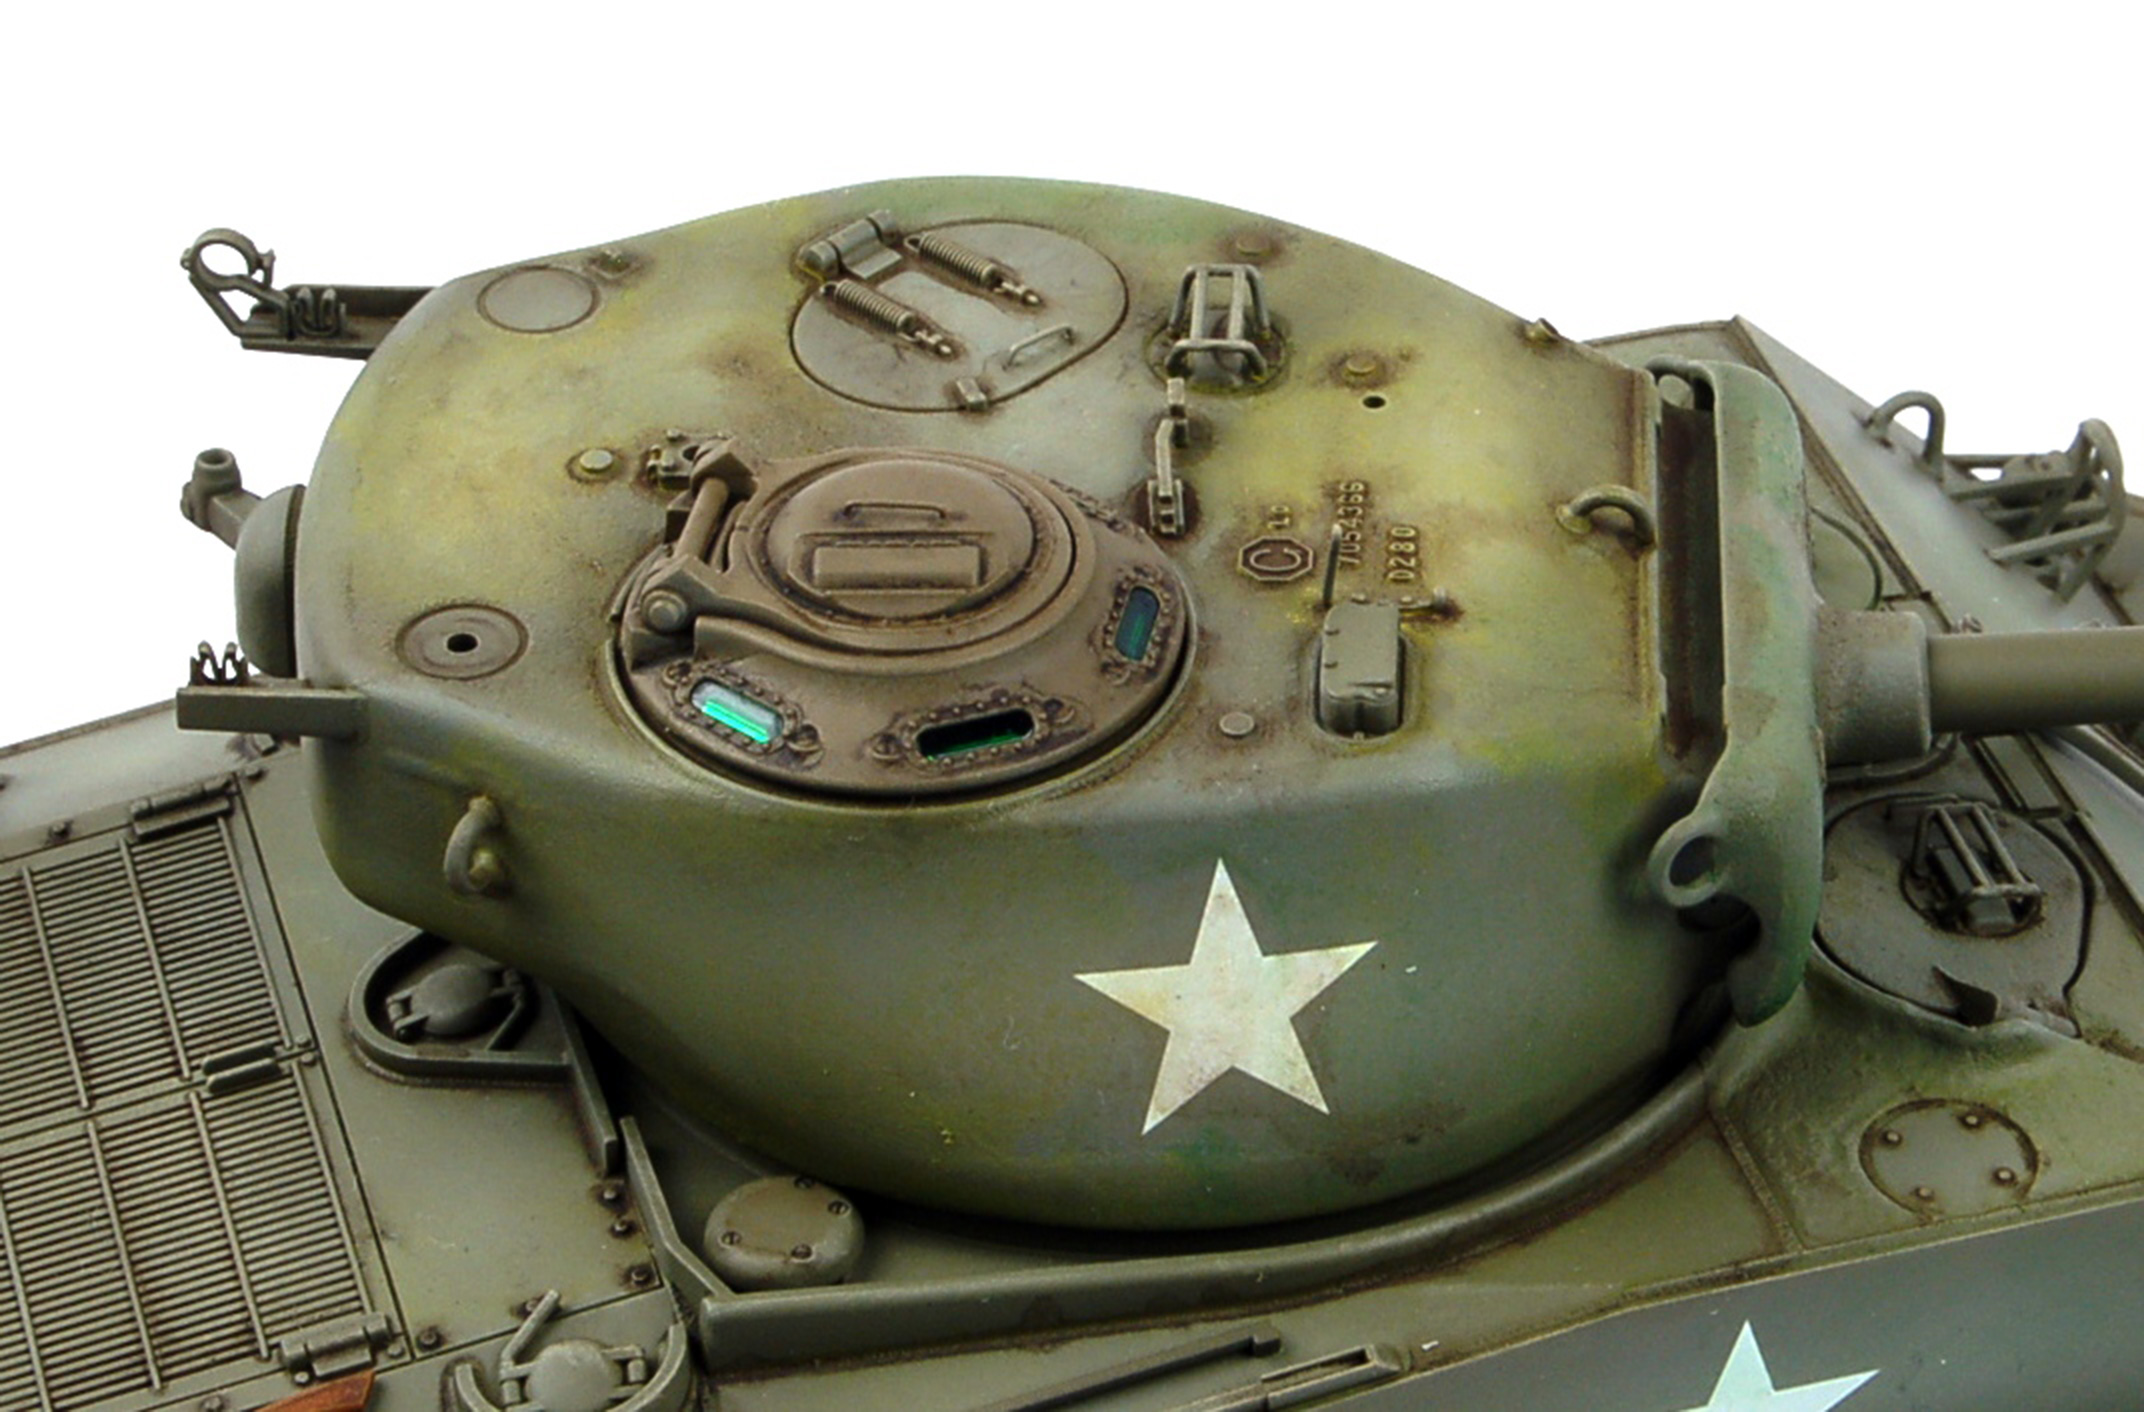
The turret assembly comes next, and this consists of two main parts, upper and lower, parts K1 and K3. The cast effect detail is excellent, and there is nice representation of the foundry casting numbers/lettering as well. The rotating commander's cupola is well detailed, with the armored vision glass being six separate clear parts. The cupola hatch has a separate periscope part to it, but curiously there is no option on the hatch to show the periscope in the up/deployed position? Tamiya includes a nicely detailed four part commander's figure, molded from the waste up, to position in the cupola should the modeler wish. The loader's hatch is also a separate part which can be deployed open or closed, and like the commander's hatch, is minus a grab handle other than the dreaded “lump”. There is also only one figure in the kit, and there isn't any interior turret detail, so having the driver's hatch open would present the problem of staring into a black void.
The main gun in the kit has a single piece plastic barrel, so there aren't any issues with lining up two barrel halves as with many kits. The muzzle brake on the end of the gun is a three part affair. Careful sanding of the barrel and the muzzle brake is necessary to remove the seam line on both. The turret option of a deployed .50 machinegun is also available. The machinegun itself is a two part affair, with a main body, and a separate rear handle. Detail is acceptable, though there is an ejector pin in an awkward place that needs careful sanding out. The gun also had a solid barrel opening, which needs careful drilling out for the best effect.
The kit comes with only two color and marking options, and both are about as boring as you can get. Scheme A is “5th Armored Division, Germany, April 1945”, and consists of five white stars: hull sides, turret sides, front transmission housing. Scheme B is “4th Armored Division, Bastogne, Belgium, January 1945”, and this consists of four stars: one on each side of the hull, in white, while the two turret stars are green. That's it. SURELY Tamiya could have found a scheme a little more interesting? Both vehicles are overall Olive Drab.
Painting and Weathering
I painted the model in a series of sub assemblies: Hull, minus road wheels and bogies, turret minus main gun, main gun, separated wheels and drive sprockets, bogies. On board tools and turret machine gun were also kept separate. All the parts were carefully washed with warm water and dish washing liquid, to remove fingerprint oils, mold release agents and sanding dust and debris. Once all these were completely dry, I applied a black primer overall. I utilized Vallejo's acrylic polyurethane black primer, mixed with Vallejo acrylic thinner and a few drops of their airbrush cleaner. This was recommended at a seminar I attended run by a Vallejo rep at an IPMS USA National Convention a couple of years ago. It keeps the airbrush tip from crusting up; in fact I haven't had any clogging at all with Vallejo acrylics since I started including some airbrush cleaner. The black primer takes fully three days to cure fully, but once cured, it really is quite resilient. Once cured, I then applied a base coat of Vallejo's Olive Drab acrylic polyurethane primer. This actually is the best deal going when it comes to olive drab acrylic paint as their 60ml bottle is only 1.5 times the cost of a 17ml bottle. For a color like Olive Drab, which I use by the bucket full due to my love of WW2 US military vehicles, a good deal as I say.
I then added a little sand yellow to the OD, and did a bit of post shading. The decals where then applied over a clear coat of Tamiya X-22 acrylic gloss. The decals are typical Tamiya: a bit thick, but when sealed under a few overcoats of more clear gloss, are just fine. Then I used a technique I have read about numerous times, but never utilized. I picked out a series of yellow and green hues of oil paint, and put little dots here and there on the hull and turret surfaces, and then “blended” them with brushes dipped in odorless mineral spirits. The colored dots of oil paint become translucent, giving a slightly different hue to the surface. It certainly makes for a more interesting surface than simply straight Olive Drab, and for a first attempt, I like the effect it produces. I am encouraged enough to keep experimenting with this technique. Once the oil paints had a chance to dry, I applied a sealing coat of Vallejo matt clear to seal the surface. The on board tools were hand painted with Vallejo wood for the handles, having already been airbrushed Olive Drab along with the rest of the model parts earlier in the painting process. Once dry, a thinned layer of Vallejo “Smoke” was applied over the wood colors, giving a very nice overall look to the tools.
Regarding the single piece rubber band tracks: I have read on a number of forums that the chemical compounds used for such tracks MAY be susceptible to being chemically attacked by the more harsh solvents out there on the market used to thin model paint. In particular enamel and lacquer thinners. Not wishing to risk having my tracks disintegrate on me months or years down the road, I now always prime the rubber band tracks with Vallejo acrylic polyurethane black primer prior to applying enamel washes on them.
Overall then, this is yet another great Tamiya product. “Tamiya” stands for model parts with good detail and that are well molded, and which all fit together with little mess or fuss. The instructions are always easy to understand, and you end up with a great model that you can be proud of. This kit epitomizes what modelers have come to expect from the Tamiya brand name. With a few simple additions like the grab handles I made from copper wire, a great model results. I HIGHLY recommend this model kit for anyone seeking an “Easy 8 Sherman” for their 1/35th collection.
Conclusion
Overall then, this is yet another great Tamiya product. “Tamiya” stands for model parts with good detail and that are well molded, and which all fit together with little mess or fuss. The instructions are always easy to understand, and you end up with a great model that you can be proud of. This kit epitomizes what modelers have come to expect from the Tamiya brand name. With a few simple additions like the grab handles I made from copper wire, a great model results. I HIGHLY recommend this model kit for anyone seeking an “Easy 8 Sherman” for their 1/35th collection.
Photos