Reviews
Armor
Sd.Kfz.179 Bergepanther Recovery Vehicle
by Eric Christianson
 Model: Sd.Kfz.179 Bergepanther Recovery Vehicle
Reviewed by: Eric Christianson, IPMS # 42218
Scale: 1/35
Company: Italeri
Price: $37.99
Product/Stock #: ITL285
Website: Italeri
Product Web Page: View
Product provided by: Italeri
The Italeri Bergepanther Kit # 285, originally released back in 1995, is still standing sentry duty as the only injection-molded set of sprues for this Panther-based German tank recovery vehicle readily available. The model has gone through a number of updates and improvements since, culminating in what you see reviewed here. After all this time, however, Italeri’s offering ‘still has it goin’ on’, sporting a relatively detailed engine, transmission, and winch/cable assembly; all housed in a decent Panther A chassis. One heck of a value, and still the only game in town.
The Sd.Kfz. 179 Bergepanther Armored Recovery Vehicle (ARV) first began its development between 1942 and 1943 to fill a need for a heavy duty tank recovery and engineering vehicle. This need came about with the introduction of German heavy armor such as the Panther medium tank and Tiger heavy tank, which generally required up to three SdKfz 9 Famo half-tracks, compared to the single Famo needed to recover a Panzer III or Panzer IV. The heavier Tigers (at the time) were valued higher than Panthers, and built in smaller numbers, leaving the Panther as the preferred base for the new armored recovery vehicle. These vehicles produced by MAN were subsequently shipped off to serve during the Battle of Kursk and in various other battles until the end of the war. Two to four Bergepanthers were allocated to each heavy tank unit making up for a total of around 330 vehicles produced during the war.
Opening the box
After building newer kits with hundreds and hundreds of parts, photo-etch sheets, brass barrels, and multi-part track links, opening the Bergepanther box was breath of fresh air.
The build, I knew, would be complex because of its open-topped aspect of the vehicle design, but a breeze when it comes to parts count. The plastic is soft, free of flash, and reasonably detailed. There are some visible ejection pin holes that will need to be filled and/or covered with weathering, but that’s about it.
The contents of the box include:
- 3 sprues in soft, light yellow plastic, packaged in separate bags
- 2 sprues of metallic gray nylon track sections
- 1 10-page black and white instruction sheet with 17 steps
The kit comes with two finishing schemes represented using black and white ink three-view drawings, and a small (but perfectly registered) sheet of two Balkenkreuz decals. These schemes include:
- German Army – Winter 1944 (Overall German Tri-color)
- German Army – Winter 1944 (Overall German Yellow)
The Instructions
Italeri instructions contain an introduction written in six languages (including English) and describe the assembly steps using symbols only. Paint color callouts only list paints from the Italeri Acrylic Paint line, but Federal Standard (FS) paint codes are listed as well. The black and white, exploded-view images are clear, relatively uncluttered, and free of errors.
Things to consider before starting:
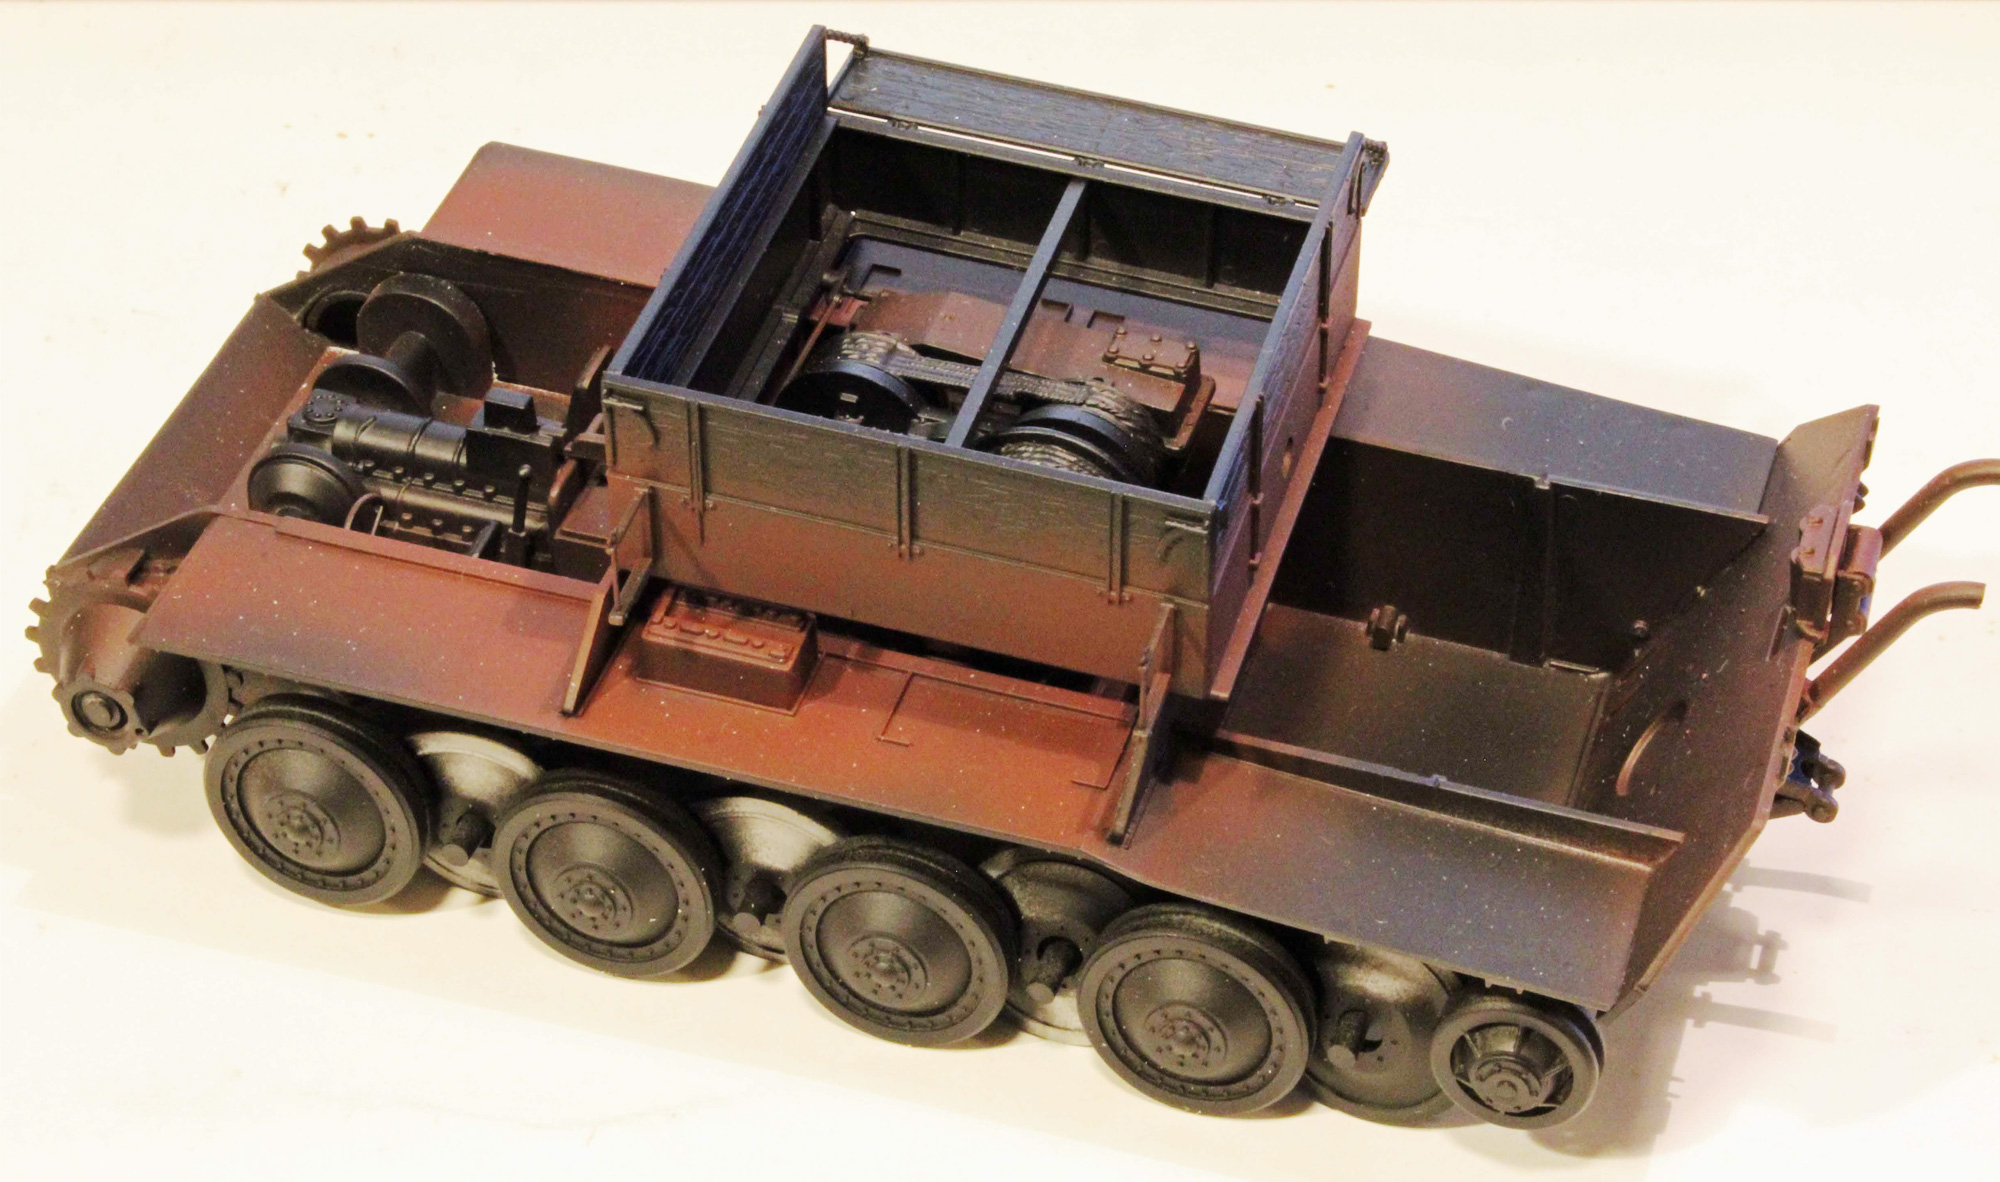
This is an open-topped vehicle, meaning that the ‘build it all and then paint it’ approach might not be the best course to take. The busy interior includes a crew compartment forward, a winch drive section in the center, and an engine section, aft. All are reasonably detailed and would serve as a good start for super-detailers. The rudimentary transmission up front, part of which is visible through the open top doesn’t benefit from a hatch of any kind, unfortunately. With all that’s going on, it’s easy to forget that this is, in all respects, a Panther tank after all.
At the rear of the vehicle, the engine is dropped into a cavity in the hull (a novel design) and can be exposed by modeling the engine hatch in its open configuration. There is a tow cable that extends from the winch, through the rear wall of the center section to the blade in the back – a design that will drive how you go about painting and weathering these areas.
The interior of the center and forward sections will offer limited access once the upper hull is in place, so you will need to do all the painting and finishing required for these two sections half-way through the build, before masking them off and continuing.
You will have complete access to the track, which can be attached any time, although with the fragile nature of the completed vehicle I chose to add the track early in the build, as instructed.
The upper portion of the center section and cable extending rearward can be dropped on at the very end, after painting and weathering. No tow cables are included in the kit; you may want to add a set from your spares.
The Build
Lower Chassis, Running Gear and Fenders
Due to the low parts count, the lower chassis of the Bergpanther is a breeze compared to some of the other German AFV’s I’ve built. Steps 1-4 take you through the assembly of the lower chassis, running gear and track. On the built model, the inner two layers of wheels are, for the most part, hidden by the outer layer of eight wheels, 4 on each side. Consequently, I left the outside layer off to be painted and weathered separately.
Late in the build I found one set of wheels standing just proud of the others – I should have checked my work more carefully before the glue set.
The Track
Italeri has included four medium-length runs of nylon track, two for each side, that are supposed to be held together using a hot knife/screwdriver. The track itself is reasonably detailed on both sides and appears to take (Tamiya) paint just fine, but it won’t take adhesive, so I decided to use a spare set of Panther track for the build since I wanted to include a little track-sag on my model.
Normally when I have access to the area under the fenders I leave the track off until the end of the build. On this vehicle, however, with all of its fragile detail added later, I thought it best to follow the directions and paint, weather and attach the track up front.
Interior
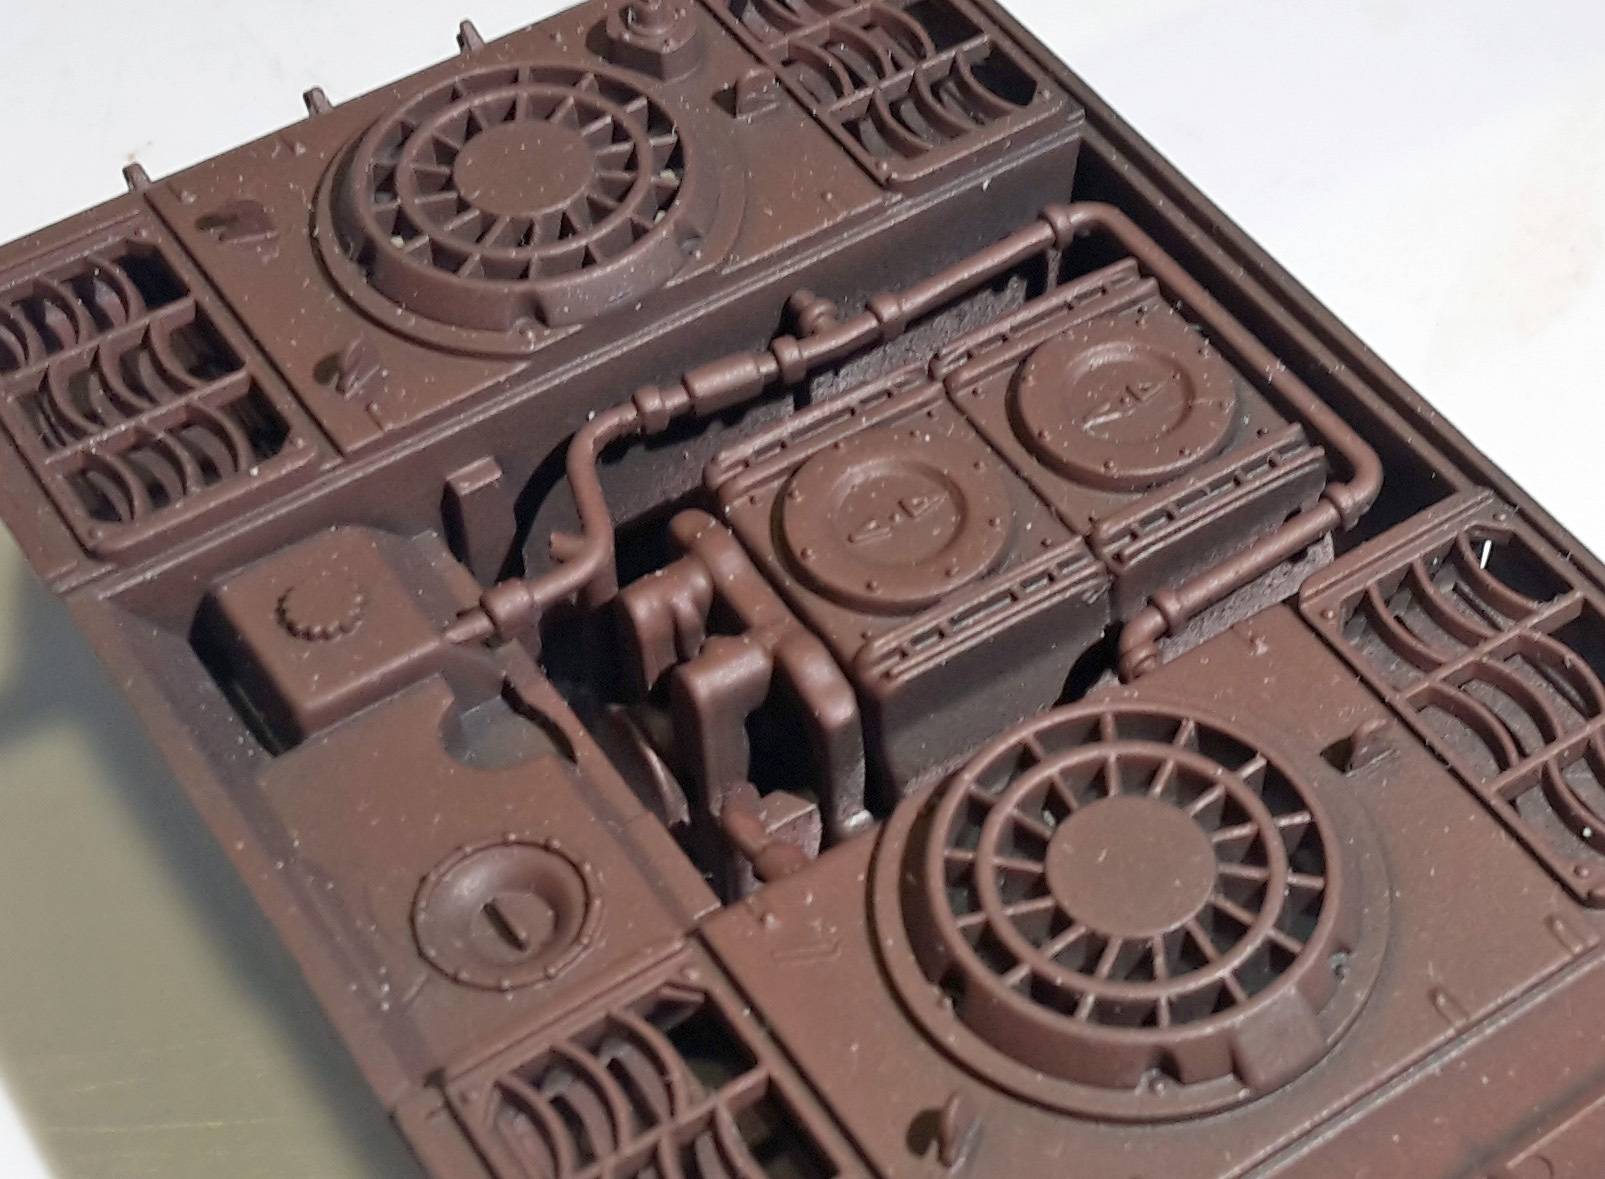
The busy Bergepanther interior is generally divided into three sections, the front and center sections are assembled, painted, and weathered before dropping the upper hull down onto the chassis, while the engine compartment in the rear is cleverly rendered as a large cavity in the upper hull. Most of the detail in all three sections is visible in the final model, although you can choose to close up the engine compartment with a hatch.
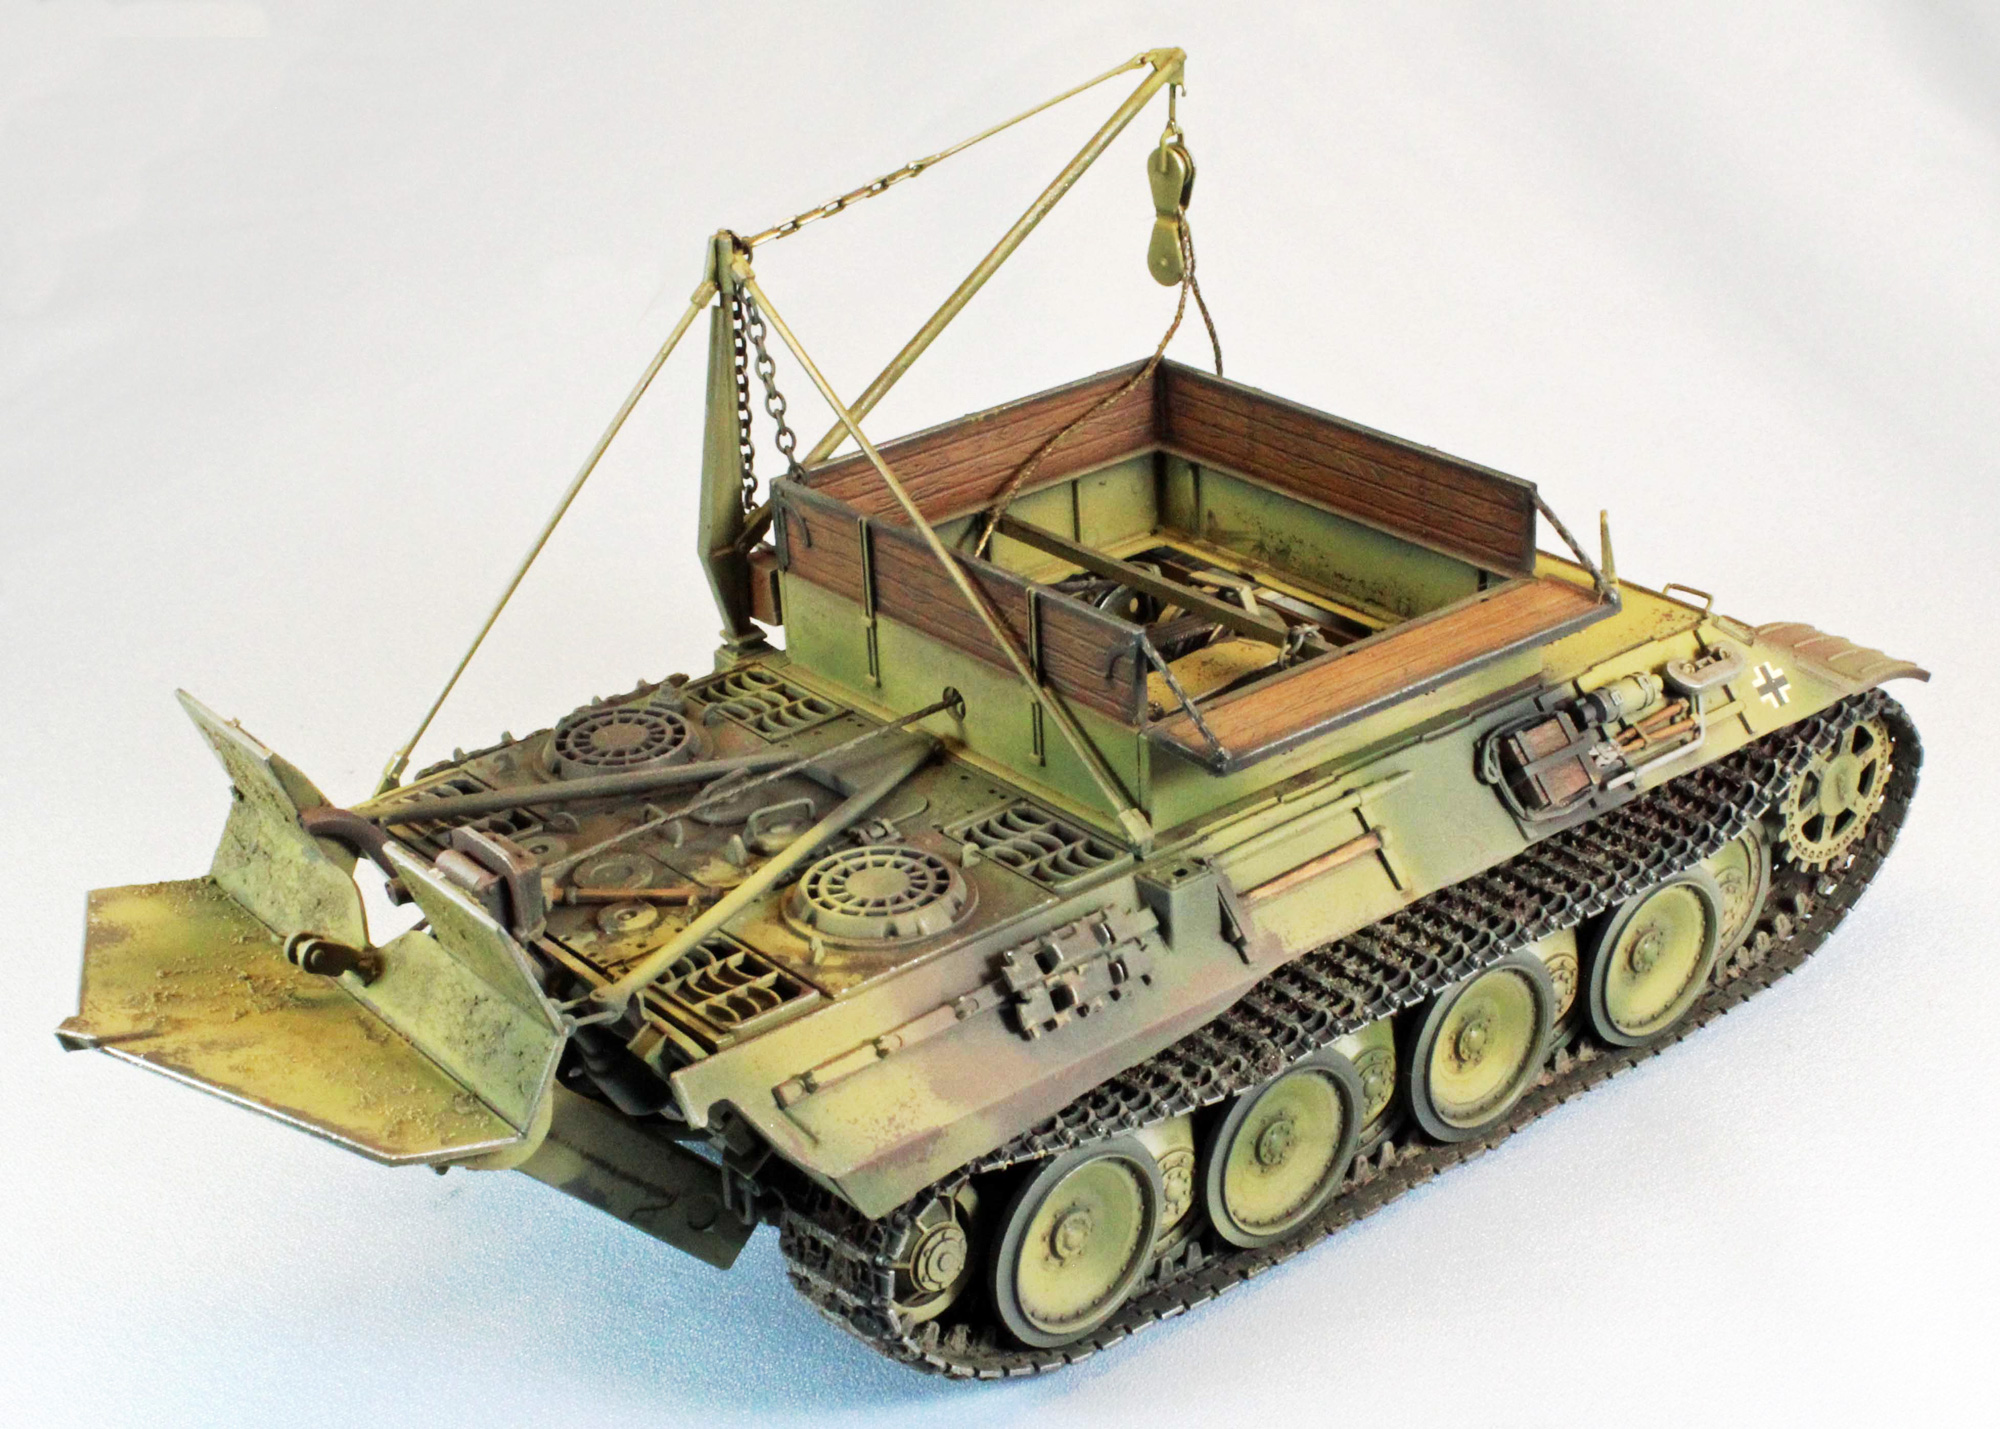
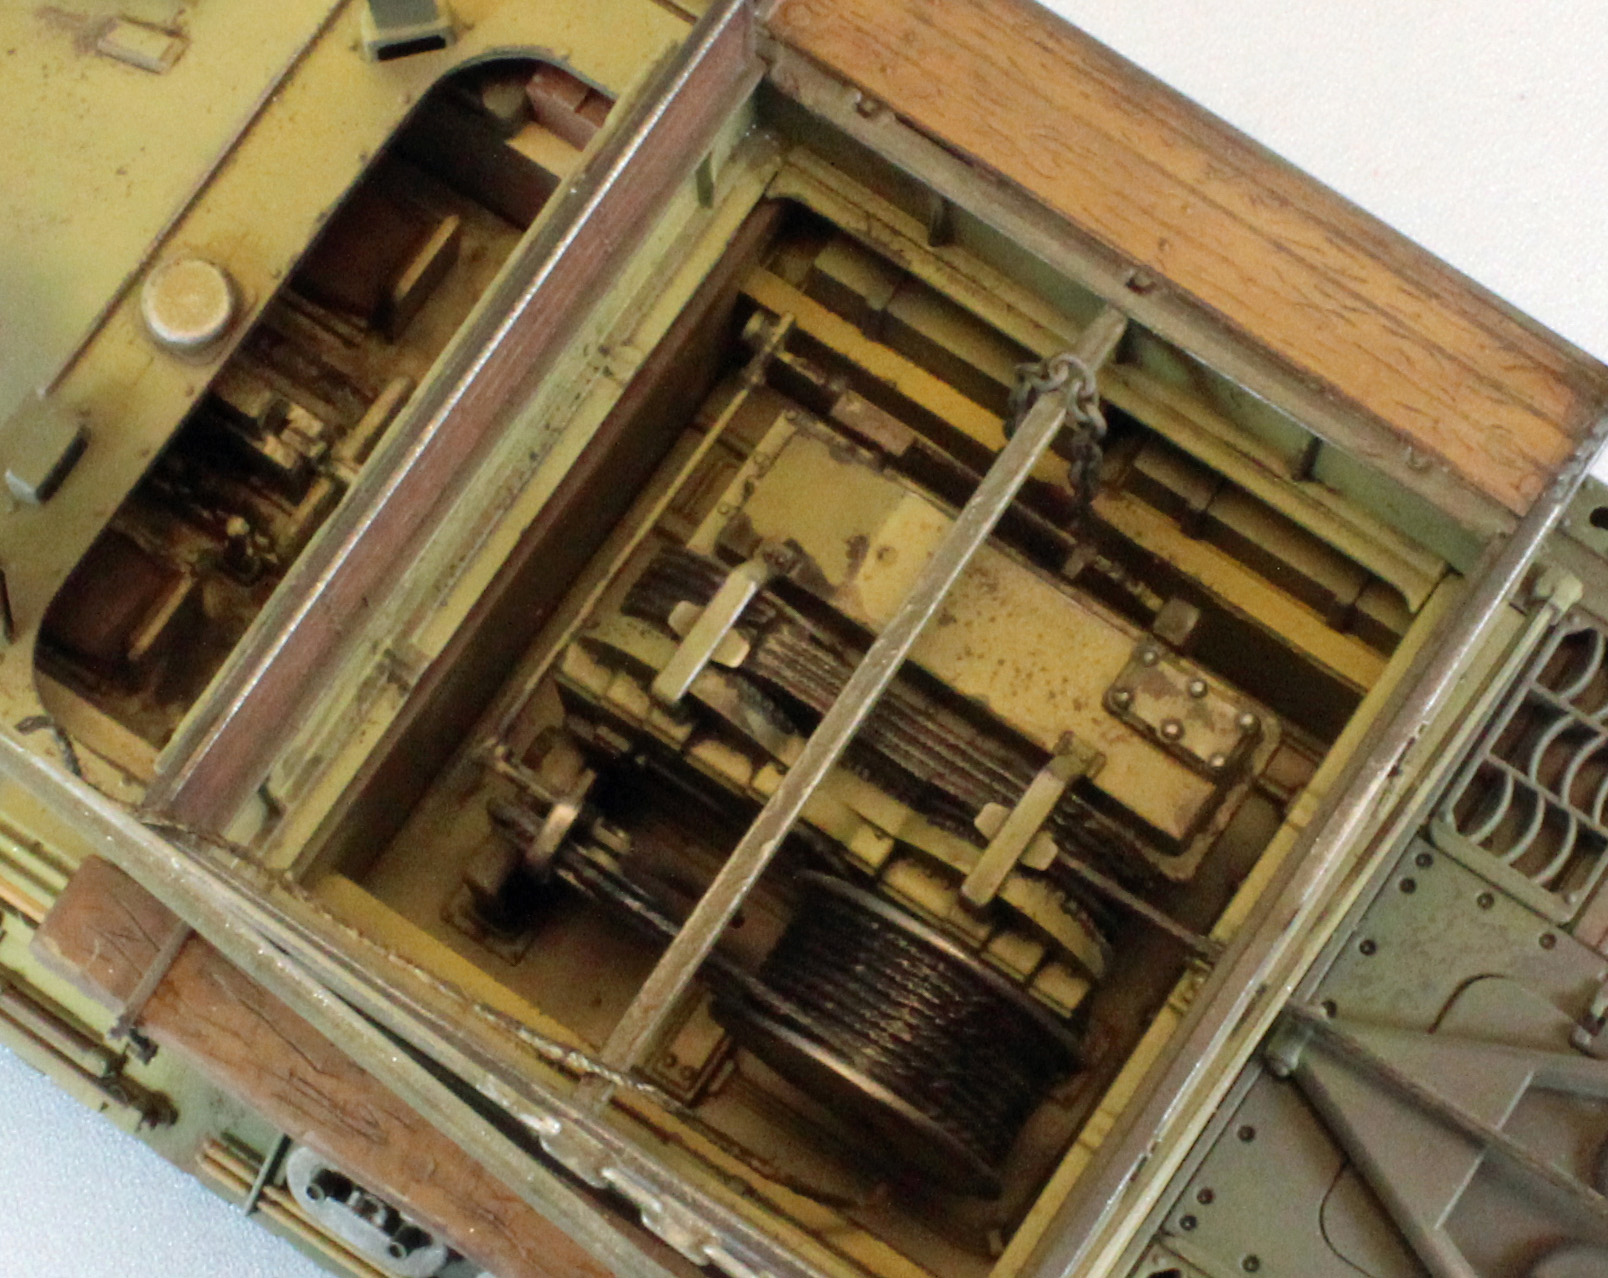
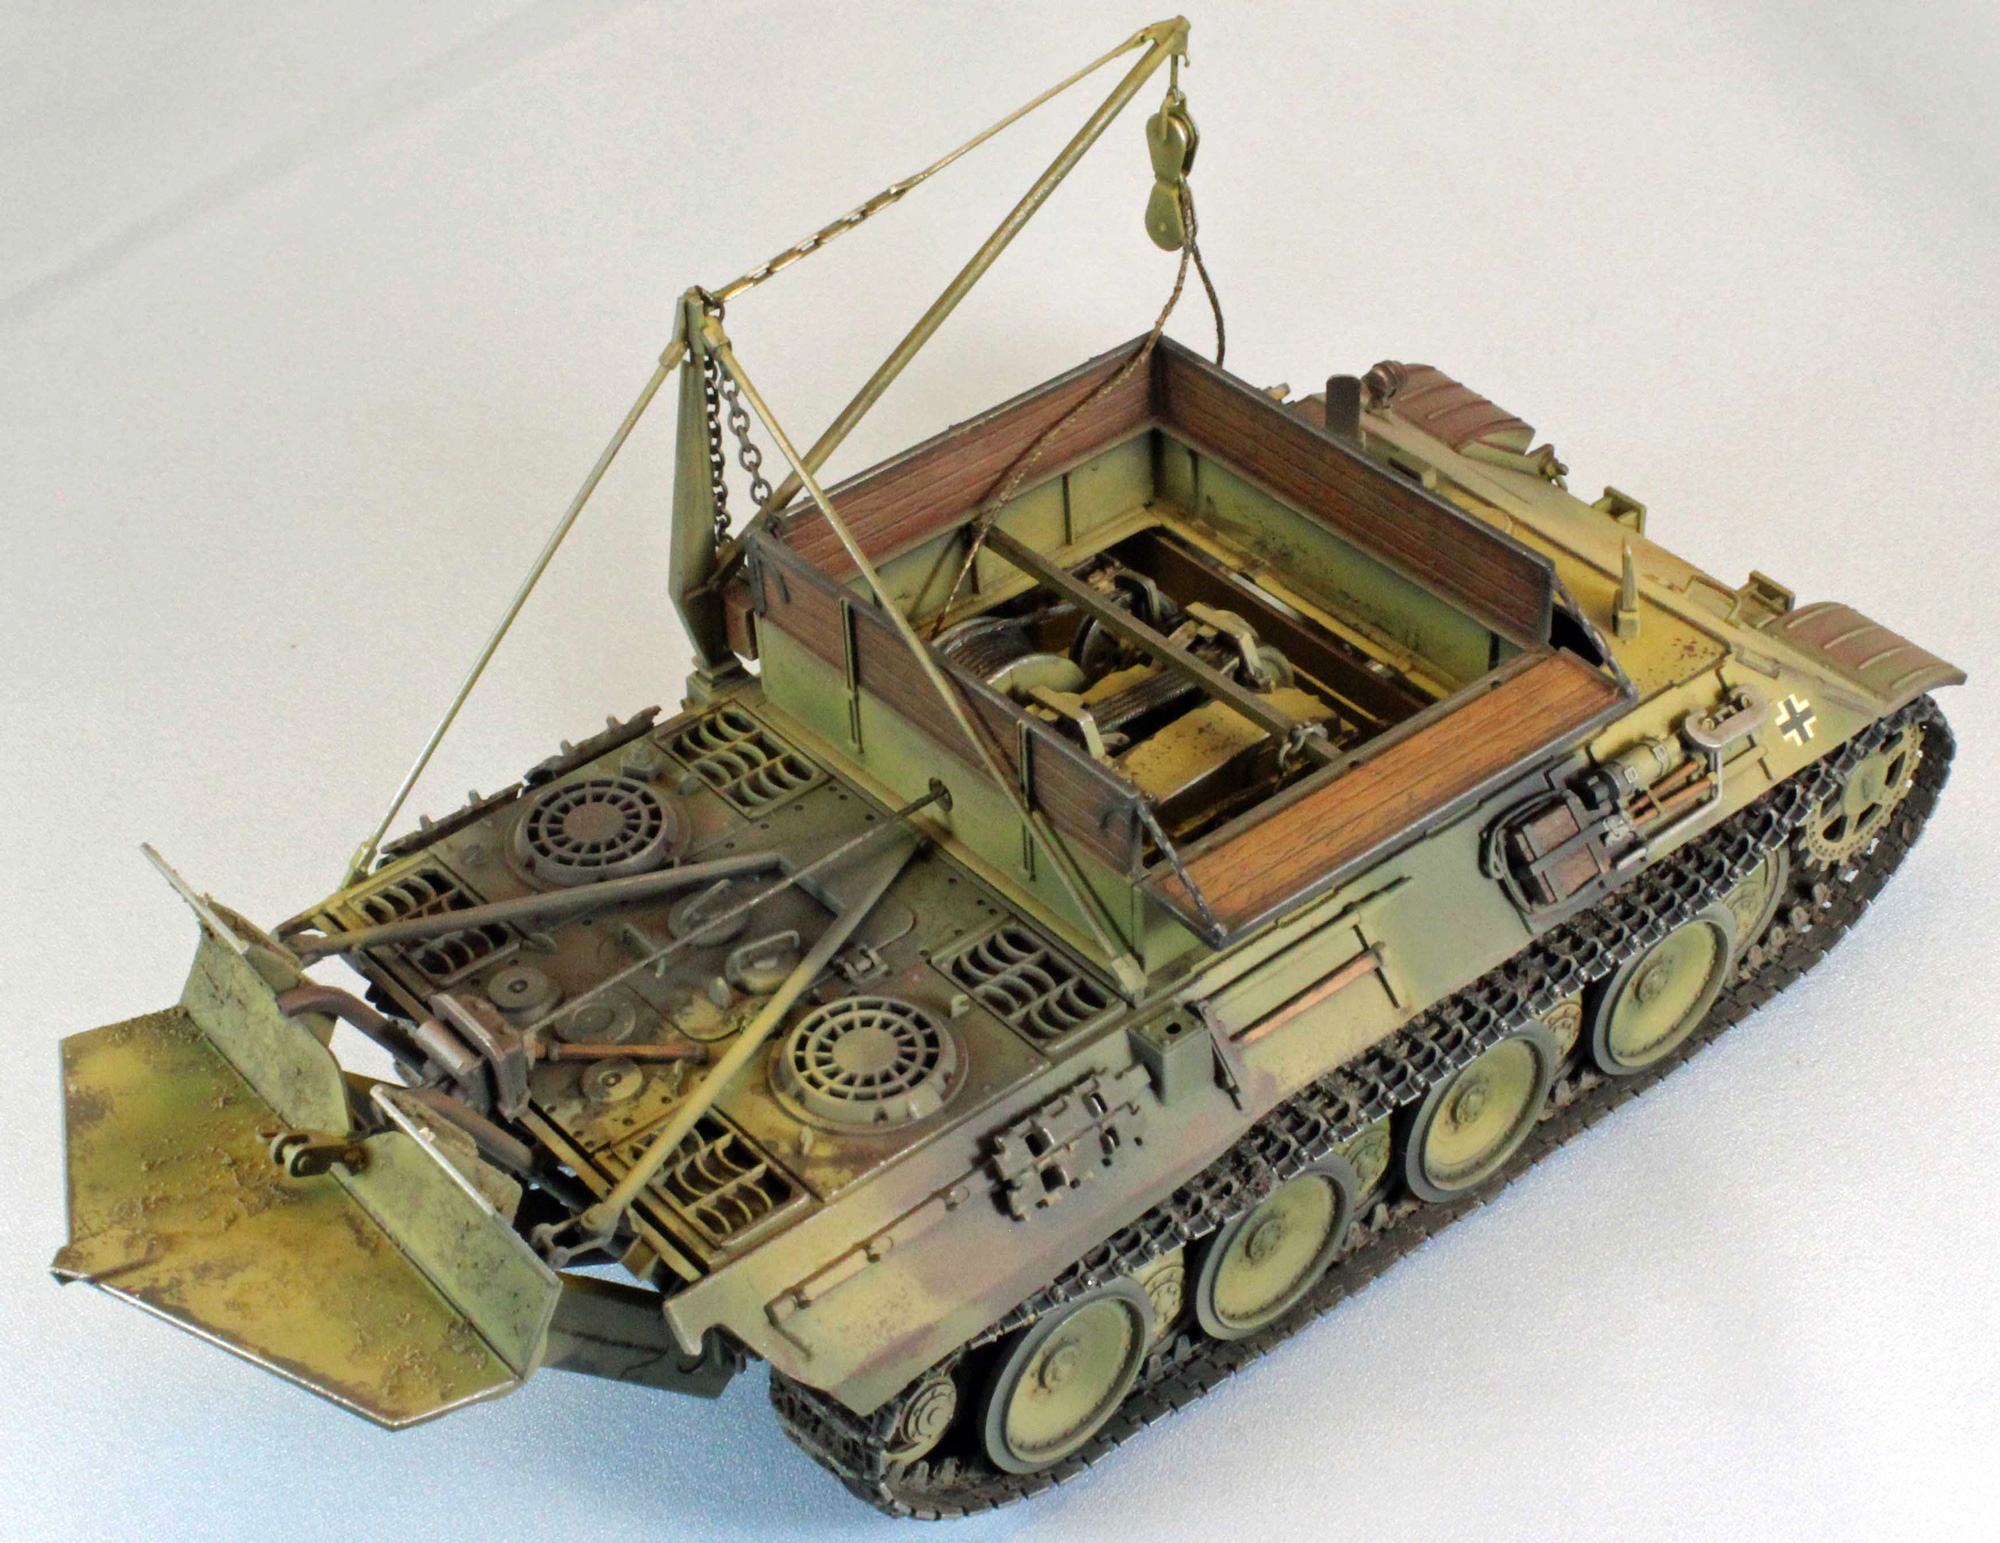
Center Section - Winch and cable assembly and Housing
The center section is easily the most interesting and will be where the eyes will be drawn on the finished model since it is also covered with an open, wooden superstructure. Italeri does a good job with very few parts in representing this busy assembly. What’s more, like the front section, the center section is completely assembled and painted as a single unit, and then dropped into the space between the bulkheads – a great design that assists in painting and finishing. The cabling looks pretty basic at first, and seems to be lacking the detail it should have, but once painted and weathered it actually comes alive. I think Italeri made a good compromise between ease-of-assembly and detail here.
I worked through Steps 5-8 before painting, save the three boxes (Parts ‘30c’) which I added after painting the inner bulkheads.
Forward Section – Crew and Transmission
The forward section is pretty rudimentary, but it is also the least visible on the final model. The horizontal surfaces that bracket the seats just inside the opening are empty so I added several boxes and other detail from my spares box to this visible area. Once finished, I dropped this assembly into the already-painted hull. Done and done.
Rear Section – Engine
Unlike the other two sections, the engine drops into a large cavity in the upper hull –a novel design that works well. The hatch, unfortunately, needs more inner detail to be left open so I decided to model it closed. I say unfortunately since the engine, once assembled, painted and placed into its ‘container’, looks pretty good – especially when you consider it only has three parts!
Main Deck and Rear Hull
Once I had all three interior sections painted and weathered to my satisfaction, it was time to drop the upper hull down onto the chassis. I had to poke and prod some of the edges into place, but once that was done, the fit was perfect. I masked off the front and center sections and moved on.
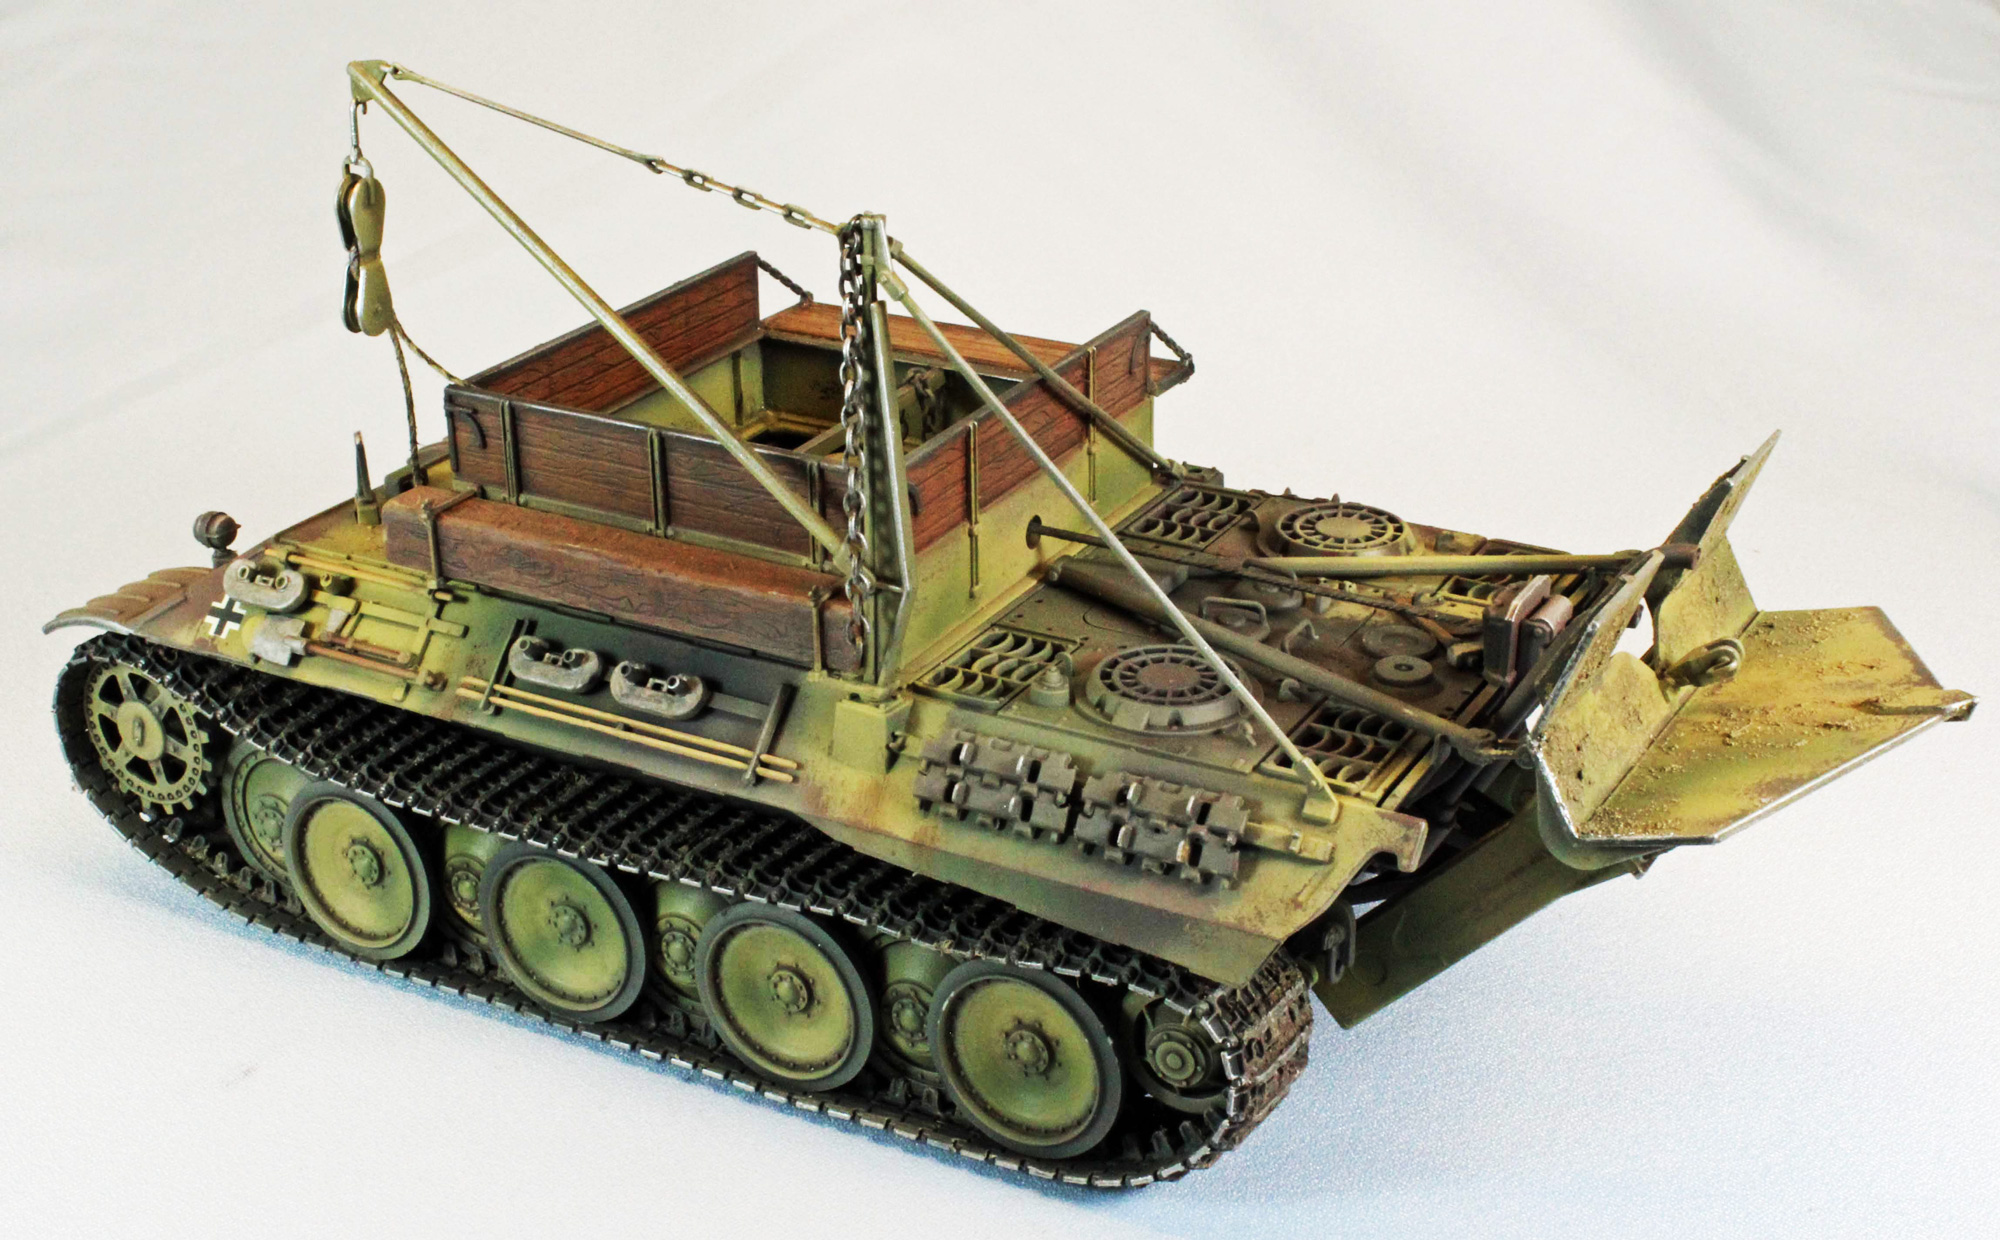
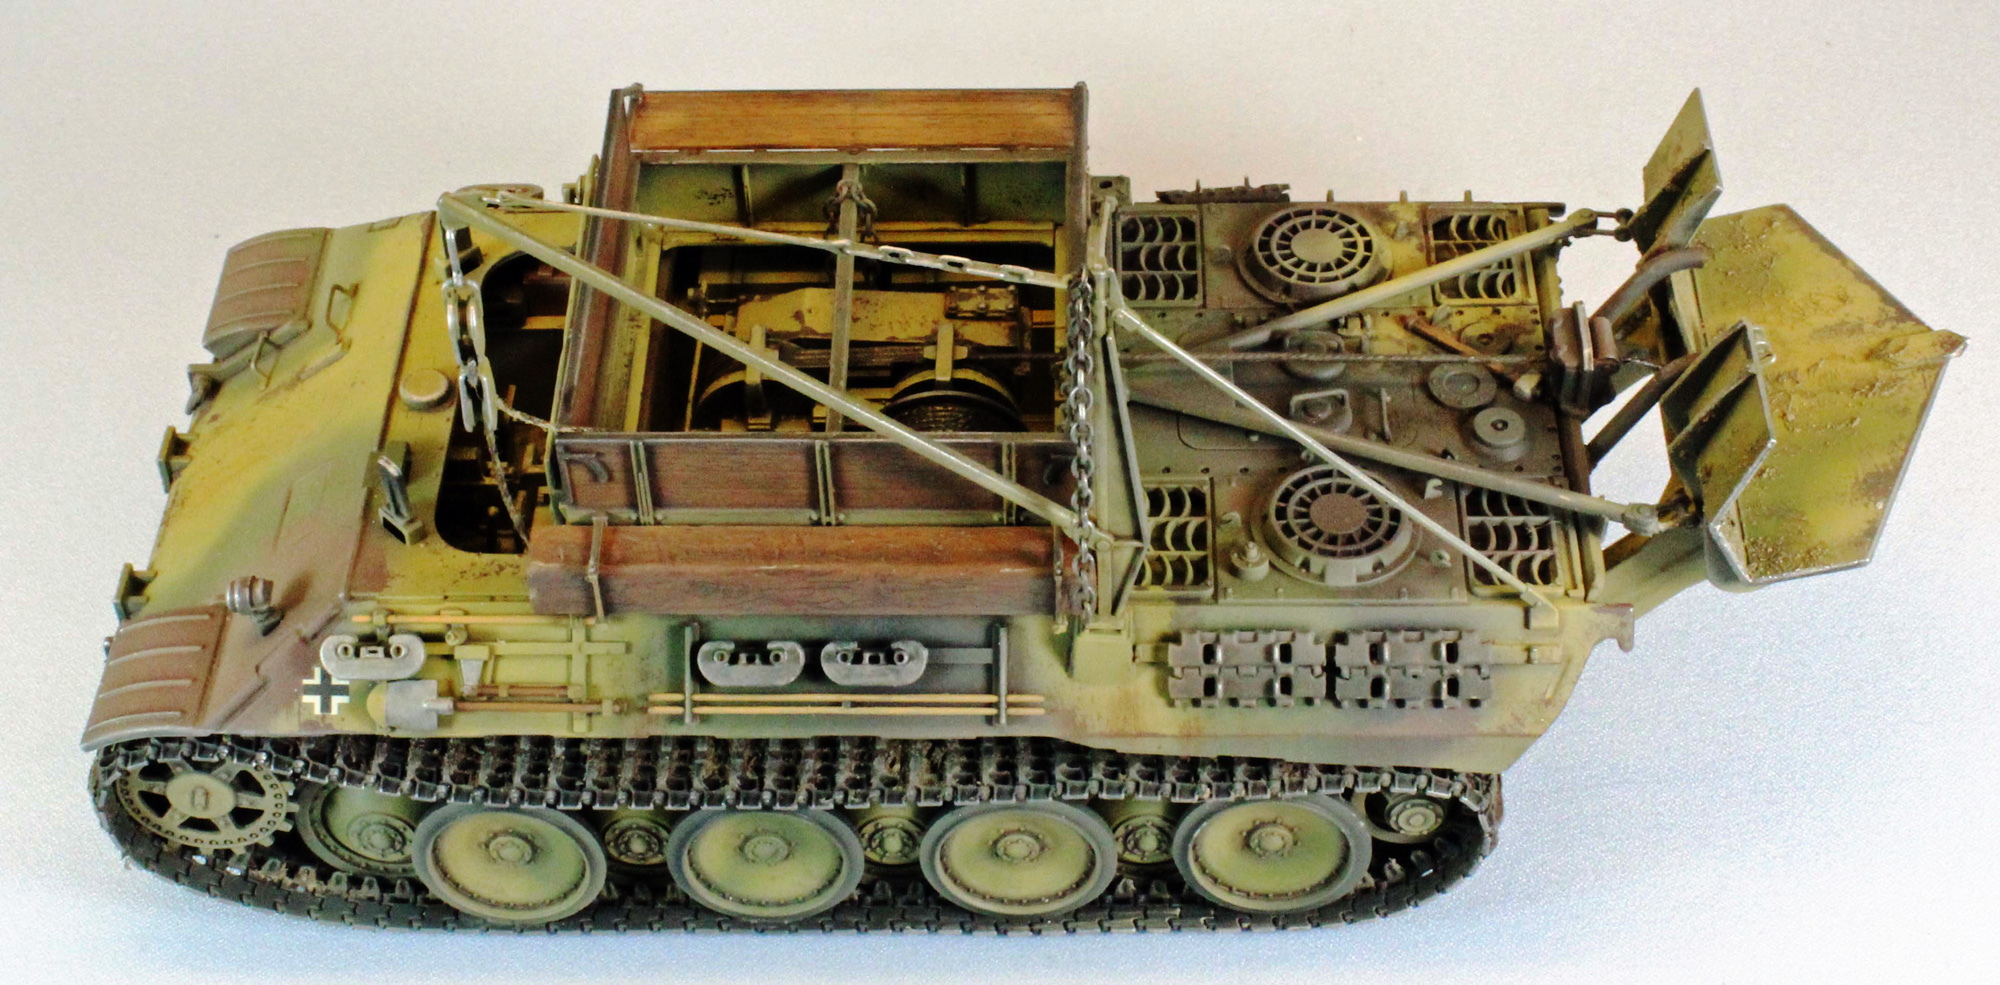
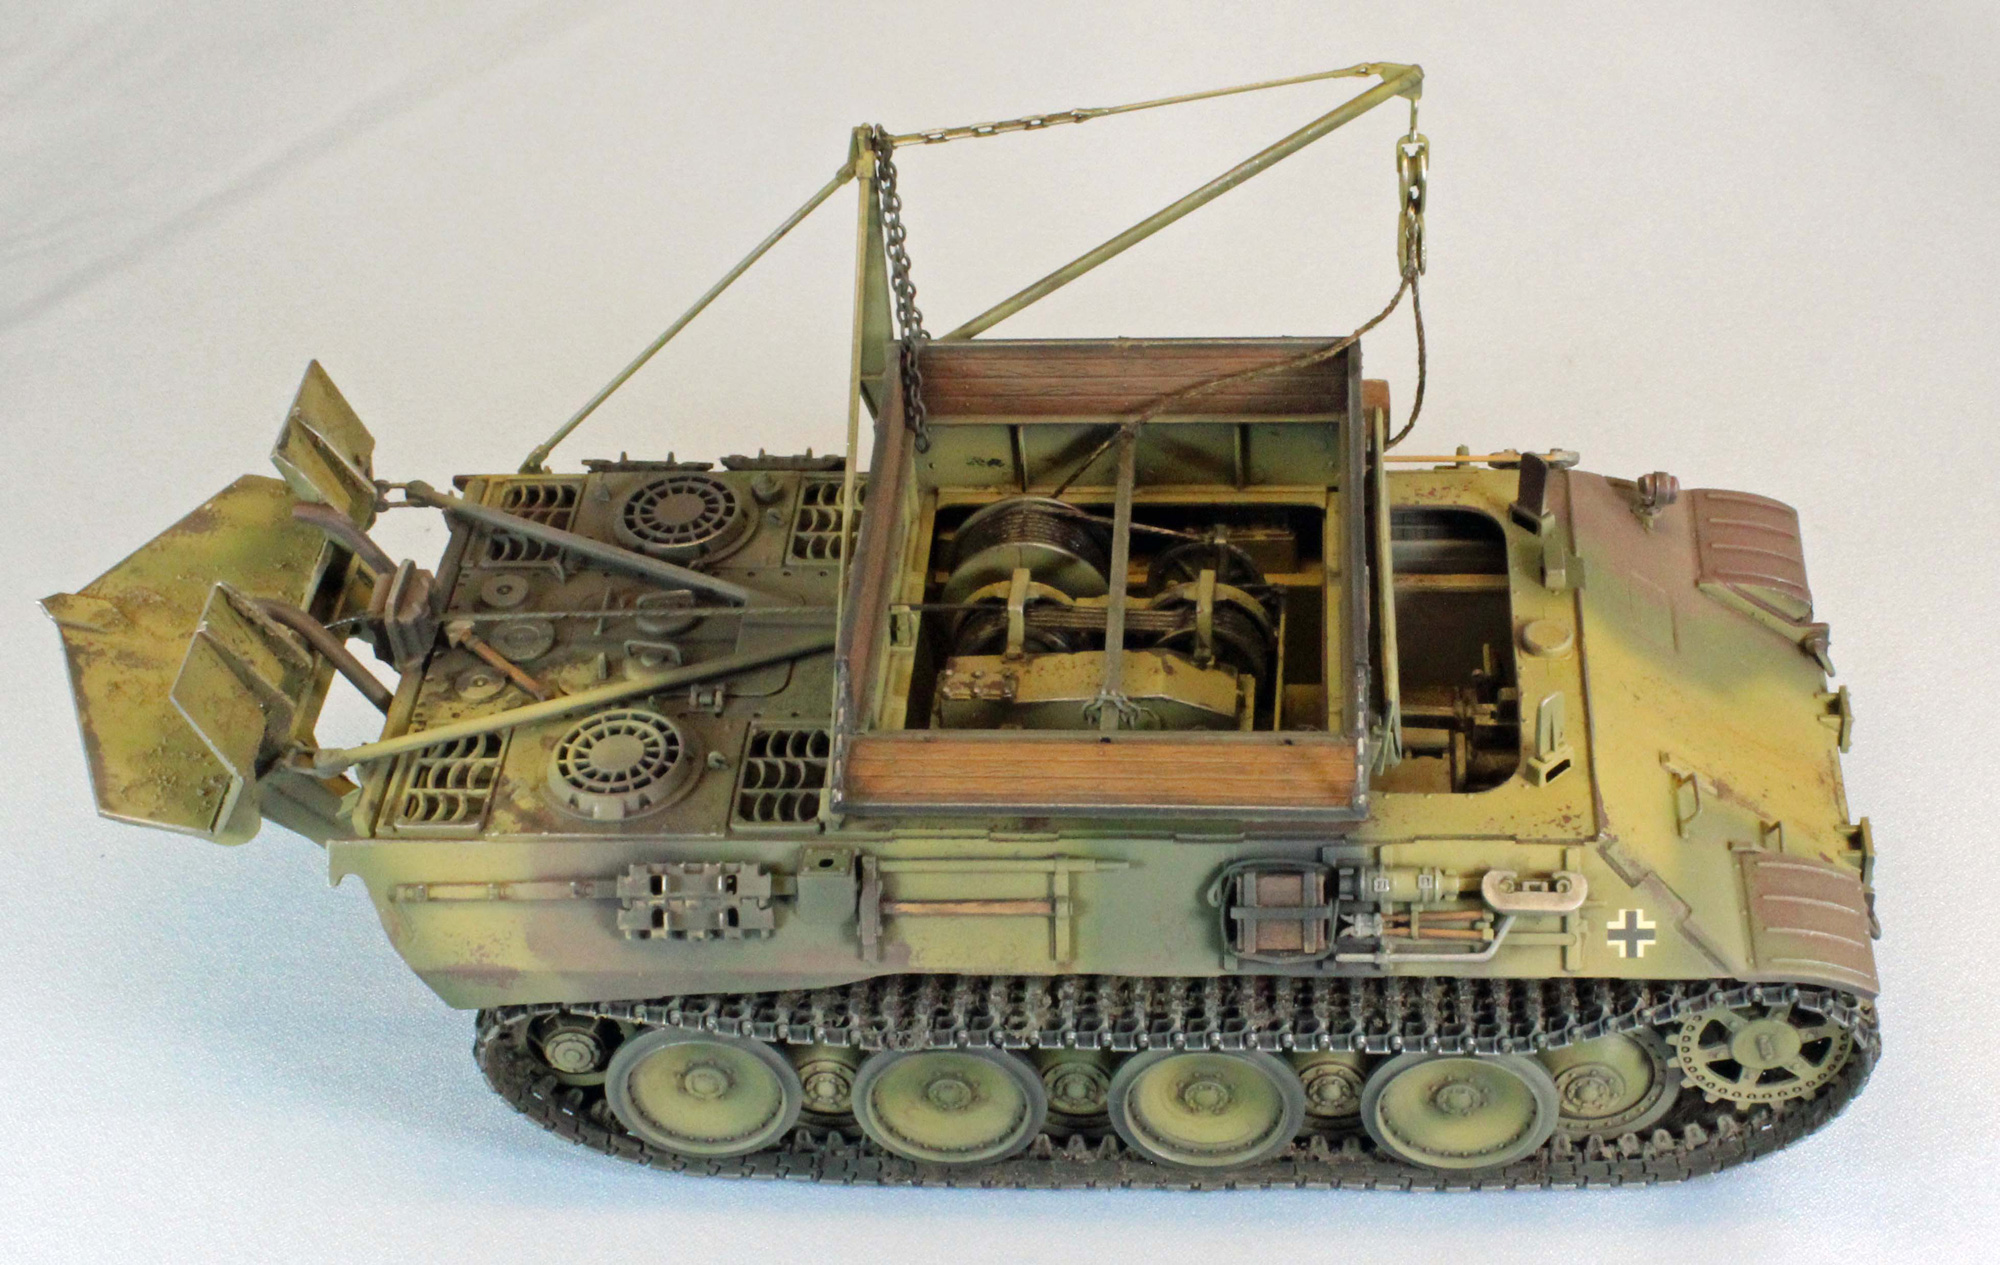
The fit of the multi-part wooden and steel superstructure is perfect, and once assembled, sits over the center section and requires careful attention to painting, lest it take away from the rest of the model. A large wood ditching beam is carried on the left side of the superstructure, slipping into exquisitely molded cradle from the side. Italeri faithfully renders the wood grain perfectly on this two-piece beam, as well as the other eight surfaces of the superstructure. Nice. A cable runs from the winch/pulley through this superstructure, back to the spade in the rear. In order to get all of that right, I chose to depart form the instructions and leave the superstructure (and cable) off until final assembly, finishing them separately.
The Bergepanther on display at the French Saumur Tank Museum has a 20mm gun used for self-defense attached to the front hull of the vehicle, and this is the vehicle Italeri chose to represent in their kit. The housing is cleverly designed and looks ok, but the single-piece gun is pretty basic, and I decided to leave the assembly off the model. I also felt the weapon, big and pokey and right up front, takes away from the ‘tank recovery’ aspect of the vehicle. There are plenty of other images of Bergepanthers I found online that lacked this addition.
Spade
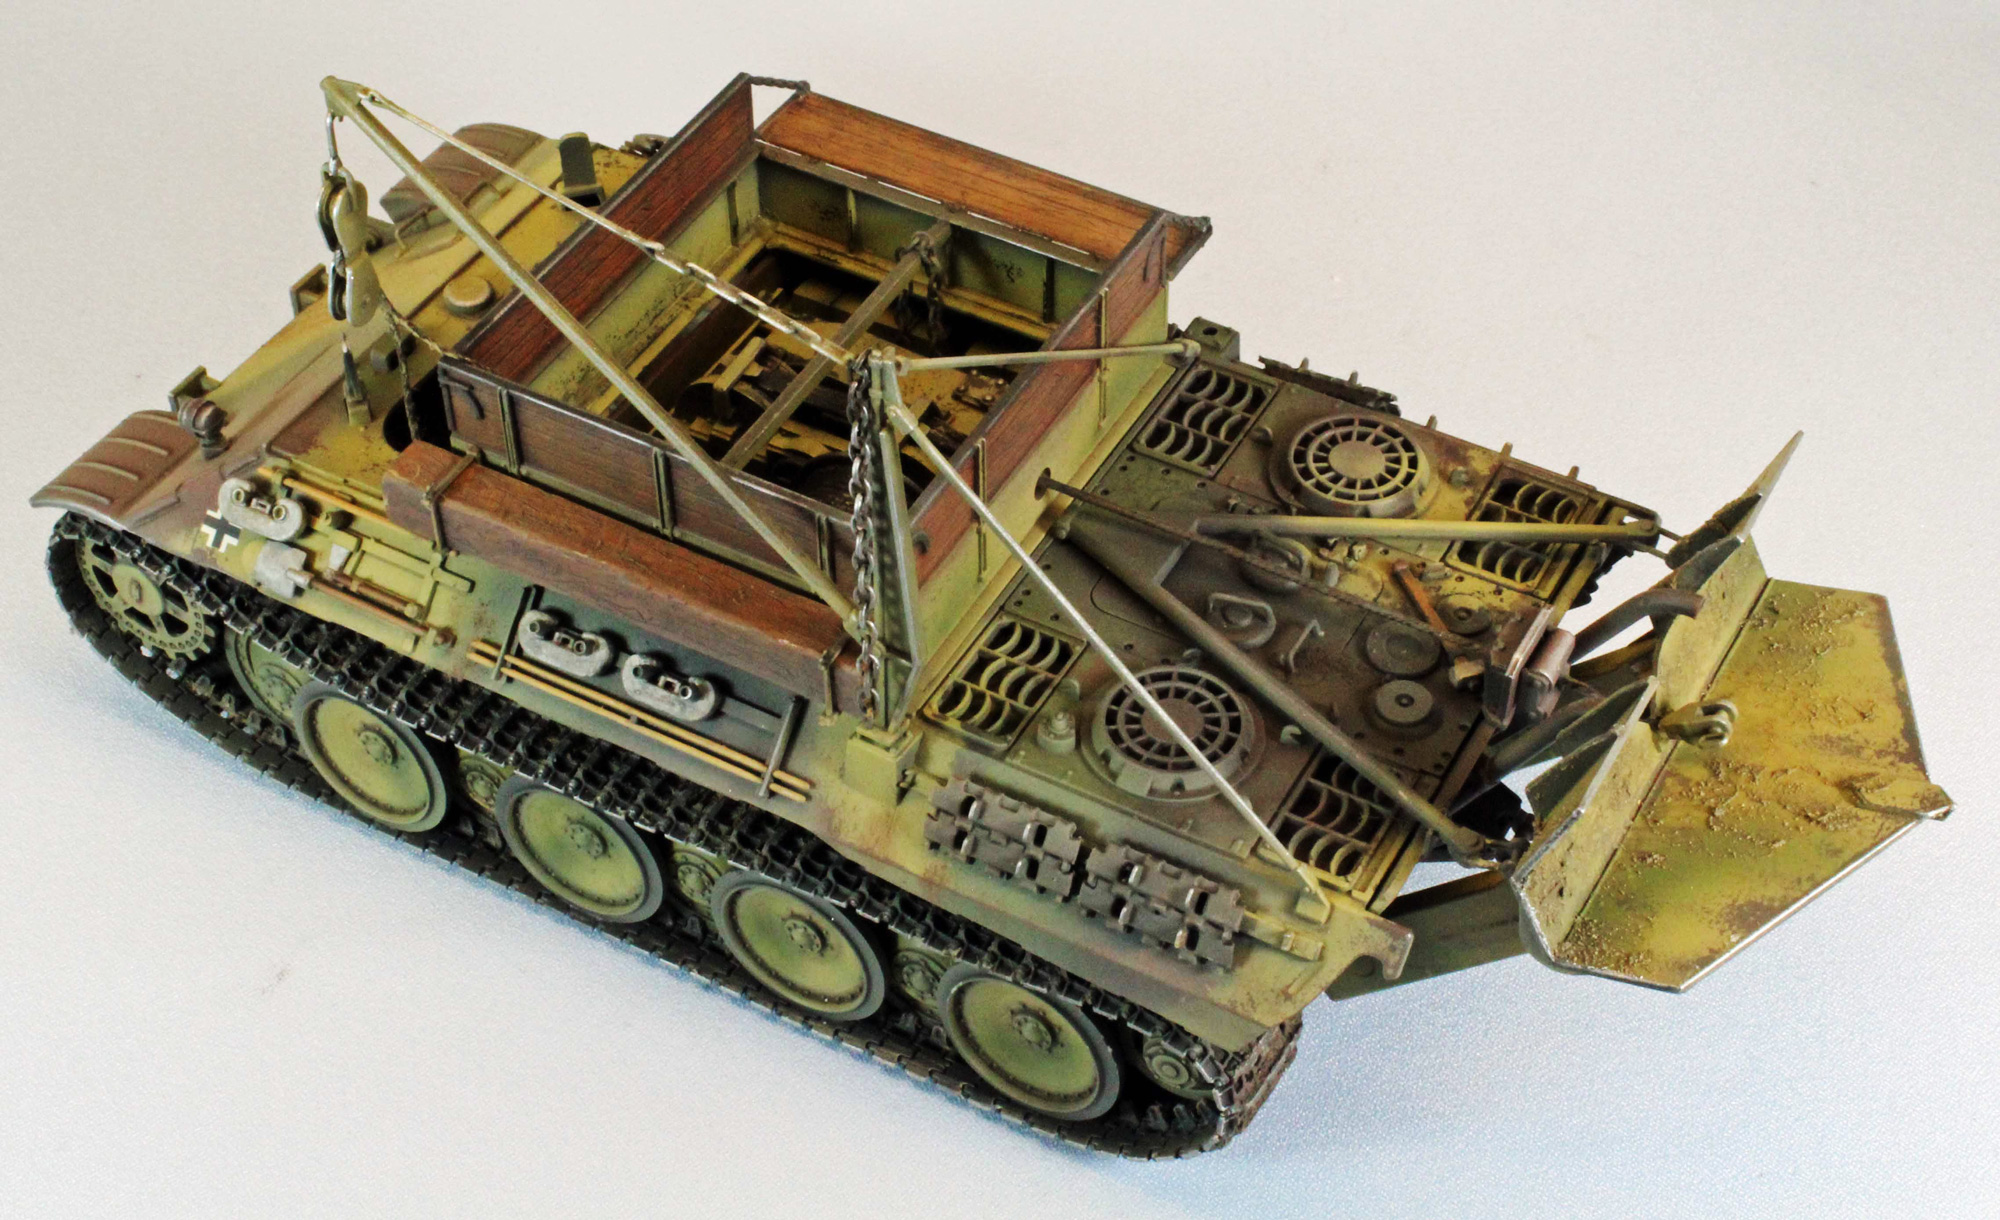
A heavy-hinged spade was fitted at the rear of most Bergepanther vehicles. This gave extra purchase when winching and was itself raised and lowered by use of the winch. Early vehicles had a relatively small, simple spade that was distinguished by its straight top edge. Later ones had a larger, deeper spade of a more complex design. This larger spade required longer exhaust pipes to be fitted with their outlets raised well above the level of the back decks in order to clear the spade when stowed.
Italeri has included the latter version and, again, did a really good job with just a few parts here. The spade can be modeled in any position; I chose to have it stowed. IMPORTANT: I assembled the entire spade separately from the rest of the vehicle, choosing to attach it at the very end of the build, which turned out to be a mistake. The four attachment points swivel to allow you to adjust the angle of the spade, and fitting these parts (with the spade attached) into the four slots in the rear hull was a real challenge on the completed model. I strongly suggest that you attach four Parts (132c) to the rear hull and let them dry. Later, whenever you attach the rest of the spade you will have a much easier time with this tricky task.
Finally, a 1½ ton capacity jib was provided for lifting engines out of disabled vehicles and can be fitted to either of two mountings (left or right) at the rear of the superstructure. Vehicles could be towed using a three-piece tow bar assembly. Italeri captures these structures with a minimum of parts while still producing a convincing design. I added a short length of twisted string to the pulley dropping the ends out of sight to add some easy detail.
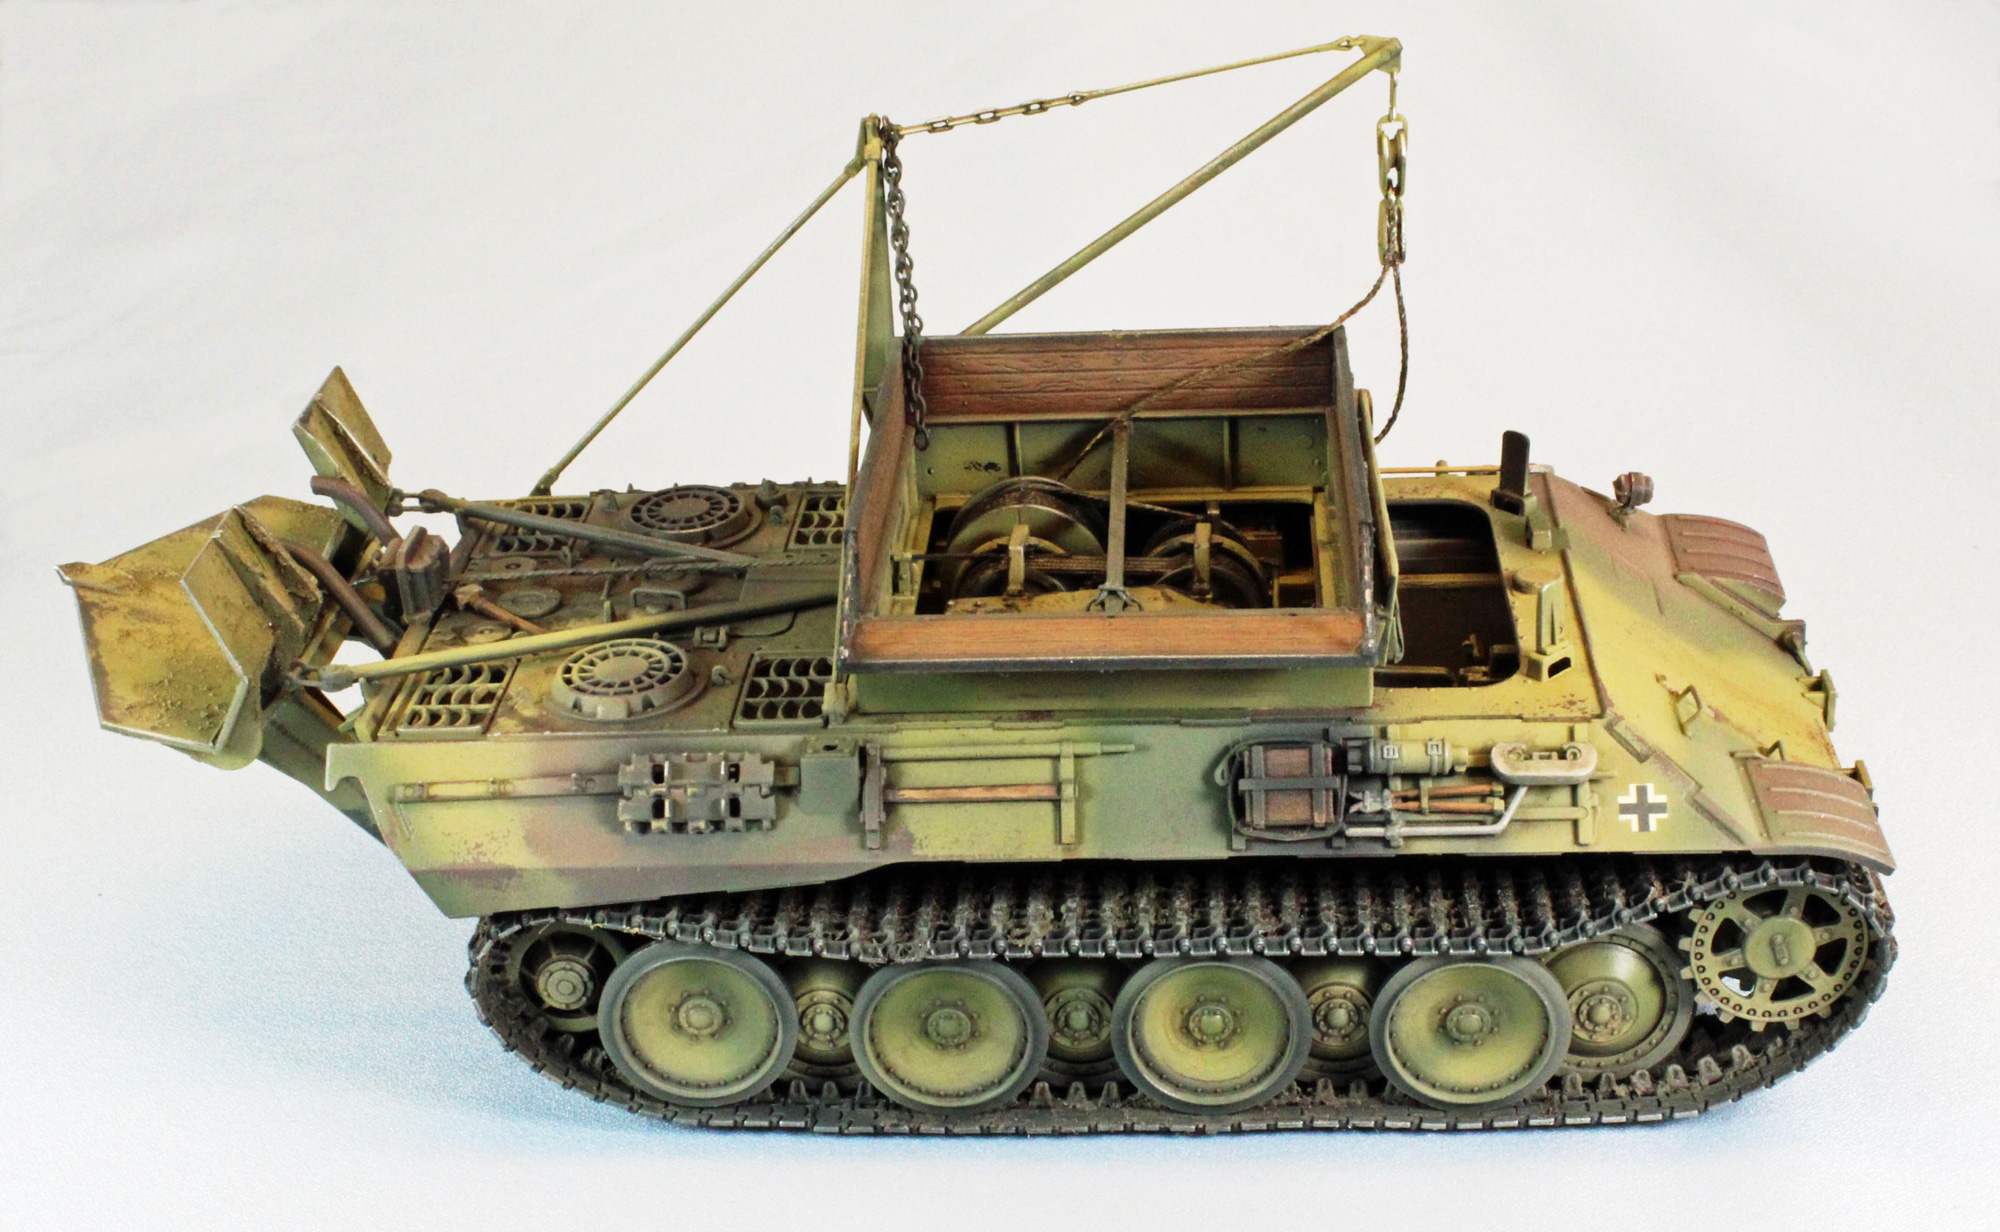
Painting and Finish
I decided to paint the Bergepanther in the German tri-color scheme, and employ paint-chipping throughout using the hairspray technique. While there are several approaches and paint products that work for doing this, I have found that Tamiya paints, thinned with Gunze Leveling Thinner, works best for me, so that is what I used.
Primer, Pre-Shade and Hairspray
I started by applying a primer coat consisting of Krylon Color Master with Durable ColorMax Technology rattlecan (Flat Black) lacquer paint. This is a superior product, drying super thin and very tough. Not to mention cheap and quick. Once the lacquer paint degassed overnight, I touched things up back in the paint booth using Tamiya NATO Black, including the tire portions of the wheels.
I then sprayed the interior of the hull with a pre-shade coat using Vallejo German Red-Brown Surface Primer – this is the color I want to expose when the camouflage layer is chipped away. I left the lower chassis and wheels black.
The primer/pre-shade coat gives the plastic some grip for the following coats, and fills in the recesses, creating a shadow effect near the flat surface edges. This will add depth for the subsequent coats to come.
Once the paint had dried, I followed up with a layer of rattlecan hairspray on the wheels and the interior portions of the vehicle to prepare the surfaces for chipping, and the rubber portions of the wheels to assist in painting. I use TRESemmé ‘Two Extra Hold’ hairspray directly out of the aerosol can, but I don’t think it really matters what type you use or how you apply it, as long as you get a decent amount on the model.
Center section of the hull, winch/pulley assembly, and rear spade
Over the red-brown pre-shade and hairspray I laid down a mix of Tamiya Dark Yellow and Deck Tan, representing a ‘lightened’ German Yellow. I let that dry for about two hours and then worked some of the paint off with a brush damp with water, going slowly once I started to see foam appear. I feel Tamiya paints work best over hairspray to produce this subtle technique. Once dry, I applied a filter using Mig Wash Brown (oil paint) filter, and a Mig Dark Wash (enamel) pin wash both diluted with Mona Lisa thinner . Once satisfied, I used the same paint mix and weathering technique for the winch pulley assembly, dropping it into place when finished, and the spade. I set the spade aside to receive an additional camouflage coat, along with the upper hull, later.
Driver’s compartment
I used the same approach for the front section, substituting the German yellow mix for Mission Models Paints (MMP) German Interior White, a color I like to use on the interiors of German and Russian AFV’s. I want to lighten things up to highlight the detail, but I think plain white is too bright. Once that was dry, I rubbed off some of the paint to simulate chipping using a damp brush. I don’t have as much control chipping the paint using MMP acrylics, but the color is right, and most of the section is out of sight on the finished model anyway.
Once dry, I gave the entire interior several filter layers of Mig Wash Brown Oils and a pin wash of Mig Dark Wash, both thinned with Mona Lisa. I used a variety of Vallejo products for the transmission and driver’s compartment detail including Model Color Saddle Brown for the seats, and LifeColor 207 ‘Oil’, Vallejo 73.815 ‘Engine Grime’ and Vallejo 73.818 ‘Engine Soot’ acrylics for the transmission.
Wheels
The Panther has interleaved wheels, and I prefer to paint the outer layer separately, and the two inner layers of wheels mounted on the hull. With the wheels already (primer) black and the tires (Tamiya) NATO Black, I hit them with hairspray to act as a mask for the tires. After airbrushing the inner portion of the wheels with a mixture of Tamiya Dark Yellow and Deck Tan, I used a damp Q-tip to wipe any overspray off the wheels. The hairspray protects the NATO black color underneath. This technique always results in a nice, neat demarcation line between wheel and tire, and is finished in a fraction of the time it takes to paint the wheels by hand.
Wooden enclosure above the Winch and Cable section
Over the black primer and red-brown pre-shade I laid down a layer of hairspray before painting the lower (metal) portions of the center section using a mix of Tamiya Dark Yellow and Deck Tan. I then carefully painted the upper (wooden) sections using Vallejo Panzer Aces New Wood. Once finished, I used Q-tips dampened with water to carefully wipe off the framing, exposing the black primer underneath which was protected by the hairspray. Like the wheels, using hairspray as a mask makes this kind of job easy-peasy.
Once everything was dry, I went to work on the yellow portions with a damp brush to chip away the paint. Next, I brushed a thick coat of Old Holland Warm Sepia oil paint straight from the tube onto all the wooden surfaces, including the large wooden ditching plank on the port side. I let the oil paint soak in for about five minutes before wiping the wooden areas clean using Q-tips. Just enough oil paint soaked in to give the wood a nice definition.
I painted the tarp up front using a mix of Vallejo Model Color German Grey, Panzer Aces 338 FieldGrau and 314 Canvas.
Overall Camouflage on the Upper Hull and Spade
After the primer, pre-shade and hairspray coats, I left the red-brown color as a base coat, adding German Yellow (Tamiya Dark Yellow+Deck Tan) and Tamiya NATO Green for the camouflage coat. I left the rear deck mostly black just to break things up a little. Once the paint had dried for about two hours I went to work rubbing the paint off until I had what I was looking for. I then applied an overall filter using Old Holland Warm Sepia oil paint thinned with Mona Lisa.
Decals, Detail Painting and Weathering
With painting and initial filters completed, I hand-brushed Future (acrylic) on the two areas that would receive the decals to give them a smooth surface to set up on. While the decals were drying I hand painted the array of deck detail and pioneer tools using mixes of Vallejo New Wood and Flat Flesh paints for the wooden detail, and AK True Metal (Gun Metal) ‘wax paint’ for the metallic portions. Once dry, I sprayed a heavy coat of Future on everything to seal the decals and set the model up for weathering.
Now that I had a glossy surface, I started weathering with an overall pin-wash using a 10:2 ratio of Mona Lisa thinner to Mig Dark Brown (enamel) Wash. I find this mixture perfect when applied to a glossy surface – the detail pops and the wash leaves no smudges.
This is a detailed vehicle and this step took quite a while. After applying wash to wheels, I placed them face down so that the wash would not run down vertically due to gravity.
Before going to bed I brushed Mig Wash Brown and Old Holland Warm Sepia Oil paints directly from the tubes on various wooden parts, leaving them to set overnight. In the morning I wiped the oil paint off using Q-tips, leaving behind a realistic wood finish. The glossy acrylic coat underneath prevents the parts from soaking in too much oil paint.
Once the oil-based products had a chance to dry, I applied a ‘road-dusting’ coat of Tamiya Buff heavily thinned with Gunze Leveling Thinner, followed by a coat of Vallejo Flat Varnish to kill any shiny spots still remaining. I cut the varnish 50/50 with Vallejo Airbrush Thinner, and then added a few drops of Liquitex Flow Aid to improve flow.
The last touch was to go over some of the edges and weld seams with a Silver Artists Oil Paint (Gamblin) using my finger, as well as Uschi Chrome Metal Polishing Powder applied with a rubber-tipped artists blender.
Conclusion
Italieri kits are a great value – they go together well, are reasonably detailed, and are never hard on the pocketbook. If some other company decides to release a Bergepanther, you can bet that it will cost three times as much and have 10 times the number of parts. My bet is that the final result will be hard to distinguish from what Italeri has produced here, with a little attention. Throughout the build, Italeri’s solid engineering effort allowed me to concentrate less on the assembly, and more on the presentation. In the hands of a decent modeler, this old Italeri Bergepanther will remain a favorite (and a heck of a value) for Panther fans.
I would like to thank Italeri for providing this kit for review, and to IPMS USA for giving me the opportunity to review it.