Reviews
Armor
Tamiya Russian Su-76 Self Propelled Gun
by Andrew Birkbeck
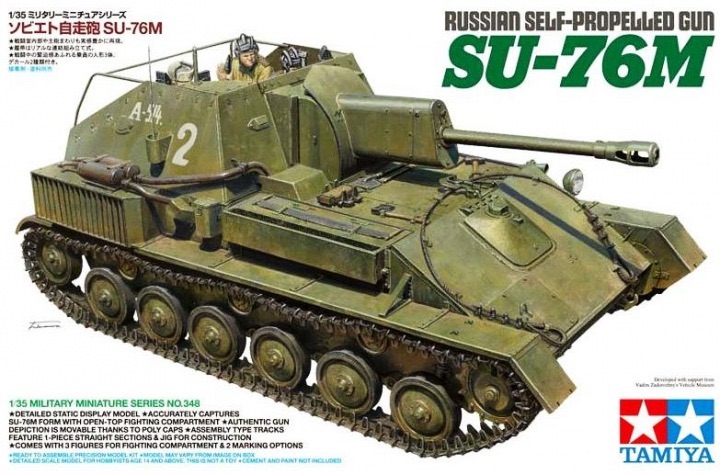 Model: Russian Su-76 Self Propelled Gun
Reviewed by: Andrew Birkbeck, IPMS # 27087
Scale: 1/35
Company: Tamiya
Price: $22.50
Product/Stock #: 35348
Website: Tamiya
Product Web Page: View
Product provided by: Tamiya
Background
Prior to the start of World War Two, the armed forces of the Soviet Union were lacking in any sort of self propelled artillery. Following the invasion of the Soviet Union by German forces in 1941, Soviet forces suffered massive loses of military material. Hand in hand with these losses came the forced uprooting of many of their key military production plants eastwards, away from the advancing German armies. But these plants were soon up and running again, and with heroic efforts on the part of the workers and plant managers, were soon churning out replacement vehicles in an attempt to cover the initial losses. As the battles on the Eastern Front turned from German offense/Russian defense, to Russian offense/German defense in late 1942 and 1943, Soviet military commanders came to grasp the need for self propelled artillery that was capable of keeping up with their advancing tank and infantry units. Enter the Su-76, a vehicle built utilizing many components from the obsolete T-70 light tank and mounting the ZiS-3 76.2mm anti-tank gun. Initial production vehicles had a fully enclosed fighting compartment, but field trials showed this made access to servicing the gun difficult, and the fighting compartment also had issues with the buildup of harmful gases both from the firing of the gun, and the vehicle’s engines. A modified design was soon introduced with a more open fighting compartment, known as the Su-76M, the subject of Tamiya’s kit. The Su-76 became the second most produced Soviet armored vehicle of WW2, only surpassed by the T-34 tank. Su-76M vehicles went on to serve with Soviet and allied nations Post WW2, including during the Korean conflict of the 1950s.
Prior to the introduction of Tamiya’s new kit, the modeling community had two choices for 1/35th models of this important vehicle. Alan of Russia produced a kit in 1990, later reboxed I believe by Dragon Models of Hong Kong under their “Imperial” series of kits. The kit was certainly buildable, but suffered from the usual problems of Russian manufactured kits of this time, being somewhat crude in places, detail wise, and lacking in precise fit. Enter MiniArt of the Ukraine around 2007 with their Su-76M effort. This kit has lots of nice detail but also some areas of poor detail and many kits I have seen have excess flash on a number of the smaller parts. Reviews I have read say that the fit of this kit’s parts leaves a LOT to be desired.
What's in the Tamiya Box?
- 5 sprues of green plastic parts
- 1 sprue of light gray plastic parts
- 1 small sprue of clear plastic parts
- 1 small sheet of decals, typical Tamiya, in register
- 1 piece of white string-like material
- 1 small bag of poly caps
- 1 black and white instruction booklet, 16 pages, with 37 assembly steps
Under Construction
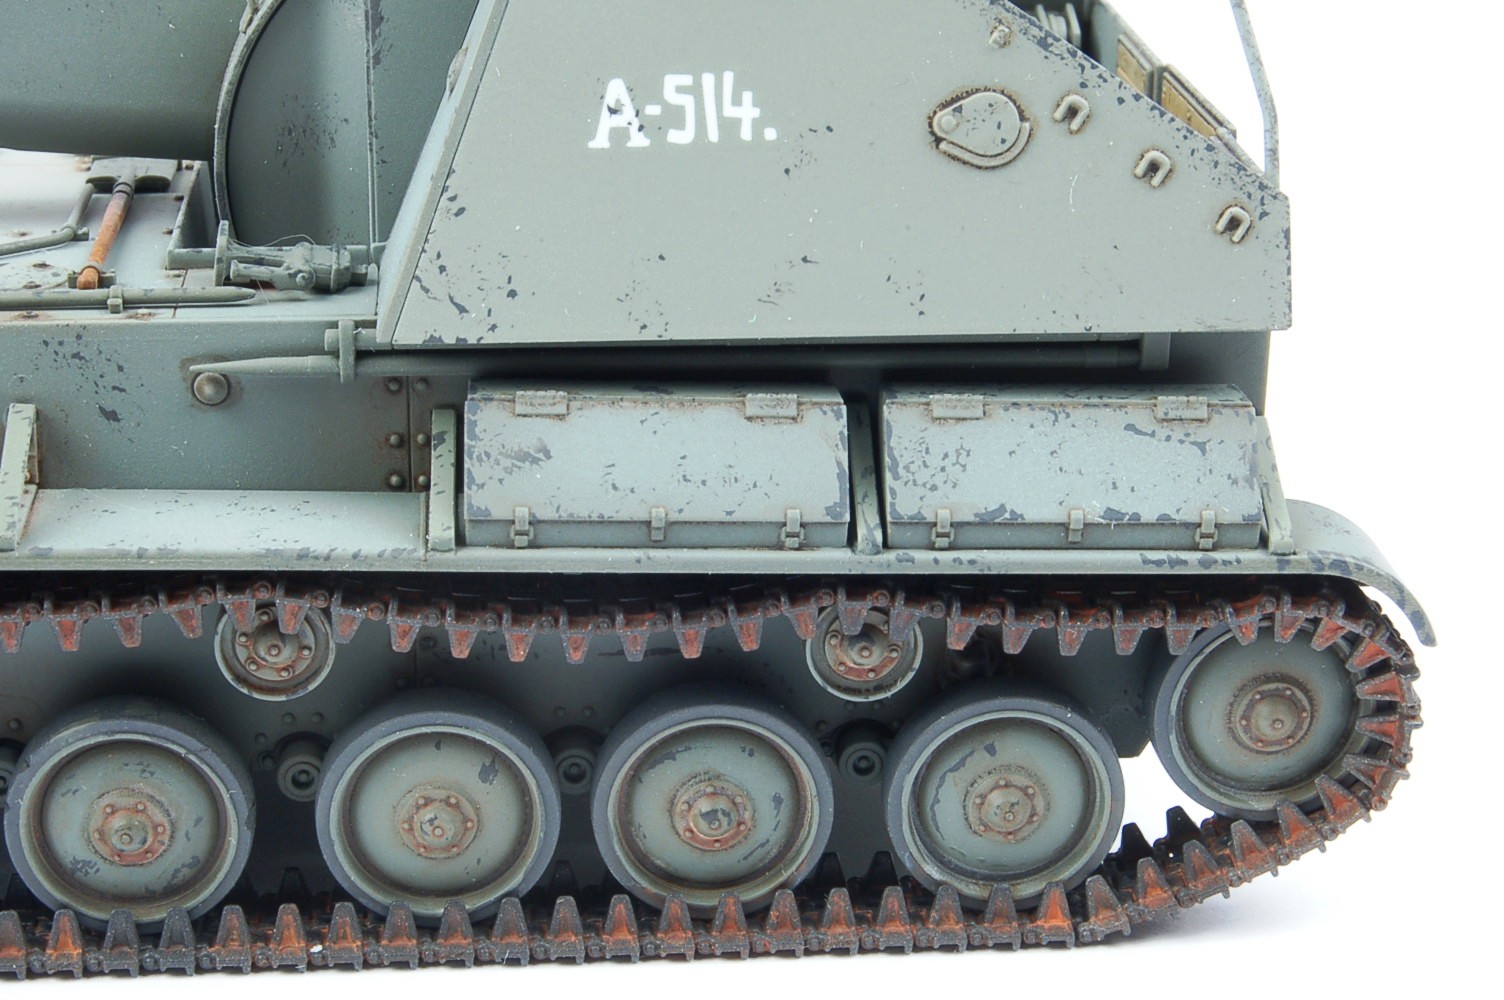
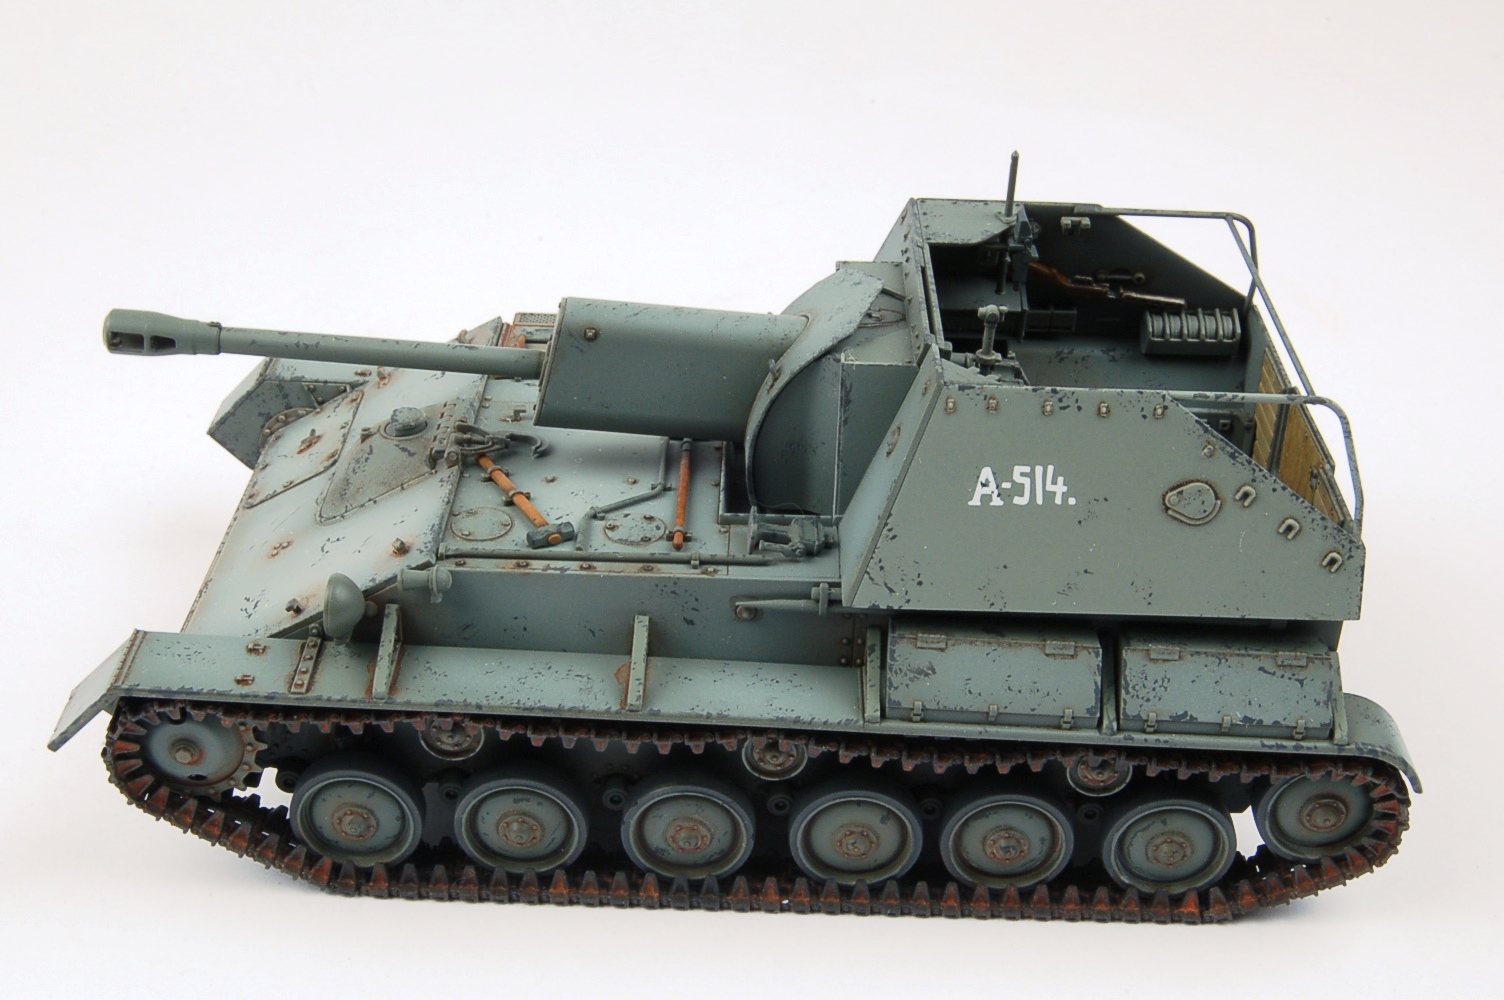
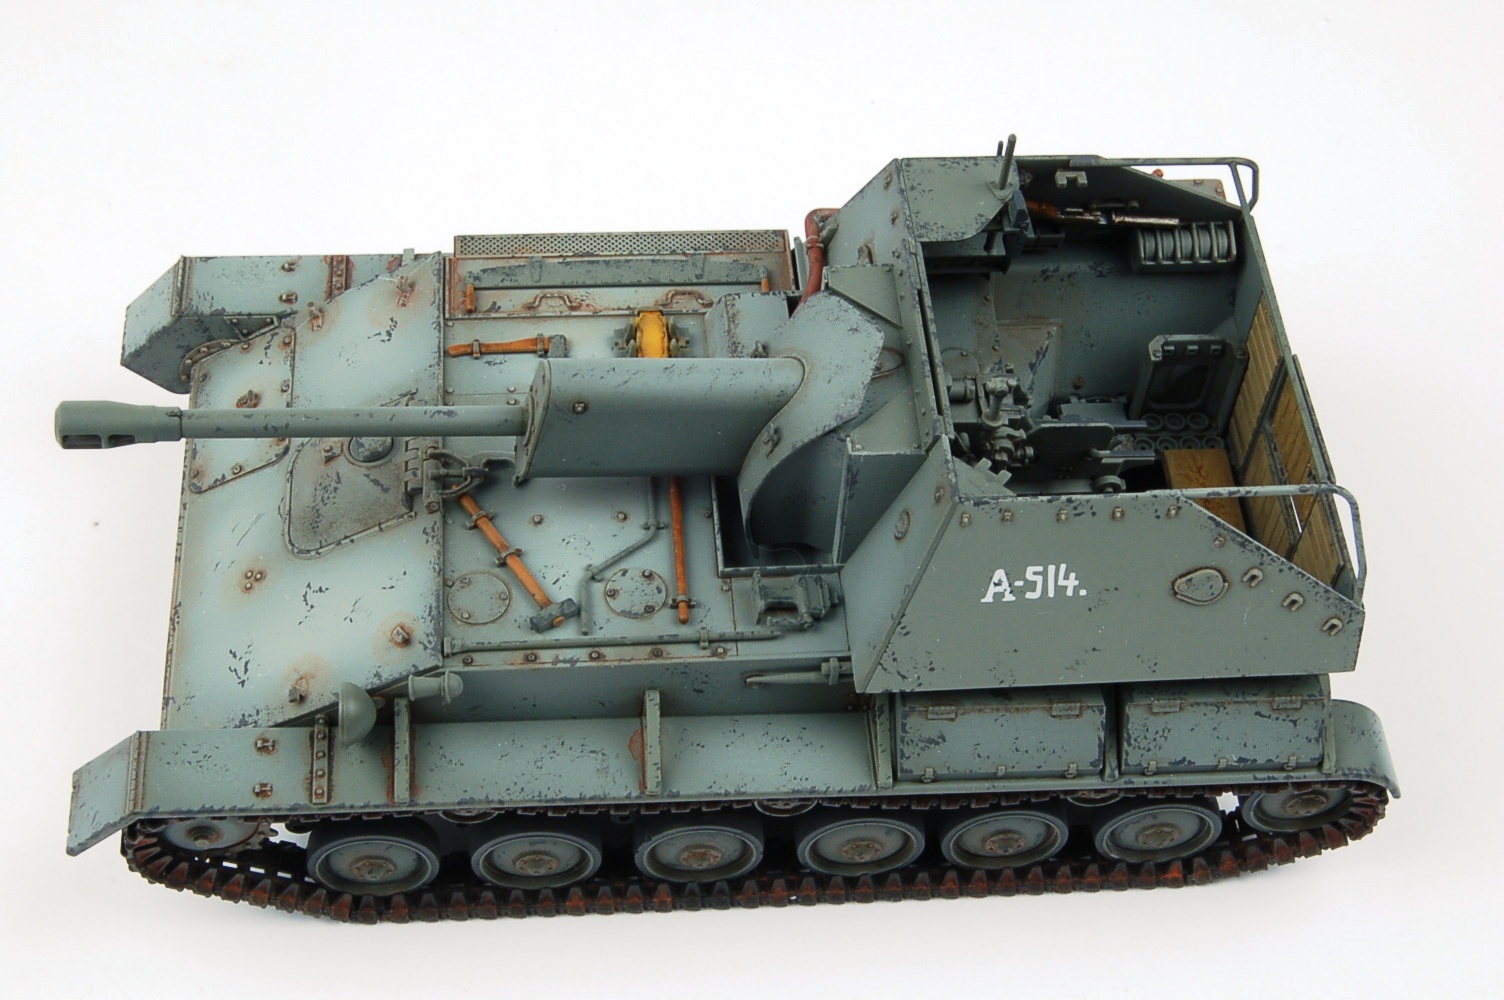
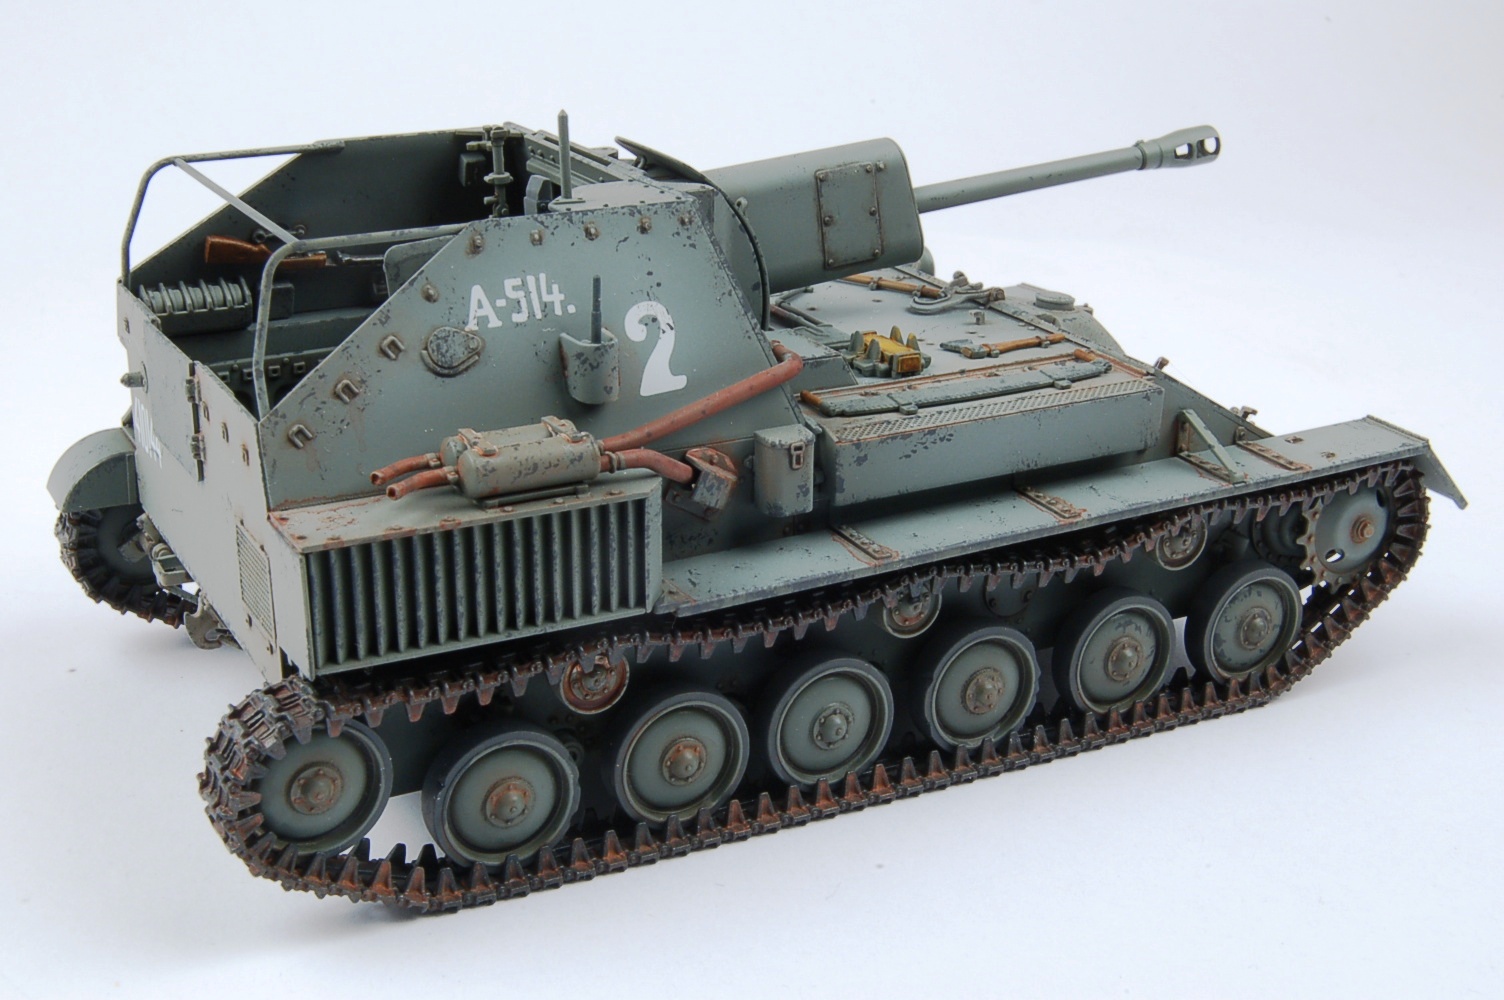
The instructions that come with the kit are typical of Tamiya’s excellent range of kits, being well laid out, easy to understand and leaving the modeler with no doubt as to where any particular part goes. The kit parts are very nicely detailed. Molding is crisp and without any hint of flash, although there are a few ejection pin marks to deal with on a few of the parts, as I will discuss as we go through the instruction sequences. The small decal sheet is typical Tamiya, the decals being in perfect register, though the decal film is a little on the heavy side, but caused me no problems whatsoever. Markings for only two vehicles are provided, both overall 4B0 Green. Marking Option A: 11th Guards Self-Propelled Artillery Battalion, East Prussia 1944. Option B: Unknown Unit, Karlshorst district, Berlin 1945.
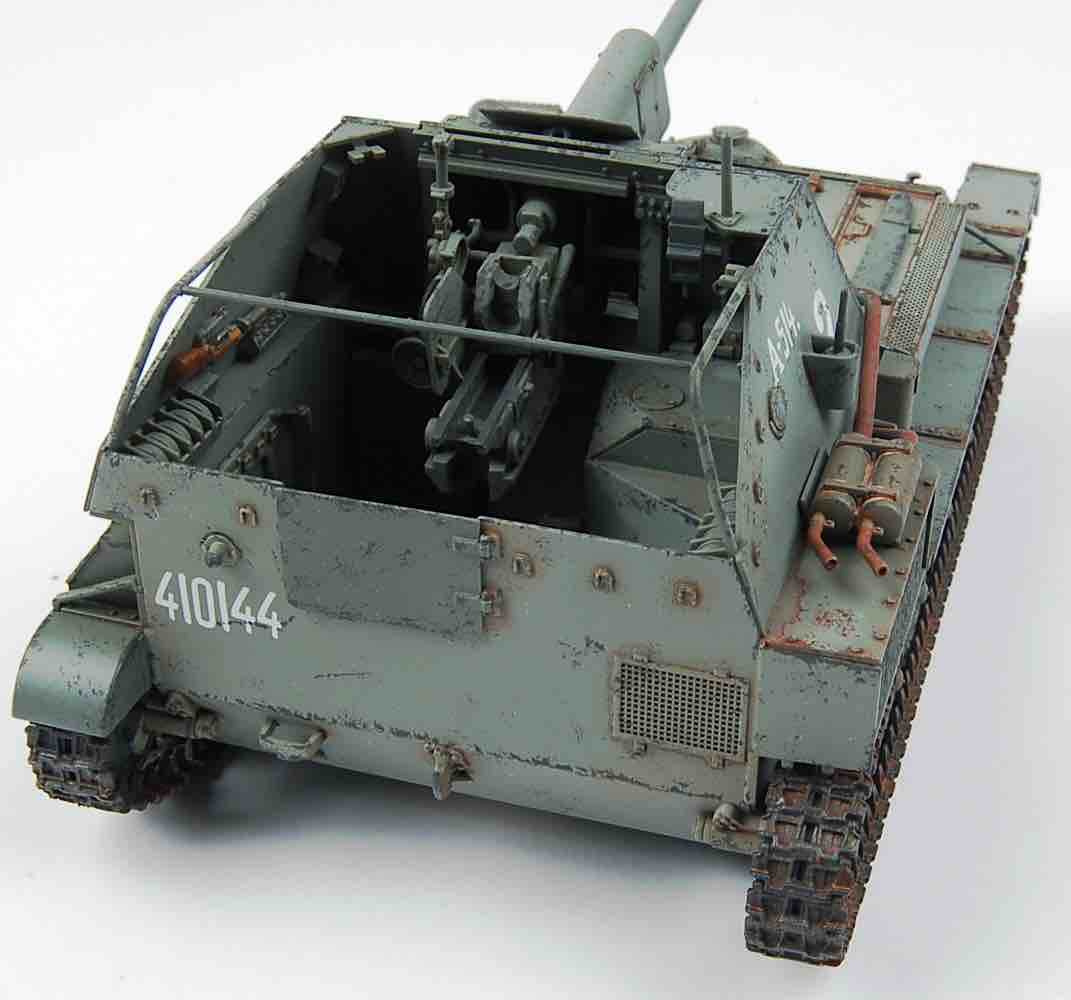
Construction begins as with many armored vehicle models, with the lower hull. Tamiya’s Su-76M has a multi part lower hull including separate side panels and a separate hull bottom plate. Thanks to clever engineering, the fit is precise and the parts line up without much thought. Next comes the attachment of the 6 return rollers, 3 per side, which have a snug fit for easy alignment. Once these are installed, however, Tamiya has the modeler jump to the fighting compartment interior, which is a rather cramped affair to say the least. Shell racks are assembled, which include individual shells. There is a multi part radio, but it lacks headsets and chords. Two sub machine guns are mounted to the interior walls of the fighting compartment, together with ammo racks for the sub machine guns. All these parts need to be painted in advance and then carefully glued to the interior walls, which themselves need painting in advance of their assembly, as waiting until later will make it difficult to get into the nooks and crannies of the fighting compartment. The rear fighting compartment plate, part B8 in instruction section 11 has a number of injection pin marks that will need removing as they will be seen after the model is completed.
Once the fighting compartment is buttoned up (at the completion of instruction Section 14) the modeler moves on to assemble the two main front upper hull plates to the lower hull/fighting compartment, together with the driver’s hatch. This hatch has a two part periscope (parts C36/37) that ideally would have been produced in one piece using slide mold technology, as it is rather an awkward assembly, which requires careful cleanup.
We then return to the lower hull/suspension (Instruction Sections 16 – 18). Tamiya’s Su-76M has separate road wheel suspension arms, and the fit is very precise, thanks to the provision of a little hole on the back of each arm (parts A16) which line up with a tiny peg on the hull side. Use a metal straight edge ruler to make sure all the arms are correctly lined up with each other. The road wheels themselves are two part affairs, which is curious because I see no particular reason for this. All the detail is on the part that faces outwards, and the second part is a simple plug for the inner part of the hub. No poly caps are employed here, so as I say, rather curious. The fit of the road wheels to the suspension arms is solid, and I used a simple two part jig to insure the road wheels lined up nicely. The drive sprocket is also a two part affair and it is held in place on the hull side by a poly cap, thus allowing it to move freely following assembly. This is important for the gluing of the tracks, as it allows the modeler to modify the alignment of the tracks during their assembly.
Over the past decade, Tamiya has gone back and forth on how they have designed the tracks for their 1/35th scale military vehicle models. We have seen the continued use of so called single piece “rubber band” type tracks; and we have seen link and length hard plastic tracks. With the Su-76M kit we get mostly individual links, together with one longer length for the lower track section. The individual links are attached to sprues, unlike some other manufacturers’ brands which have them separated out of the box. Each individual link has two ejection pin marks on the inner surface of the track, but the track links are very small, and the pin marks all but invisible to the naked eye once the model is completed. Tamiya provides the modeler with an assembly jig for the upper run of tracks which drape from the drive sprocket back to the idler wheel, across the three return rollers. The issue here is that the jig is manufactured from the same type of plastic as the track links. Normally manufacturers who provide a jig make it of a nylon type plastic impervious to solvent based model glues. You can then put the individual links on the jig, apply glue, and let the glue set up before removing the tracks from the jig. If you try this with Tamiya’s jig, you will end up with tracks glued tightly to the jig! So what does Tamiya want the modeler to do with the jig? They have you line up the track links in a straight line as best you can (use a metal or wooden straight edge), and then as they are setting up, press the length of track onto the jig so that it can assume the correct sagging. Frankly I think this is a poor idea, and Tamiya should follow the lead of the other manufacturers and make the jig out of the nylon type material. I’m just sayin’…………. The tracks themselves are well detailed, fit together nicely, and line up well as a whole.
Next comes the assembly of the multi part mufflers and exhaust louvers which are glued onto the right side of the lower hull, together with the exhaust piping. These are positioned in such a way that painting them after the exterior of the vehicle is painted 4B0 Green does not present any problems. The left and right fenders of the vehicle, however, do present painting problems. If you glue them to the hull sides, you will need to have painted the lower hull and tracks etc., first. At least that’s how I saw it. Test fitting of the fenders showed they were a near perfect fit, so I assembled them together with some tool boxes that go on the left fender, but left them off the model until the very end of construction, painting them separately for gluing on after the tracks had been painted. I also kept the on board tools off the model, painting them separately, and again, installing them onto the model after it had been painted overall 4B0 Green. These tools consist of a nicely detailed shovel, sledge hammer, axe, pry bar, jack and a two man saw.
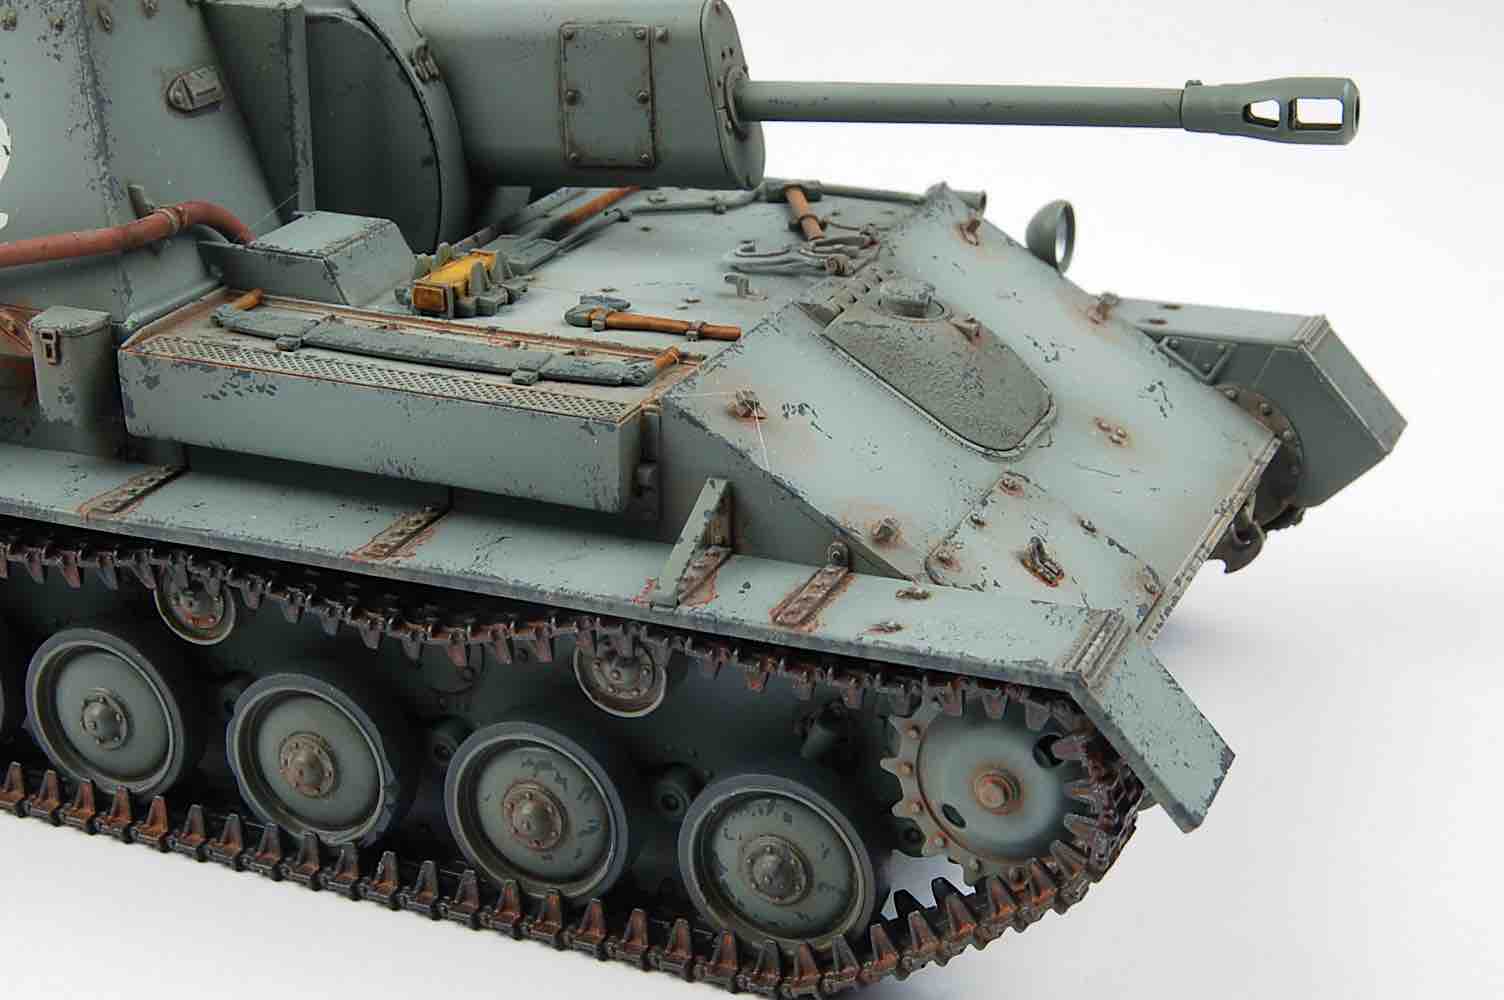
The Zis-3 gun unit is well detailed, and like the rest of the kit the parts fit is excellent. The barrel is a three piece affair, with a single part barrel and a two part muzzle brake. Other than careful clean up of the seam lines, the fit of these three pieces presented no problems. Once assembled, the gun unit should be painted as one sub assembly, and when the rest of the model is painted the gun mount pops into a hole at the front of the fighting compartment and is held in place via a poly cap. It can thus turn side to side, and move up and down as well.
Once the gun is in place a mounting brace, which you will have pre painted, is placed above the gun sub assembly to hold it in its proper position. The fenders can then be positioned and carefully glued, together with their 6 mounting braces. The vehicle horn and headlight, pre painted, are also attached at this time. The headlight is two parts with a separate clear lens. This was left off until the model was completely finished and glued in place with some canopy cement.
Tamiya provides the modeler with three crewmen for their Su-76M model designed to fit into the rear fighting compartment. The multi part figures are very well molded in gray plastic, coming with separate heads and arms, and the poses are appropriate for the loading and firing of the gun.
The model was painted overall 4B0 Green, as mentioned. I utilized Vallejo paints for this model, starting off with their acrylic-polyurethane Russian Green 4B0 Surface Primer, 73.609. This is a particularly dark green, so I added some White Surface Primer, 74.600 to give it a more “scale appearance”. When I was happy with the mix ratios, this was thinned utilizing Airbrush Thinner 71.161 together with a few drops of Airbrush Cleaner 71.199, which I was told by a Vallejo rep would help stop clogging at the airbrush tip. I haven’t experienced airbrush clogging since I tried this. Once the model parts received an initial coat of the 4B0 Green, I took the original mix, and added some more white to it, to lighten it up even more. The second mix was then utilized to create panel fading.
The model was then given an overall coat of gloss clear, utilizing Johnson’s Future, or as it is known today, Pledge Floor Care Multi Surface Finish. I spray this without thinning, but you have to be very careful not to apply too much at once or it runs badly. I then let this dry for 48 hours to make sure it had cured thoroughly. Next I applied the Tamiya decals, utilizing Marking Option A. I used the Gunze Sangyo Mr Mark Softer and Mr Mark Setter decal setting solutions. The Tamiya decals as always are a tad on the thick side, but this was not noticeable once I had finished the decal work. The decals adhered well to the flat surfaces upon which they were applied. Once they had been allowed to dry for 24 hours, the decaled areas were given a couple of light coats of Future to seal them.
I next took a dark brown oil paint from my stash, and mixed it with Mona Lisa brand odorless mineral thinner to create a “wash” and applied this to the model to highlight the rivets etc. After the wash had been given 12 hours to dry, I cleaned up the excess with Qtips dipped in the mineral thinner. The model was then left alone for 48 hours to make sure the oil paint wash had thoroughly dried. I then airbrushed the entire model with multiple thin coats of Alclad 2’s Klear Kote Matt, which is a lacquer product. This leaves a VERY flat matt surface on the model.
Next came the addition of paint chips to the model, using a dark gray Vallejo acrylic color, and utilizing both a fine tip paint brush, and some sponge material. Again, this adds “interest” to the model. I next broke out my rust colored oil paints, and made up two different washes, a dark rust and a lighter rust shade. These were applied one at a time, with drying time in between, to the tracks, and to other areas of the model. This “livens up” the model, IMHO, and gives interest to an overall dull green vehicle. Once I was happy, I airbrushed a last thin coat of Klear Kote Matt over the entire model to seal everything. Lastly the clear lens was added to the headlight.
Note: my model is missing the fighting compartment shells and the tow cable from the front hull. I have yet to figure out the correct painting of the shells (I am not sure Tamiya is completely correct on their colors), and I want to replace the string Tamiya gives you in the box with a suitable diameter length of twisted copper cable, which I have yet to find.
Conclusion
This is a superb kit of an extremely important WW2 and Post WW2 Soviet military vehicle. Detail on the model’s parts is to a very high standard, and thanks to exemplary engineering, the model went together with great ease. I can without hesitation recommend this kit as a fun building and finishing experience for even new modelers to the hobby. I would like to thank TamiyaUSA for the opportunity to review this kit.
Photos